
Elements Installation Guide
This article provides instructions for installing Symplectic Elements. Additionally, the appendices contain check-lists for migrating and refreshing instances of Elements.
Main Installation Folder
Symplectic advises all clients to create a directory named Symplectic at the root of a drive, e.g. “D:\Symplectic” and then create the following directories beneath it:
“D:\Symplectic\Backups” - this is useful for keeping backups, depending on the clients backup strategies;
“D:\Symplectic\Elements” - this is where the binaries will be installed. It is referred to in this documentation as the Main Installation Folder (<Main_Installation_Folder> in path names);
“D:\Symplectic\Builds” - this is where the archived (.zip) installation media and future upgrade kits should be kept.
Advanced Installation Notes:
If you are installing multiple Elements instances on the same hardware you should create multiple folders at the “Symplectic” level (e.g. “Symplectic_Test”, “Symplectic_Live”) each with “Backups”, “Elements” and “InstallMedia” sub directories.
If your security model is to have Elements run under a specific user account (i.e. not using local system) then you will need to ensure that the associated user account has at least read/write access to the Main Installation Folder and all sub folders (this is so that log files and search indexes can be created by the system).
Running the Installer
Download the Installation Pack for the current version of Elements from the Symplectic Support site and extract the contents of the zip archive.
Note: You must check that the .zip file has not been marked as "Blocked" by Windows before extracting it (This can be done by right clicking the file, selecting Properties and clicking the Unblock button, if present). Failure to do so will result in Elements executing with suppressed privileges after the installation, causing various errors in the system. A reapplication of the installation will then be necessary to fix it.
Unzip the installation kit and run the process Setup.exe from within the Setup folder of the Install kit. This will launch the graphical installer at the Setup Rules screen as shown below:
Page 1: Setup Rules
On this screen a few general pre-requisite checks will be run, you will not be able to proceed with the installation if any errors are reported. Please discuss this with your Symplectic implementation manager.
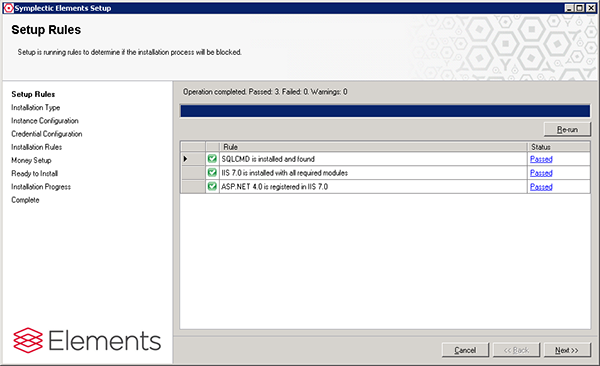
Note: warnings at this stage will not prevent installation but should be discussed with Symplectic.
When ready, click next.
Page 2: Installation Type
For a fresh install of Elements you should select the “New installation of Elements” radio button, and then click next.
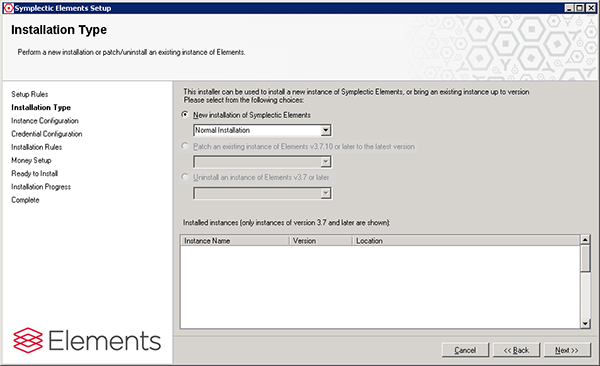
Note: If using the "Install Into Existing Empty Database" option, you need to make sure the database has a collation of: Latin1_General_CI_AS. Also the default schema for the service account needs to be: dbo.
Page 3: Instance Configuration
Here you configure three things:
The name that this instance will be known as, for future upgrades, etc. (This can be “default” or an arbitrary name of your choosing).
The location that the Elements should be installed to, i.e. your chosen Main Installation Folder (e.g. "D:\Symplectic\Elements").
The connection to the database server.
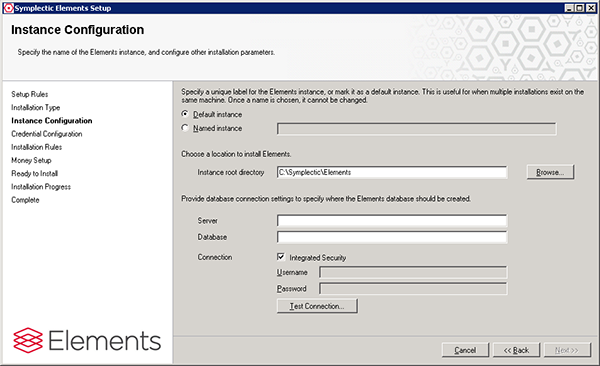
For the Database server you must configure the following:
The location of the SQL server, e.g. “localhost” or an appropriate DNS/netbios name for the SQL server. (You can append a specific port number after a “:” if required).
The name of the database that is to be created, we recommend using “elements” or something similar.
If the user account being used to run the setup utility has the necessary rights on the SQL server you can choose to use integrated security, otherwise you must supply the username and password of an appropriate SQL login to the SQL server with the necessary rights.
Note: the user that accesses the database must usually have the right to drop and create databases (although there are exceptions – please discuss this with Symplectic).
Note: if you specify an SQL account, rather than Integrated Security, Elements will be configured so that all access to the database uses the supplied SA credentials.
Note: if you choose Integrated Security, access to the Database during installation will be using the credentials you logged onto the application server with. However when Elements runs post-installation, it will use the credentials you choose on the next page of the installer wizard.
Advanced Installation Notes: if you install using integrated security then Elements will be configured so that the user contexts the Website and Scheduler run under will be the ones used to access the database. These user contexts must have the rights of DBOwner on the created database and a default schema of dbo. They do not, however, require the right to drop and create databases or bulk admin rights.
Once these settings are configured, correctly (you will not be able to proceed until they are) click next.
Page 4: Credentials Page
On the credentials page you configure two things:
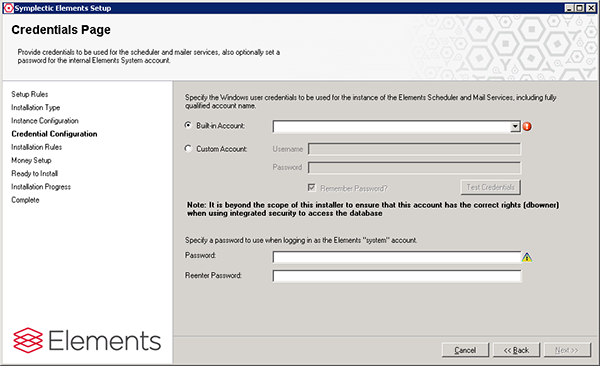
Service User Account
Select the user account that is going to be used to run the Windows services (Scheduler and Mail Service) that are part of the Symplectic Elements suite. Typically the built in local system account is chosen.
Note: The selected account must have the “logon as a service” permission set, or the Installation will not be possible. All the windows local built-in accounts already have this permission set by default.
Advanced Installation Notes:
Note that using any other lower privileged account (built in or custom) may require additional configuration post install to ensure that the necessary database, windows and file systems permissions have been allocated.
System user password
Here you specify a password for the “system” user which can be used to access the new Elements server post installation.
Note: you must login with the username “system” all in lowercase and the selected password, which is case sensitive.
Page 5: Installation Rules
Here some basic tests are run to ensure that the installation should proceed correctly. If any of the tests fail, take the necessary action to correct the error and re-run the tests. You can get more information, and in some cases correct or bypass the issue, by clicking on the link in the test status.
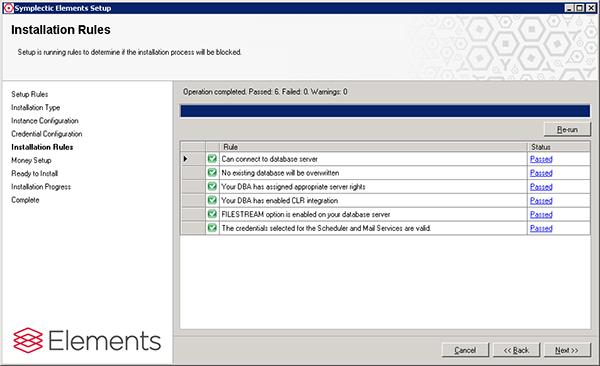
Note: warnings at this stage will not prevent installation but should be discussed with Symplectic.
Once all the tests are passed successfully click next.
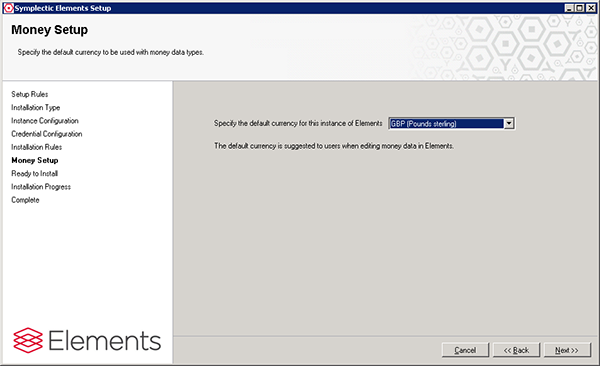
Page 6: Currency
Select your currency.
Page 7: Ready to Install
This screen is a final check to confirm the details of the install prior to actually installing the software. If there is anything you wish to change, go back to the previous steps and correct them.

Note: you have the option to complete the install without starting the services.
To install the system binaries and generate the database, click on install.
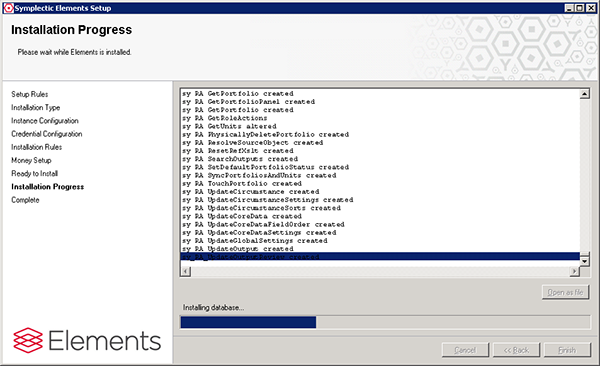
Page 8: Installation Progress
The progress screen will keep you informed as the installation progresses, installing the Elements executables and creating a new database.
On completion a popup window will appear to inform you how the installation went.
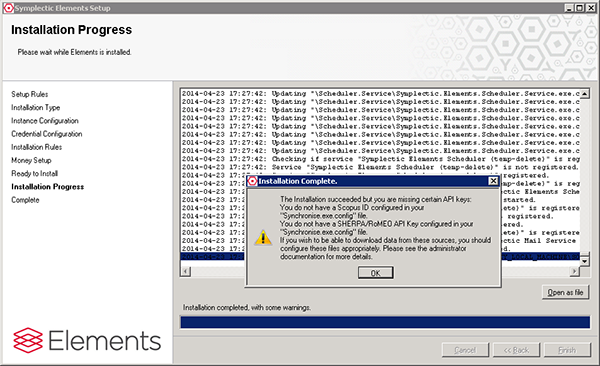
Note: please take a moment to read this message as it may contain advice relevant to how you configure your system after installation.
Note: if anything goes wrong with the installation, please click on the “open as file” link and send the contents to your Symplectic implementation manager.
Finally click on Finish to exit the installer.
Modifying the Config Files
The next step is to update some config files to configure the system for your environment.
Website Application Configuration
The configuration options below apply to the following file:
<Main_Installation_Folder>\Website\web.config
e.g. "D:\Symplectic\Elements\Website\web.config" using the example at the top of this page.
Running page over http/https
Locate the XML sections below and set these appropriately to produce the desired behaviour for your system:
<add key="force-ssl-connection" value="false" />
<add key="force-non-ssl-connection" value="false" />
Elements default behaviour (with both these options set to false) is to run the login page over HTTPS and all other pages via plain HTTP.
Setting force-non-ssl-connection to true makes the login page run over plain HTTP.
Note: this is unsecure and should only ever be used for testing. Setting force-ssl-connection to true forces all pages of the application be served over HTTPS.
Note: you should never have both of these options set to true simultaneously.
If you plan to run Elements over HTTPS only, it is recommended to add the following settings to the web.config file:
<system.web>
...
<httpCookies requireSSL="true" />
</system.web>
Note: the <system.web> section already exists in the web.config file.
The above setting prevents cookies being sent over HTTP. This is a precautionary measure, to prevent identification cookies being exposed in case of IIS misconfiguration (e.g. allowing certain pages to be served over HTTP)
<system.webServer>
<httpProtocol>
<customHeaders>
...
<add name="Strict-Transport-Security" value="max-age=31536000"/>
</customHeaders>
</httpProtocol>
</system.webServer>
Note: the <system.webServer> section already exists in the web.config file.
The above setting informs web browsers that IIS is supposed to only ever serve pages over HTTPS. Conforming web browsers will change any HTTP links to HTTPS ones before sending the request. They will also show an error message if the security of the connection cannot be ensured (e.g. the server's certificate is self-signed).
Note: You cannot use this option if your IIS server uses a self-signed certificate for serving HTTPS.
Setting the ports
Locate the xml sections:
<add key="ssl-port" value="443" />
<add key="http-port" value="80" />
Set these to the port numbers that you wish your website to run on, they should match the binding ports chosen later when configuring IIS.
Advanced Installation Notes: if you are installing multiple Elements instances on the same web server you will need to consider how to set up your ports. Each Elements instance MUST use a different ssl-port (we suggest 443, 444, 445, 446, etc.). For the http-port you can either choose different port numbers (80, 81, 82, 83, etc.) or use port 80 for all websites and configure host header resolution to ensure people arrive at the correct site. (N.B. typically users are expected to access Elements via the http port and then be redirected to the associated SSL port specified in the settings above).
IIS Configuration
Note: the exact details of how to achieve this configuration will vary depending on the version of IIS installed, please discuss this with your Symplectic implementation manager if you have any issues.
The website must be configured in IIS so that its root directory points to <Main_Installation_Folder>\Website
e.g. "D:\Symplectic\Elements\Website" using the example at the top of this page.
This website must be configured to use an appropriate application pool:
for Elements versions up to and including 4.10.1, the website must use an application pool that runs using the “Classic Managed Pipeline mode” - e.g. the ASP.NET v4.0 Classic application pool running under ASP.Net v4.0.30319.
for Elements v4.11 and later, the website must use an application pool that runs using the "Integrated Managed Pipeline mode" - e.g. the ASP.NET v4.0 application pool running under ASP.Net v4.0.30319.
Note: you may need to enable this version of ASP.Net under ISAPI and CGI restrictions.
Application Pool
In addition to using the appropriate pipeline mode, the selected Application Pool must be configured so that:
32 Bit Applications are enabled
An appropriate "Process Model Identity" is selected (e.g. LocalSystem)
Note: other security models are possible. Please see below, and discuss your needs with Symplectic:
Advanced Installation Notes: if your security model is to have Elements run under a lower privileged user account (i.e. not using local system) then you will need to configure the Application Pool to run using that account. You will also need to ensure that the selected account has the necessary permissions on both the file system and database to allow Elements to operate correctly, please discuss this with Symplectic.
There are various other permissions requirements that IIS imposes upon an account selected to run an application pool. In the main these are handled automatically when using IIS7 or later. If you are using an older version of IIS, or have a locked down windows installation, you may need to consider permissions such as "Log on as a batch job", etc.
Please refer to the IIS documentation.
HTTP/HTTPS Bindings
You can select whatever valid Http Port Numbers you like for the site bindings (default 80 and 443), but they must match the settings in the web.config file chosen earlier.
Note: if multiple Elements systems are installed on one server then each installation must use different http Port Numbers. Alternatively you can configure host header resolution for http and different ports for https.
You must have a valid SSL certificate to configure the https bindings. A self-signed certificate is suitable for development purposes or initial installation, but a fully signed and trusted SSL certificate is generally necessary for production systems.
Advanced Installation Notes: if you are installing multiple Elements instances on the same web server and have chosen to have them use the same http-port (usually port 80) you will need to create the bindings in IIS using host header resolution to ensure that the correct website is accessed. This will also require that you have multiple DNS entries pointing to the same web server.
Database Security
You must ensure that all the user accounts that will be used to access the database during normal Elements operation have the rights of DBOwner and, by default, a dbo schema on the created Elements database. (E.g. see the Security - > Logins node in the SQL Server Management Studio’s Object Explorer).
Using SA Login
If you are using SA security to access the database this will probably not be an issue as the same user credentials that were used to perform your installation will be used for all database access, and these should have the necessary permissions.
If you have any issues, simply set the appropriate user mapping so that the SA account being used to access the database has DBOwner privileges and a default schema of dbo on the appropriate database.
Using Windows Integrated Security
If you are using integrated security you will need to ensure that the user accounts selected to run both the IIS application pool and the Symplectic Elements Scheduler service have the necessary database permissions.
For a single machine install (web app and DB on one machine) with the local system running both the application pool and the Scheduler service this will just work on most installations, as local administrator accounts are, by default, granted sys admin privileges to the SQL server.
For a split install (DB on separate server) running using local system a database user Domain\Machine$ must be added (where Domain is replaced with your domain and Machine the machine name of the web app server). This user should be mapped as DBOwner with a default schema of dboon the appropriate database.
Advanced Installation Notes: if your security model is to have the IIS application pool or the Scheduler service run using a lower privileged user account (i.e. not using local system) and you are using integrated security, you must ensure that the user accounts in question have the rights of DBOwner and a default schema of dbo on the appropriate database.Note: it is normal for both the IIS application pool and the Scheduler service to use the same user credentials.Note: to prepare for any future Elements patches to this server, you should ensure that the account that will be used to run Setup when patching the server also has the rights of DBOwner and a default schema of dbo on the appropriate database.
Initial Elements Configuration
Type the following into the address bar of a web browser launched on the server where the Elements binaries have been installed:
http://localhost:80/
Note: replace 80 with whatever http port you have configured.
Log in using the system user credentials set up above and you will be automatically forwarded to the licencing page. If not, you can access the page via System Admin > System Settings > Licence
Licensing
To use the product you must obtain a licence from Symplectic. To do this, click the link (on the Manage Licence page in Elements - shown when you log in to an unlicensed product):
Generate licence request.
Save the request (.lrq) file and pass it to your Symplectic Implementation Manager.
In return you will receive a corresponding licence file (with the extension .lic). This file should be uploaded to your Elements server using the tools on the licensing page.
Further Reading
General Elements Configuration
For more detailed configuration and setup of the main Elements system please refer to the guides available from the Symplectic Support site.
Advanced API Configuration
API Ports
The Elements API needs to be able to open http/https ports depending on the API configuration.
If you are only using http ports (not https) and run the IIS application pool under the local system account then you will not need to do anything further. Otherwise you will need to refer to the API administrator guide.
SSL Certificates
If you wish to run any of the recent secure APIs that restrict access to https connections you will need to register an SSL certificate against the selected port numbers.
Please refer to the API administrator guide.
Appendix A: Server migration
In order to migrate from an existing server (source) to a new server (target), follow this procedure:
In advance of migration
Complete target server build according to Symplectic Elements installation prerequisites
Configure firewalls on target server
Register target server (external IP addresses) for data sources (e.g. Web of Science, Scopus)
Install Elements on the target server
Configure the website in IIS on target server
Login to Elements on the target server as system administrator
Request Elements licence for target server
Upload new Elements licence to target server
Define outage period and communicate this to Elements users
On the day of migration
Login to Elements on the source server as system administrator
Update the notice flag in source server web config file to prevent logins to the system
Make a note of active Scheduled Jobs on the source server and deactivate them
Stop the Symplectic Elements Scheduler service on the source server
Stop the Symplectic Mail Service on the source server
Stop the website in IIS on source server
Backup the Elements database on the source server (ensure the target and source servers can access the location where the database backup is stored)
Stop the Symplectic Elements Scheduler service on the target server
Stop the website in IIS on target server
Restore the target server Elements database from the source server backup
Update target server config files to reflect source server (see appendix E)
Point live DNS to target server (institution task)
Ensure any systems accessing Elements API are pointing to target server (e.g. HR import feed, grant imports)
Patch Elements on target server using the same setup utility as during install (ensure the box to start services after install is left unchecked)
Start the website in IIS on target server
Login to Elements on the target server as system administrator
Review configuration and settings (see appendix E)
Start the Symplectic Mail Service on the target server
Start the Symplectic Elements Scheduler service on the target server
Activate the same Scheduled Jobs on the target server as were active on the source server
Appendix B: Refresh one instance from another (e.g. DEV from PROD)
In order to refresh one instance (target) from another (source) follow this procedure:
Ensure that both target and source systems are running exactly the same version of Elements
Backup the Elements database on the source system
Review and record differences in settings that you wish to preserve after refresh (see appendix E)
Stop the Symplectic Elements Scheduler service on the target system
Stop the target system’s website in IIS
Restore the target system Elements database from the source system backup
Start the target system’s website in IIS
Log in to Elements on the target system as system administrator
Work through the previously recorded settings, changing them back to the appropriate values for the target system.
Start the Symplectic Elements Scheduler service on the target system
Run a full reindex via the Search Index Management page
Appendix C: Install Elements over an existing database (e.g. promoting DEV to PROD)
In order to install a new instance (target) using the database from an existing instance (source), follow this procedure:
Backup the Elements database on the source system
Install Elements on the target system (do not set up IIS)
Stop the Symplectic Elements Scheduler service on the target system
Restore the target system Elements database from the source system backup
Patch Elements on target system using the same setup utility as for install (leave services off)
Login to Elements on the target system as system administrator
Review configuration and settings (see appendix E)
Start the Symplectic Elements Scheduler service on the target system
Start the Symplectic Mail Service on the target system
Appendix D: Rollback Elements
In order to perform a rollback of Elements, you have to have retained a copy of the Application folder and a backup of the database
Stop the Symplectic Elements Scheduler service
Stop the Symplectic Mail service
Restore Elements database
Restore Application folder
Appendix E: Configuration and Settings
Elements is controlled by settings in configuration files on the server and in the website. Examples of pertinent settings to consider during migration/refresh/install are listed below.
Configuration Files
web.config
SSL settings
Proxy settings
http ports
Synchronise.exe.config
Proxy settings
SHERP A/RoMEO value for:
sync-sherpa-api-key
SCOPUS values for:
sync-users-scopus-requester-end-user-account-id
sync-users-scopus-result-format
Web of Science edition values for:
wos-lite-journal-editions
wos-lite-conference-editions
wos-editions
Website Settings
Global Settings
Go to System Admin > General Settings > Global Settings. In particular, the "Base URL", "system email" and "Online search identifier" should differ between systems.
API Settings
Go to System Admin > Authentication & Access > Manage API.
In particular the "Host" name and enabled endpoints under API endpoints, especially if the source and target instances are hosted on the same machine.
The Login page announcement
Go to Category Admin > Notifications & Actions > Login Page Announcement. This is often used to identify which system is which.
Scheduled Jobs
Go to System Admin > Jobs & Scheduling > Scheduled Jobs. Test systems often have various jobs disabled, for example "Emailer: Notification" is often disabled to ensure a test system does not email academics.