How to configure CVs in Elements
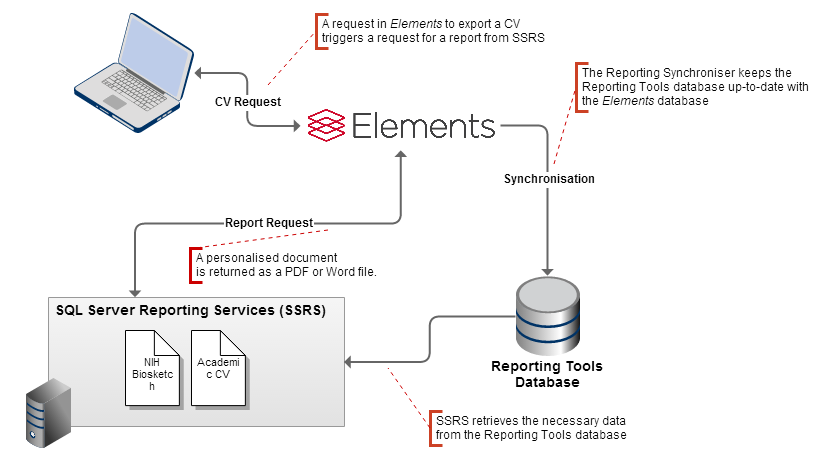
CVs in Elements are generated using SQL Server Reporting Services (SSRS/Report Server) and the Elements Reporting Database. When a CV export is requested, Elements contacts SSRS and requests the rendering of a 'report' for a user. The SSRS Report Server then contacts the 'data source' (Reporting Database) to request the information it requires ('datasets') in order to generate the report. It formats this information as laid out in the report and returns it to Elements as a document (.pdf, .docx) which is then downloaded by the user. To ensure that the data is up to date, ongoing synchronisation is required between the Elements operational database and the Reporting Database.
In preparation
Before initiating this work, please ensure that the following aspects have been considered.
Resources
This is a significant change that requires dedicated IT resources for initial configuration and troubleshooting.
Data quality
We expect a wide variation in the quality of the data held and created by users and we would strongly urge you to check sample reports against the data held. Clearly, if the data does not exist in Elements it cannot be populated in the output. You may find that effort is required to improve the quality of the data.
Environment configuration
There are several configurations over which this setup is possible:
Elements instance, the SSRS Report Server, and Reporting Database all on one machine
Elements instance and Reporting Database on one machine, with the SSRS Report Server on another.
Elements instance on one machine, with the SSRS Report Server and Reporting Database on another.
All three components on three separate machines.
Note: if the Reporting Database is on the same machine as the Elements operational database, then as per the Elements Prerequisites specification, they should be kept on different disks.
Depending on which configuration you choose, the settings you use within Elements and SSRS will differ.
If the SSRS Report Server will run on the same domain as the Elements Website, you can configure the Website to connect to SSRS using Integrated Security. This will require that the account running the Website (e.g. the SYSTEM user) has rights to log in to SSRS. If the Report Server is hosted on a different domain, then credentials will need to be supplied to be stored in the Website configuration file so that they can be used to access the Report Server.
Similarly, if the credentials used to connect to SSRS are under the same domain as the Reporting Database, the Report Server can access the Reporting Database using Windows Integrated Security (given that the account has the correct permission to the SQL Server instance and the Reporting Database). If the Report Server and the Reporting Database are not under the same domain, credentials which are used to access the SQL Server, via a Windows Account or through SQL directly, must be stored in the Report Server.
The SSRS Report Server processes the data from the Reporting Database using 'reports' which have to be uploaded to the Report Server. This will be done using the Reporting Setup tool. These reports contain all the logic necessary to harvest the data from the Reporting Database and format it into a CV or Biosketch and return it to the user on the Elements Website.
Prerequisites
Make sure that the following steps have been completed before starting:
SQL Server Reporting Services must be installed in Native mode, not SharePoint mode
Symplectic Elements must be version 4.12 or later
Symplectic Reporting Database must be installed
The Elements Reporting Synchroniser service must be started, and a full data synchronisation must have completed.
Preparing Elements for CVs
The following steps are required to enable CVs in Elements:
Configure SQL Server Reporting Services
Deploy CV report templates to the SSRS Report Server
Modify Elements configuration for CV functionality
Test export of CV and Biosketch from the Elements website
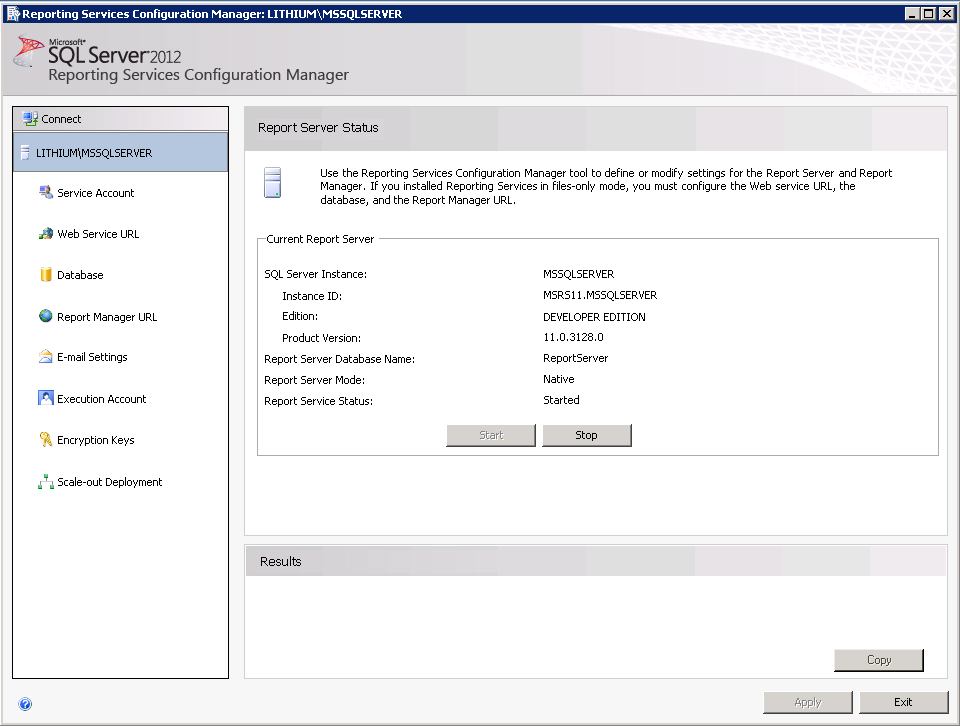
1. Configure SQL Server Reporting Services
Configuration of the SSRS Report Server is done via the Reporting Services Configuration Manager (for simple settings) and the 'rsreportserver.config' configuration file (for advanced settings). The Configuration Manager will be sufficient for this guide; depending on your network configuration and setup you may need to alter some of the advanced settings after completing this guide.
Location of the config file on SQL Server 2014: "C:\Program Files\Microsoft SQL Server\MSRS12.MSSQLSERVER\Reporting Services\ReportServer\rsreportserver.config"
Location of the config file on SQL Server 2012: "C:\Program Files\Microsoft SQL Server\MSRS11.MSSQLSERVER\Reporting Services\ReportServer\rsreportserver.config"
Location of the config file on SQL Server 2008 R2: "C:\Program Files\Microsoft SQL Server\MSRS10_50.MSSQLSERVER\Reporting Services\ReportServer\rsreportserver.config"
Documentation on modifying the rsreportserver.config file can be found here:
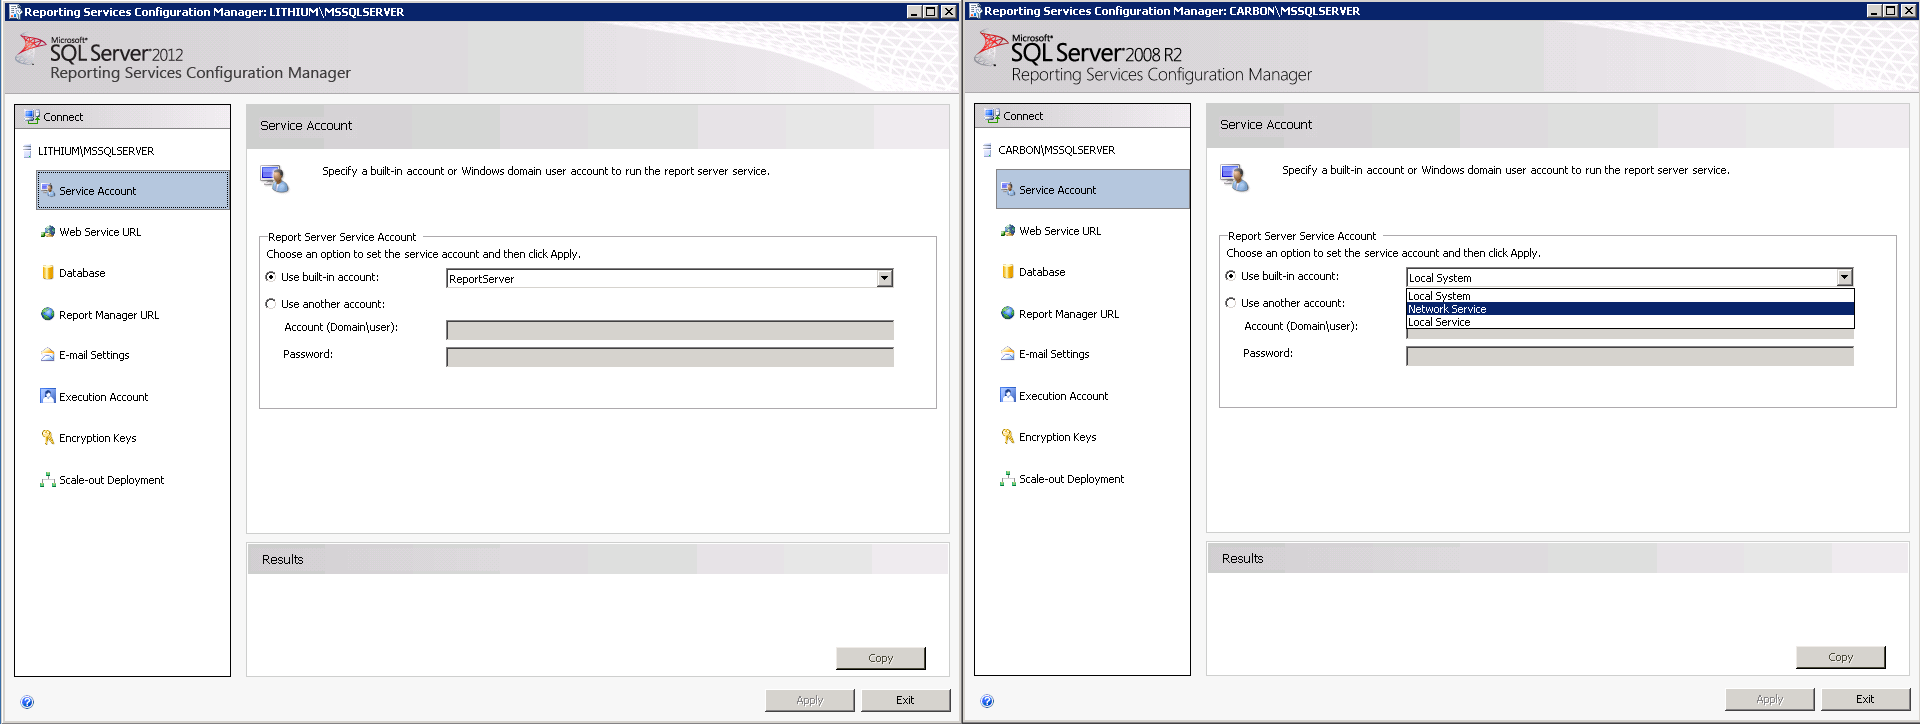
Service Account
For SQL Server 2012, select the built-in account 'ReportServer'. You can alternatively choose to run SSRS under a different Windows User account.
If you are unsure of which account type you should use, full details in the SSRS documentation can be found here:
SQL Server 2012
SQL Server 2008 R2
Configure Web Service URL (ReportServer)
The Web Service URL page controls the SSRS API, which is the primary access point for Elements.
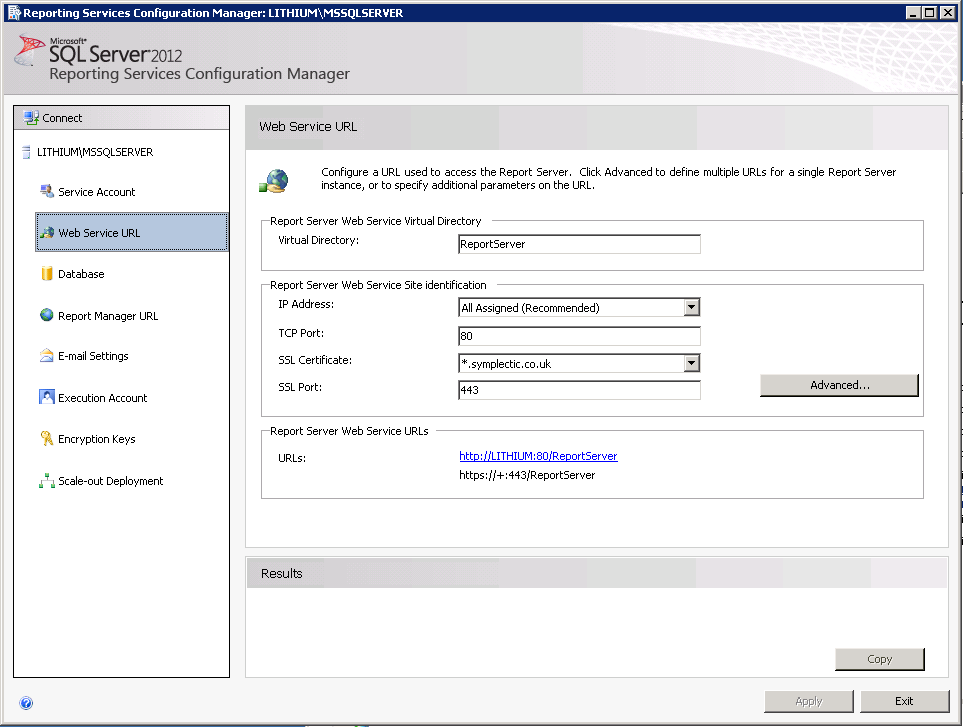
A secure HTTPS endpoint to encrypt traffic is recommended. To add an HTTPS endpoint, click on 'Advanced'. Suitable SSL Certificates for the fully qualified domain name of the machine must be used for the secure endpoints.
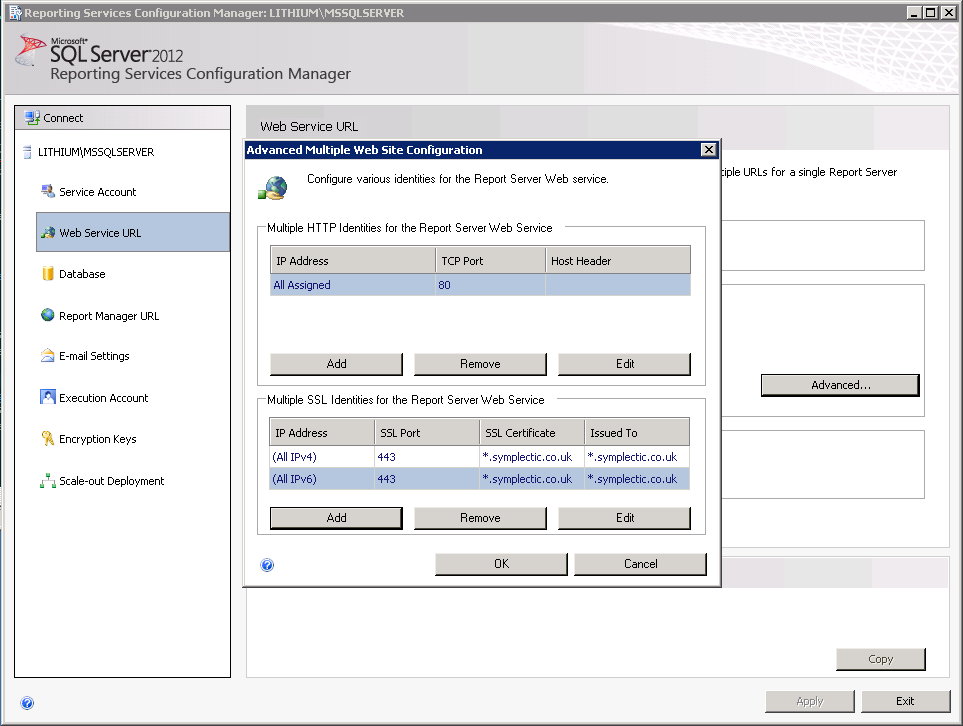
SSRS should function correctly on port 80 for HTTP and 443 for HTTPS. If use of these ports causes problems, the endpoints can be configured on different ports so that clashes with other services do not occur. For this, specific inbound firewall rules may be needed to permit access.
Note about SSL Certificates: The certificate name should match the domain name of the machine. I.e. in the example screenshots '*.symplectic.co.uk' matches the domain name 'lithium.symplectic.co.uk'.
Database
The default database of 'ReportServer' within the instance of SQL Server that hosts Reporting Services should already be configured. Default connection credentials for SSRS's access to its own database should already all be set up to use the SSRS Service Account you configured already.
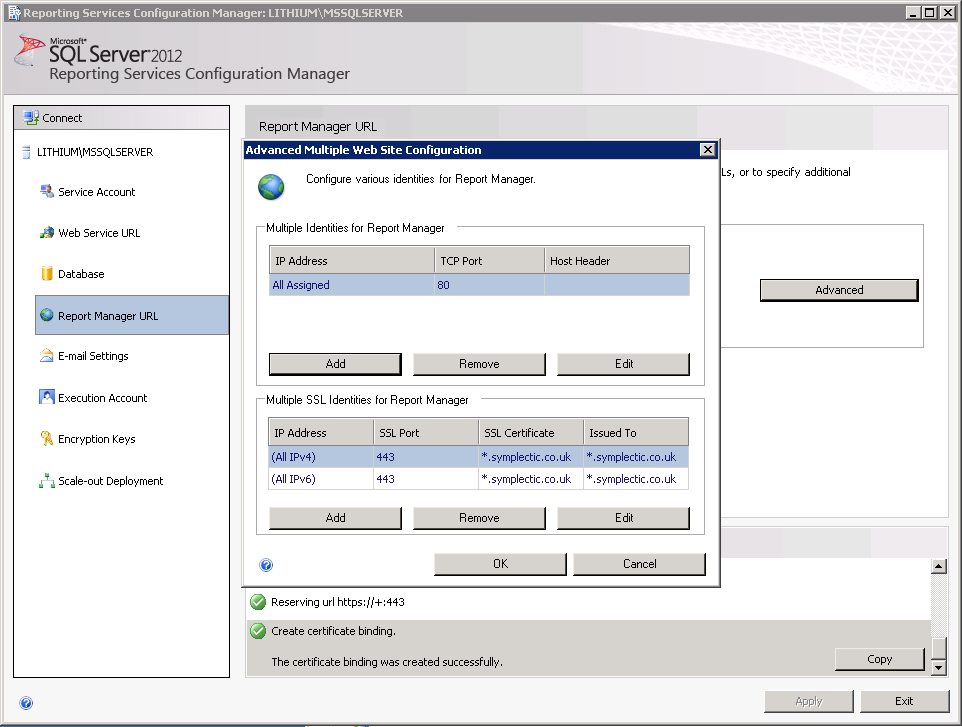
Configure Report Manager URL (ReportManager)
The Report Manager is a website that allows easy administration of the contents of the Report Server. The default virtual directory for this page is /Reports - we recommend you set it to /ReportManager to easily distinguish it from /ReportServer (and as a bonus prevent the irritating autocomplete when you type .../reports and hit enter in a browser).
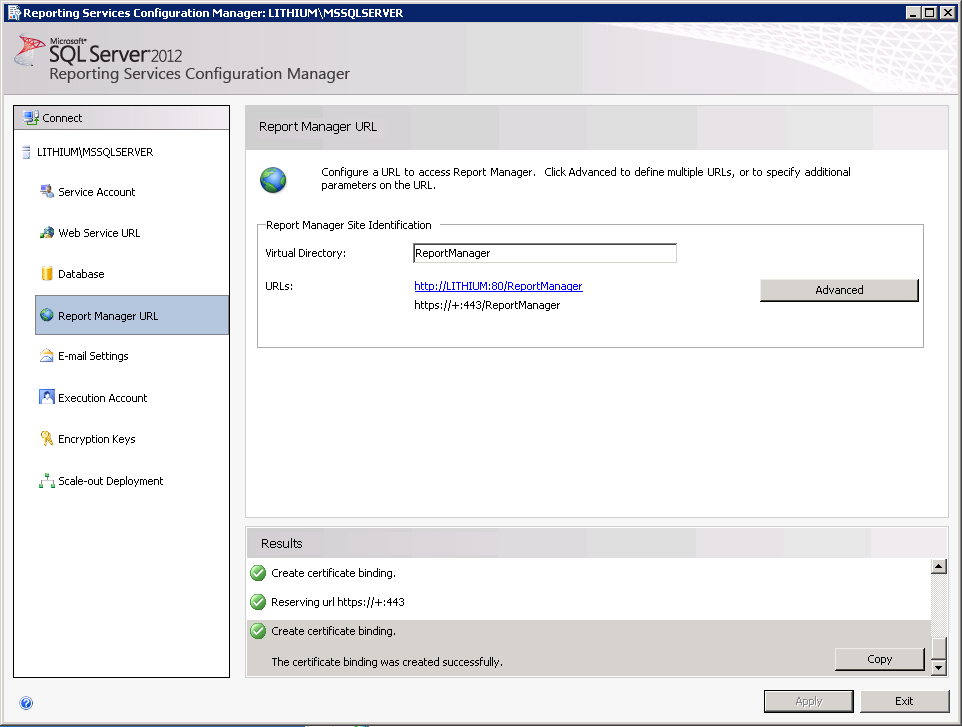
Set the Report Manager URL up in an almost identical manner to the Web Service URL, binding relevant SSL Certificates to the secure endpoints.
To initially log in to the Report Manager website, launch Internet Explorer locally as an Administrator and navigate to the Report Manager URL. Once access has been gained in this way, the internal security settings of the SSRS Report Server can be managed. It is best to do this after you have established which accounts will be permitted access to which components of which systems.
You must use Internet Explorer running as an Administrator. Other browsers, including Microsoft Edge, do not work with SQL Server Reporting Services.
Once you have started the service you should have a working installation of SSRS.
Configure access to SSRS from Elements
Elements needs to know what credentials to use to connect to SSRS in order to render CVs. The credentials must map to a Windows account on the machine running SSRS that is mapped to roles within SSRS that have suitable rights to render reports. To assign report generation rights to the chosen account:
On the host machine for SSRS:
Run Internet Explorer as Administrator
Access the SSRS Report Manager (the URL we configured previously) via one of the following addresses:
http://localhost/reportmanager
http://localhost:<port>/reportmanager
https://<server-name>:<port>/reportmanager
https://<server-name>:<port>/reportmanager
https://<fully.qualified.server.name>:<port>/reportmanager with login details for the current user
So that you don't have to run IE as a Windows System Administrator, you are first going to want to assign within SSRS the "System Administrator" role to your normal Windows account as well as the account you wish to connect to the SSRS Report Server as:
Click on the "Site Settings" hyperlink at the top right.
Select the "Security" tab.
Click the "New Role Assignment" button
Enter your username, check the "System Administrator" checkbox, and click "OK".
You will also wish to assign within SSRS the "Content Manager" role for the top level SSRS folder to the Windows account:
Click on the "Home" hyperlink at the top right.
Click the "Folder Settings" button.
Click the "New Role Assignment" button.
Enter your username, check the "Content Manager" checkbox, and click "OK".
Try closing IE, reopening without running as Administrator, and visiting the Report Manager URL.
Once these permissions have been set, the reports should then be deployed using the Reporting Setup tool.
2. Deploy CV report templates to the SSRS Report Server
Launch ReportingSetup.exe, found in the <Main_Installation_Folder>\Reporting.Setup folder. Each page that follows will configure part of the report deployment.
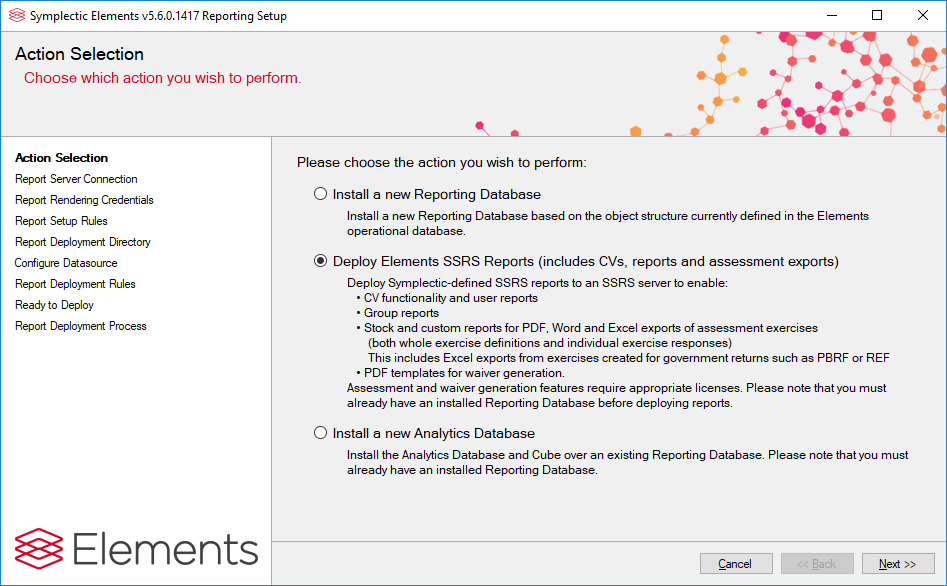
2.1 Action Selection
Choose "Deploy Elements SSRS Reports" and click "Next".
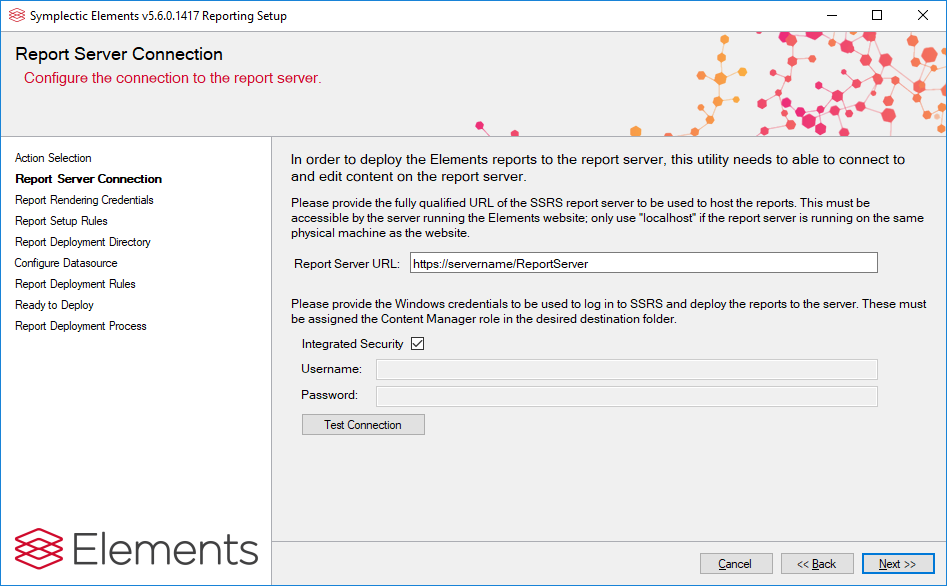
2.2 Report Server Connection
Provide the URL of the report server, along with the username and password of the SSRS account to be used to deploy the reports.
Note: a domain can optionally be specified by supplying a username of the form "DOMAIN\Username".
If Integrated Security is selected, the user account under which ReportingSetup.exe is being run will be used. The account must have the Content Manager role on SSRS, to allow it to create and delete content on the server.
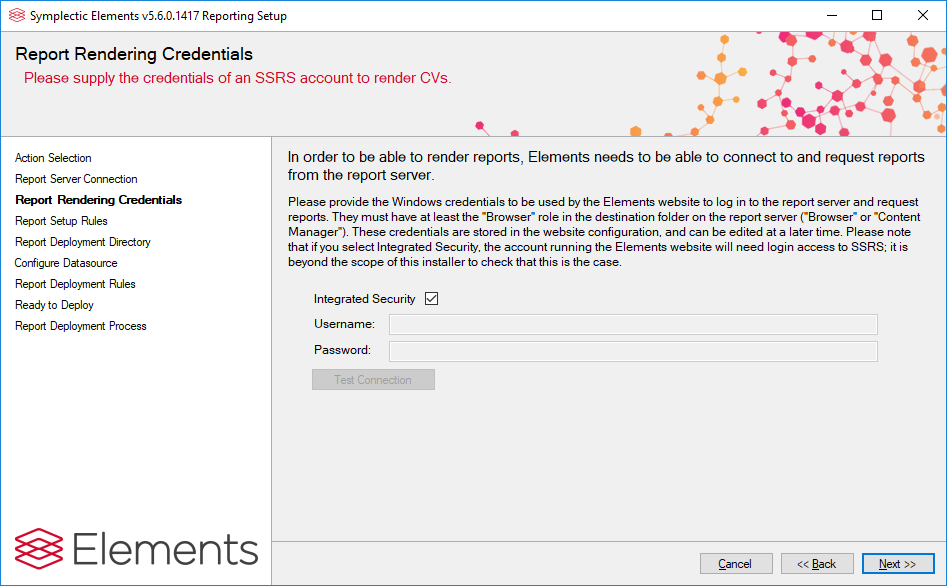
2.3 Report Rendering Credentials
Specify the credentials which the Elements Website will use to log in to SSRS to request the reports. AS before, a domain can optionally be specified. The same account as the Report Server Connection page can be used, but for security reasons it is recommended that the provided account has only the "Browser" role on SSRS. This will mean that the account stored by the Elements Website will be able to read, but not modify, content. Note that Integrated Security here would mean that the account running the Elements Website itself would attempt to log in to SSRS. It is beyond the scope of the setup tool to test whether or not that account has access.
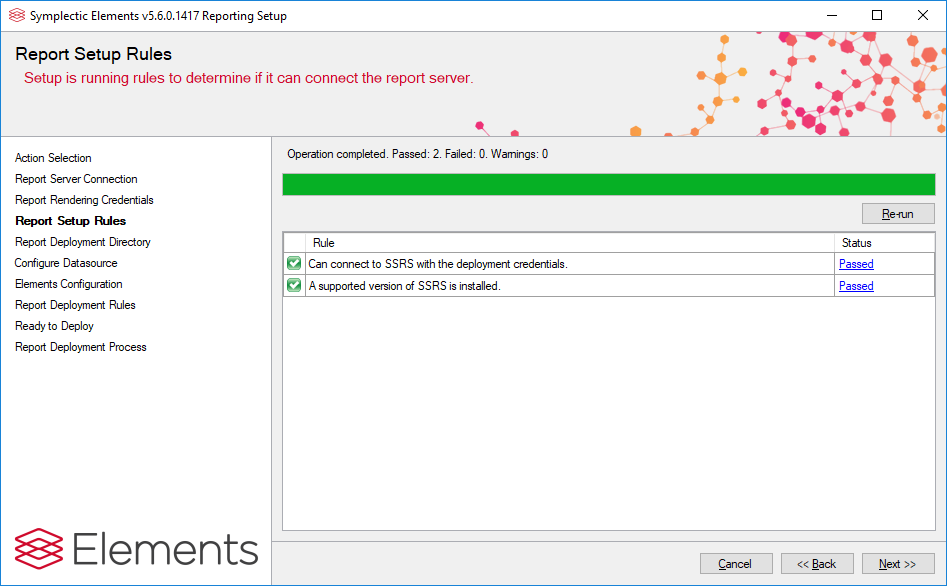
2.4 Report Server Rules
This step checks the connection to the report server. If any tests fail, you will not be able to continue with the setup process.
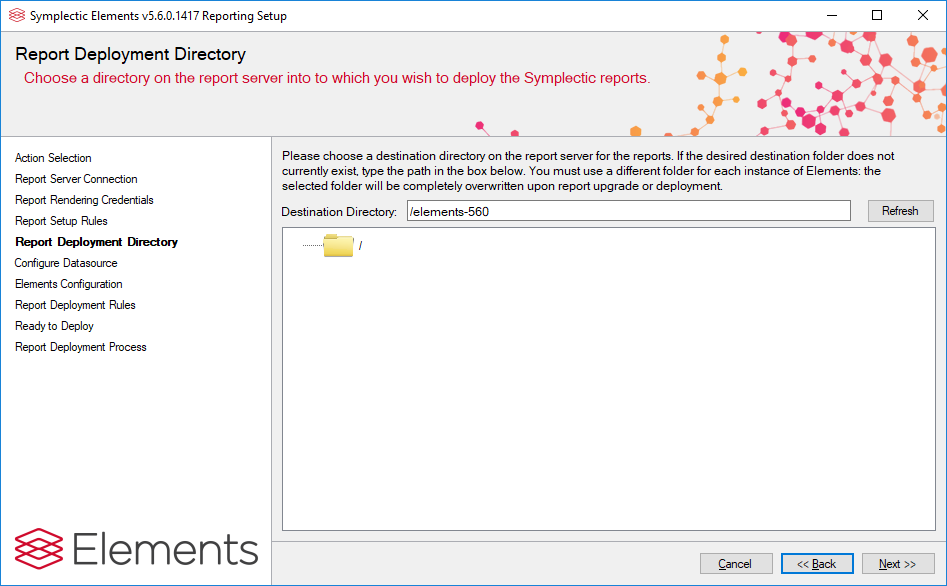
2.5 Report Deployment Directory
Choose the location of the reports within the SSRS directory structure. A different directory should be used for each Elements instance. An existing folder can be selected by clicking on it within the directory tree, or a new folder can be specified by typing its path in the Destination Directory textbox. On SSRS, directories are separated by the "/" character, and the root folder "/". If there any existing Elements deployments on SSRS (of Elements version 4.12 or later), these will be indicated by the Elements logo.
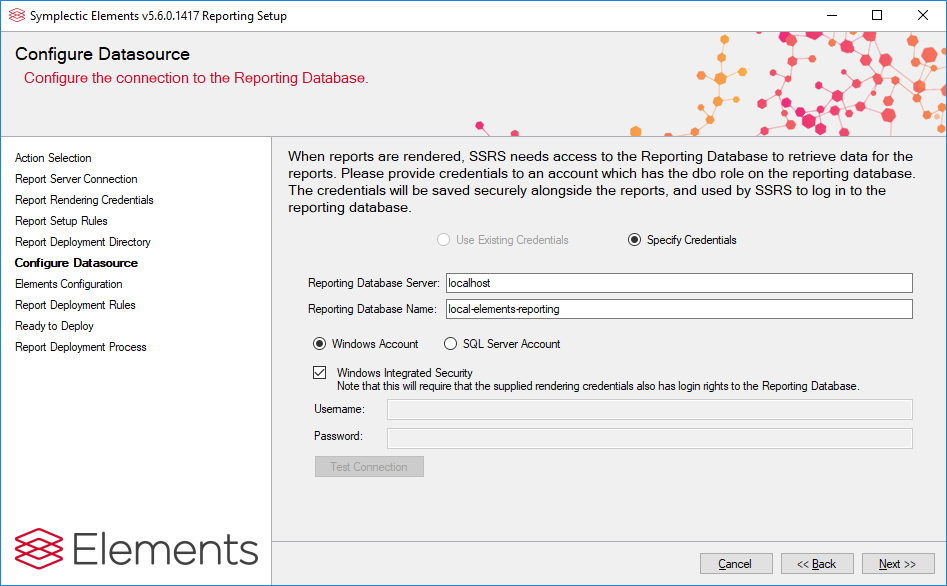
2.6 Configure Datasource
Now the connection from SSRS to the Reporting Database is configured. This is the connection which SSRS will use to retrieve data upon a request for a report. The server and database name of the Reporting Database must be provided (but will be pre-populated from the current Reporting Synchroniser configuration), along with credentials to allow SSRS to connect. Note: the credentials provided must have the db_owner schema on the Reporting Database in order for reports to be generated.
Integrated Security here means that SSRS will use the Windows account which has requested the report: the Report Rendering Credentials. Note that if Integrated Security is selected for both this data source and the report rendering credentials, the setup will not be able to test these connections: the integrity of the report deployment must be tested manually after the reports have been deployed.
If the deployment directory has previously has Elements reports deployed to it, the current credentials are loaded from SSRS and "Use Existing Credentials" is provided as an option (see the image below). Otherwise, you must specify the credentials to be used.
If a connection cannot be established to the SQL Server, check all your firewall and network settings. The default port for SQL is 1433, check that this port is open (or the port that your SQL Server is listening on if it is not using the default port). Verify that you can connect remotely to this SQL Server Instance with the credentials you are using for SSRS from the machine hosting the Report Server. The SQL Server instance must be configured to allow remote connections if it is not already.
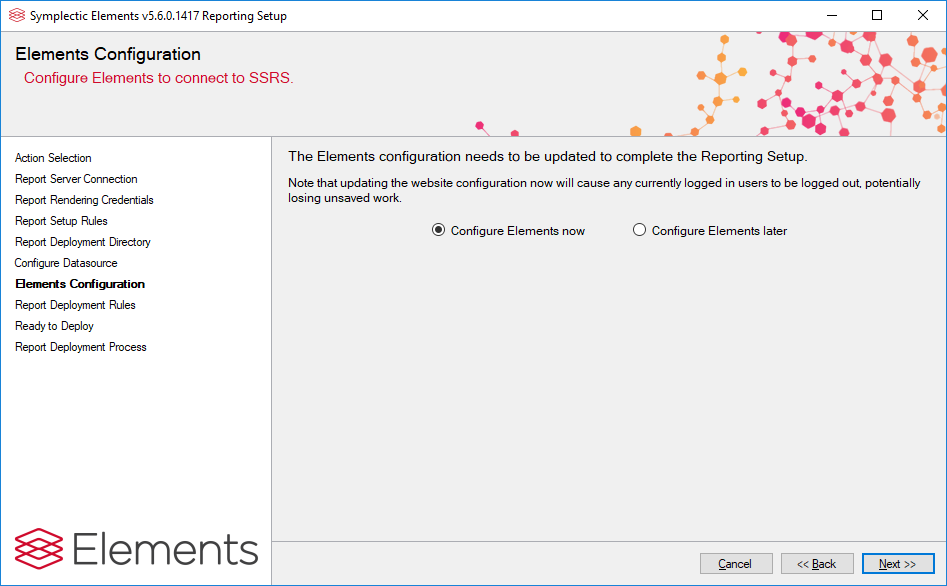
2.6b Elements Configuration
This page appears only if any of report server URL, report rendering credentials, or report base folder have been changed since the last report deployment (if there has been one). Selecting "Configure Elements now" will update the web.config file to contain the new values. Alternatively, selecting "Configure Elements later" will provide a table of the key names and values which must be updated before CV export will function. Clicking Save Key Values will save a text file containing the key values for future reference.
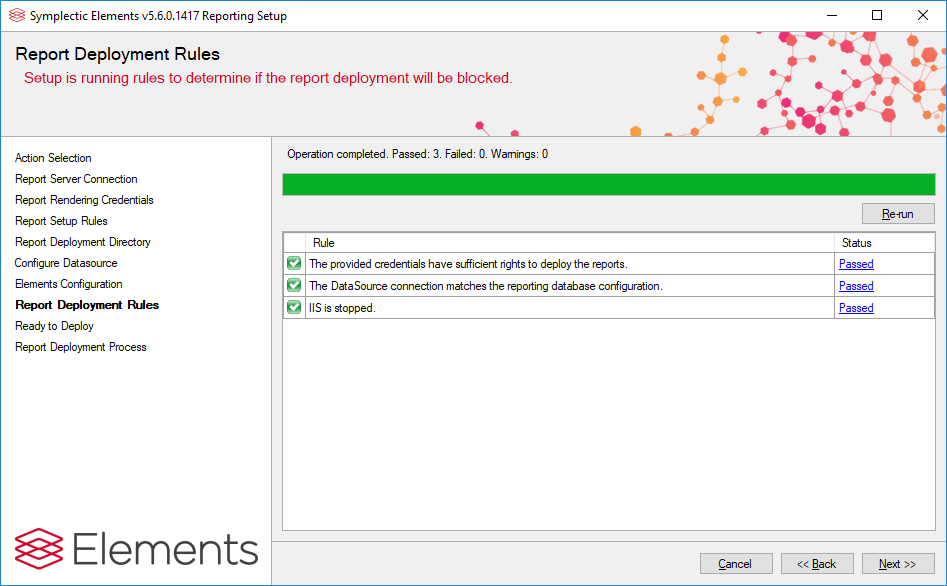
2.7 Report Deployment Rules
This step checks whether report deployment will be blocked. If any tests fail, you will not be able to continue with the setup process. Warnings will not stop deployment but you should check them so that you are informed about the consequences of continuing.
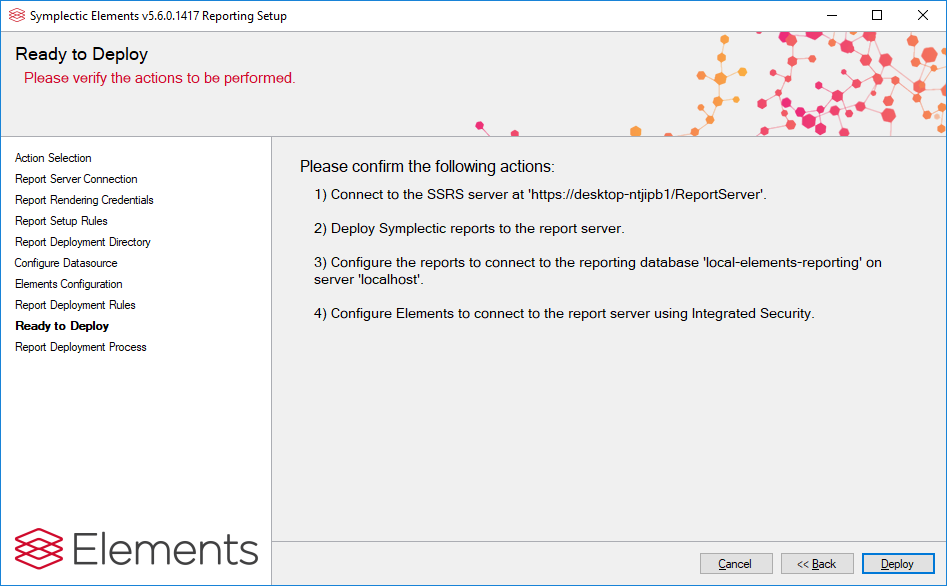
2.8 Ready to Deploy
This page provides a final chance to check parameters before deployment. If the actions listed are correct, click "Deploy" to perform them.
2.9 Report Deployment Process
This page provides feedback on the deployment process.

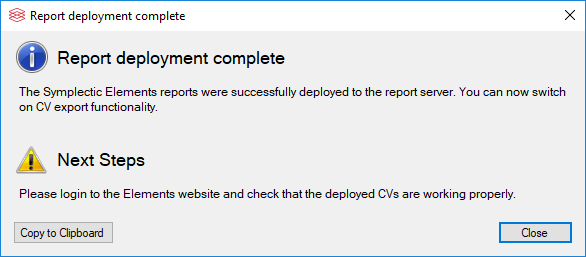
2.10 Report Deployment Complete
If the deployment succeeds, a Report Deployment Complete dialog box will be shown. This will contain information about the deployment, and any necessary further steps to be taken.
3. Modify Elements configuration for CV functionality
Open the file <Main_Installation_Directory>\Website\web.config for editing in a text or code editor.
3.1 Enable CV export
Find the following lines in the web.config file and make sure that "value" is set to "true":
    <!--whether the cv export feature is enabled-->
    <add key="cv-export-enabled" value="true" />
3.2 Bypass proxy server(s)
If a proxy server is being used and the SSRS instance is not on the same machine, you may need to bypass the proxy in order to connect successfully to SSRS. If this is not the case, you can skip this step.
If you do need to add a proxy bypass, first find the <defaultProxy> element in the web.config file. Add the <bypasslist> element as shown below (replacing "symplectic.co.uk" with the host address of your SSRS instance):
<configuration>
  ...
  <system.net>
    <defaultProxy>
      <bypasslist>
        <add address="[a-z]+\.symplectic\.co\.ukquot; />
      </bypasslist>
      ...
    </defaultProxy>
  </system.net>
  ...
</configuration>
This will bypass the default proxy and access the URI directly instead. From the MSDN documentation on adding a regular expression to represent a URI in the bypasslist:
Warning: You should use caution when specifying a regular expression for this element. The regular expression "[a-z]+\.contoso\.com" matches any host in the contoso.com domain, but it also matches any host in the contoso.com.cpandl.com domain. To match only a host in the contoso.com domain, use an anchor ("
quot;): "[a-z]+\.contoso\.comquot;
The following code example adds two addresses to the bypass list. The first bypasses the proxy for all servers in the contoso.com domain; the second bypasses the proxy for all servers whose IP addresses begin with 192.168.
<configuration>
  ...
  <system.net>
    <defaultProxy>
      <bypasslist>
        <add address="[a-z]+\.contoso\.comquot; />
        <add address="192\.168\.\d{1,3}\.\d{1,3}" />
      </bypasslist>
      ...
    </defaultProxy>
  </system.net>
  ...
</configuration>
4. Test export of CV and Biosketch from the Elements website
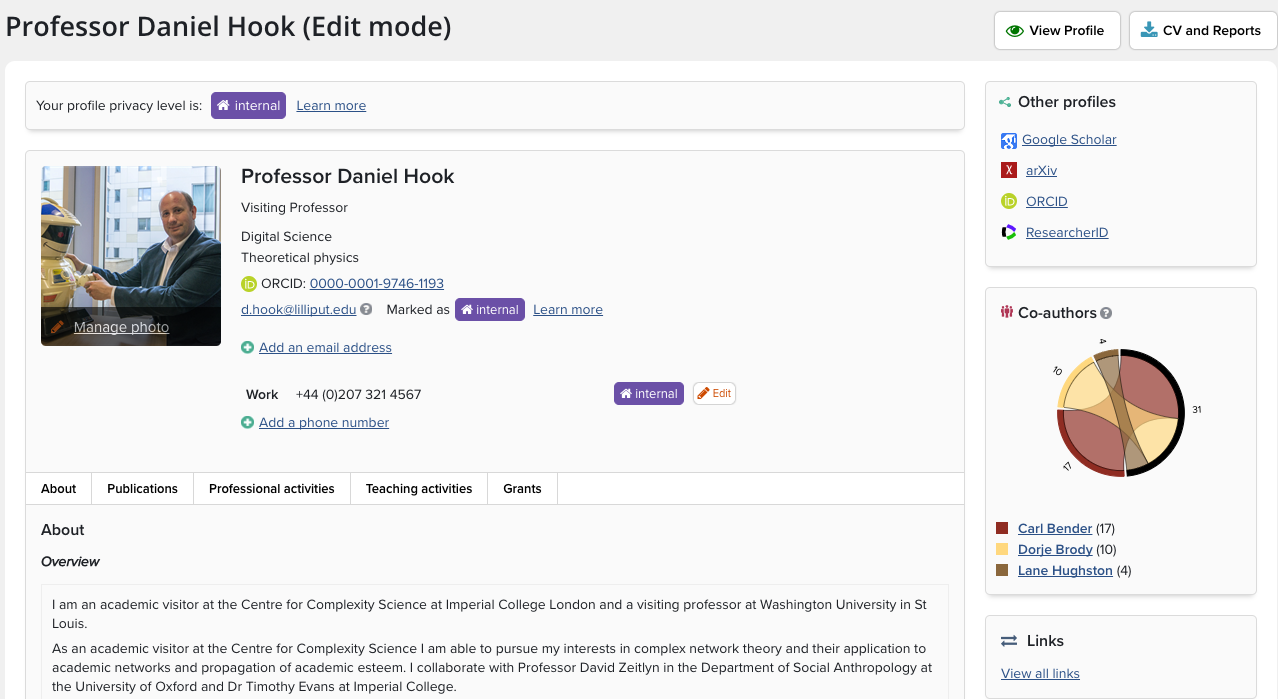
Set up the report via the Manage Registered Reports page. Now when you login to Elements, you will see that the page Menu > My Account > Edit Profile ( In 5.x: Menu > My Account > View Profile) now has a 'CV & Reports' button.
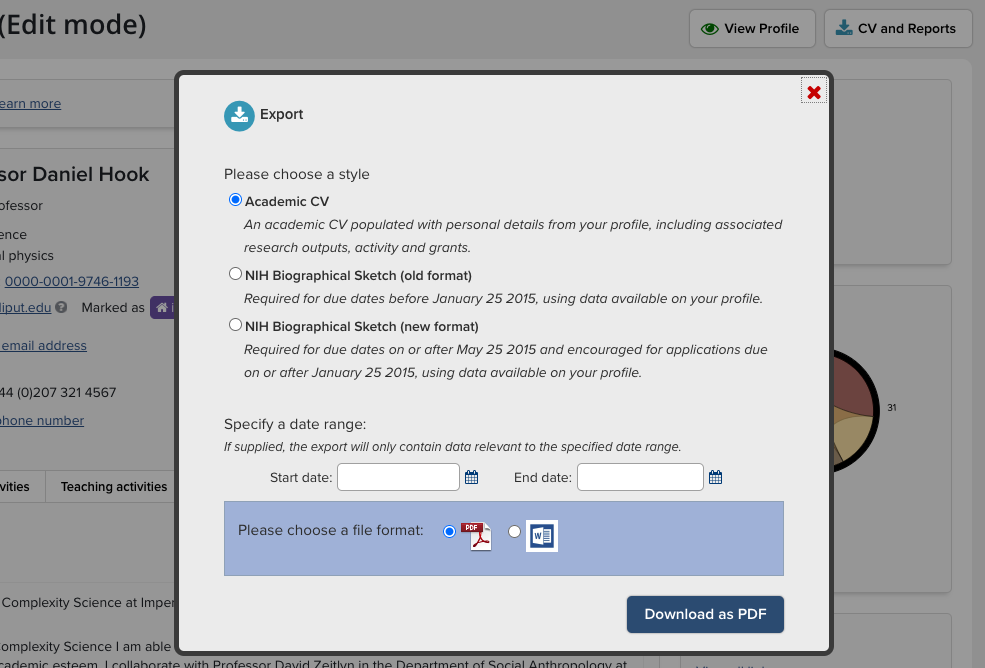
Clicking this button produces the following screen, where you are prompted to choose between an Academic CV or an NIH Biosketch (in two different versions), and select the format of either PDF or Microsoft Word. Note that the Biosketch CVs will only export as a Word document, as it will require further customisation.
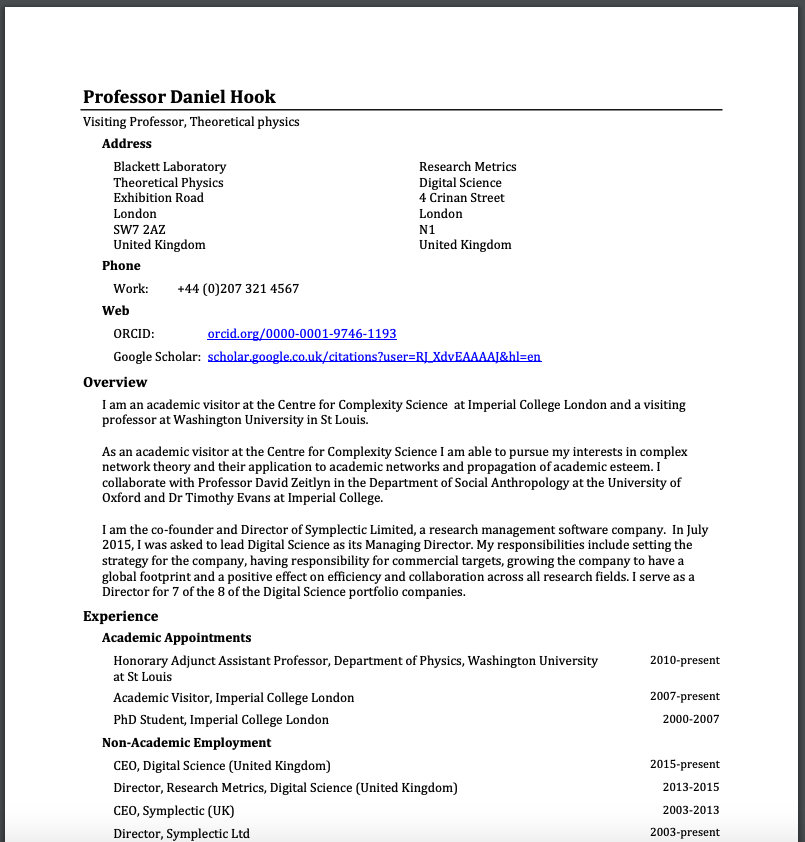
Clicking the download button should prompt the user to save the generated CV. An example output is shown below:
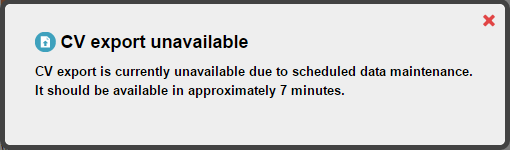
Note that if the Reporting Synchroniser is not fully up to date with recent changes, the user will encounter the following message after clicking the download button:
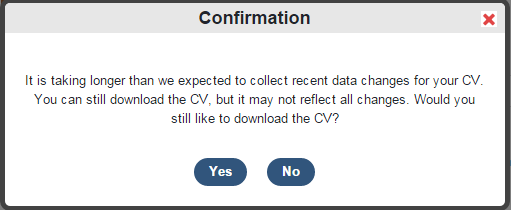
And additionally, if a full reload of the reporting database is underway (a full data synchronisation), then CV export will be temporarily disabled. Clicking the Export button at these times will show the following message: