
Troubleshooting Guide for Search Settings
The purpose of this document is to assist Elements users in creating and curating search settings.
Why Are Some of My Publications Not Found?
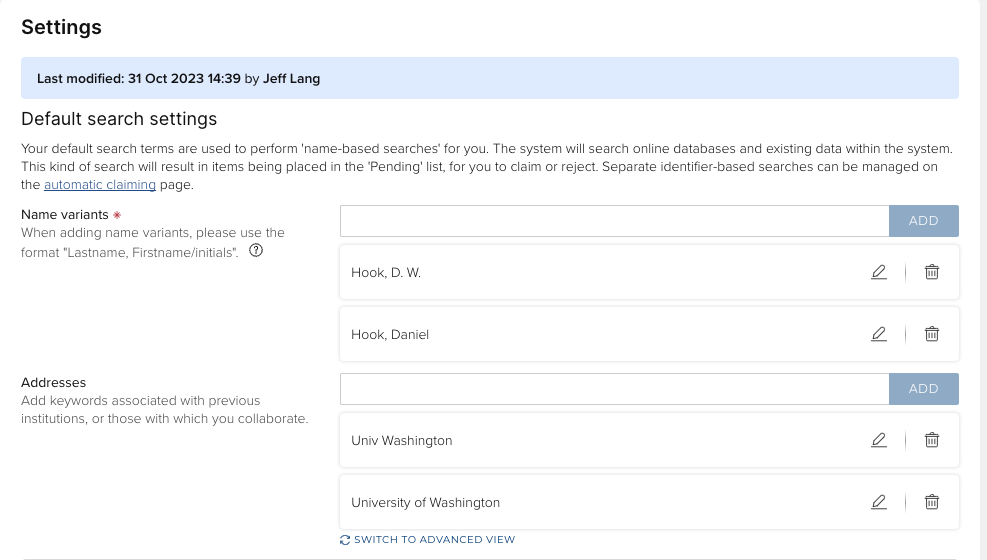
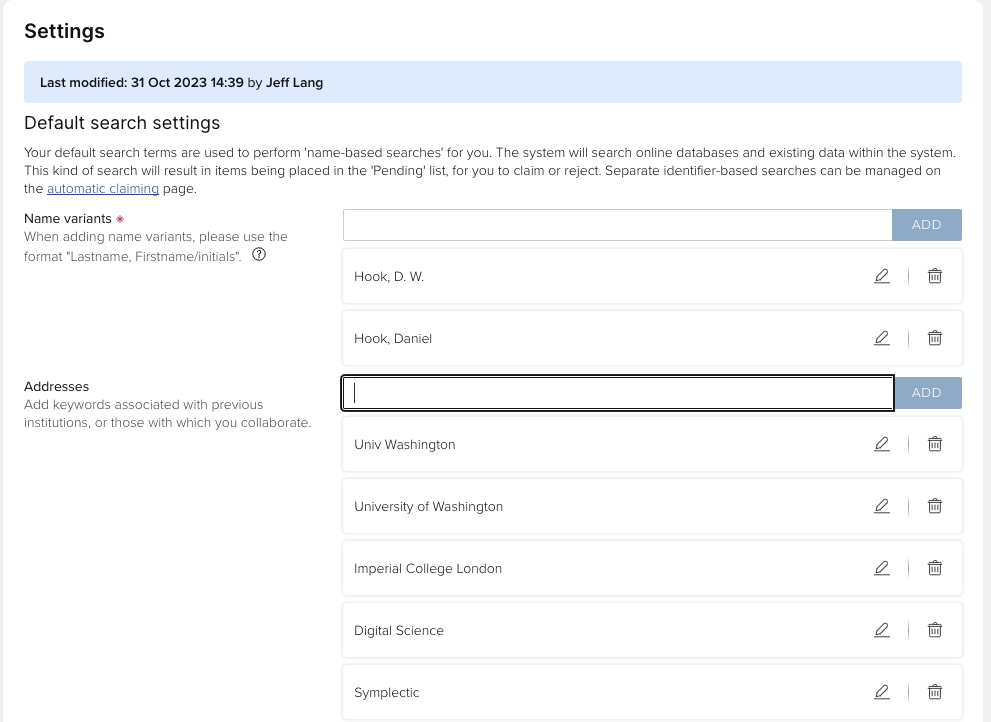
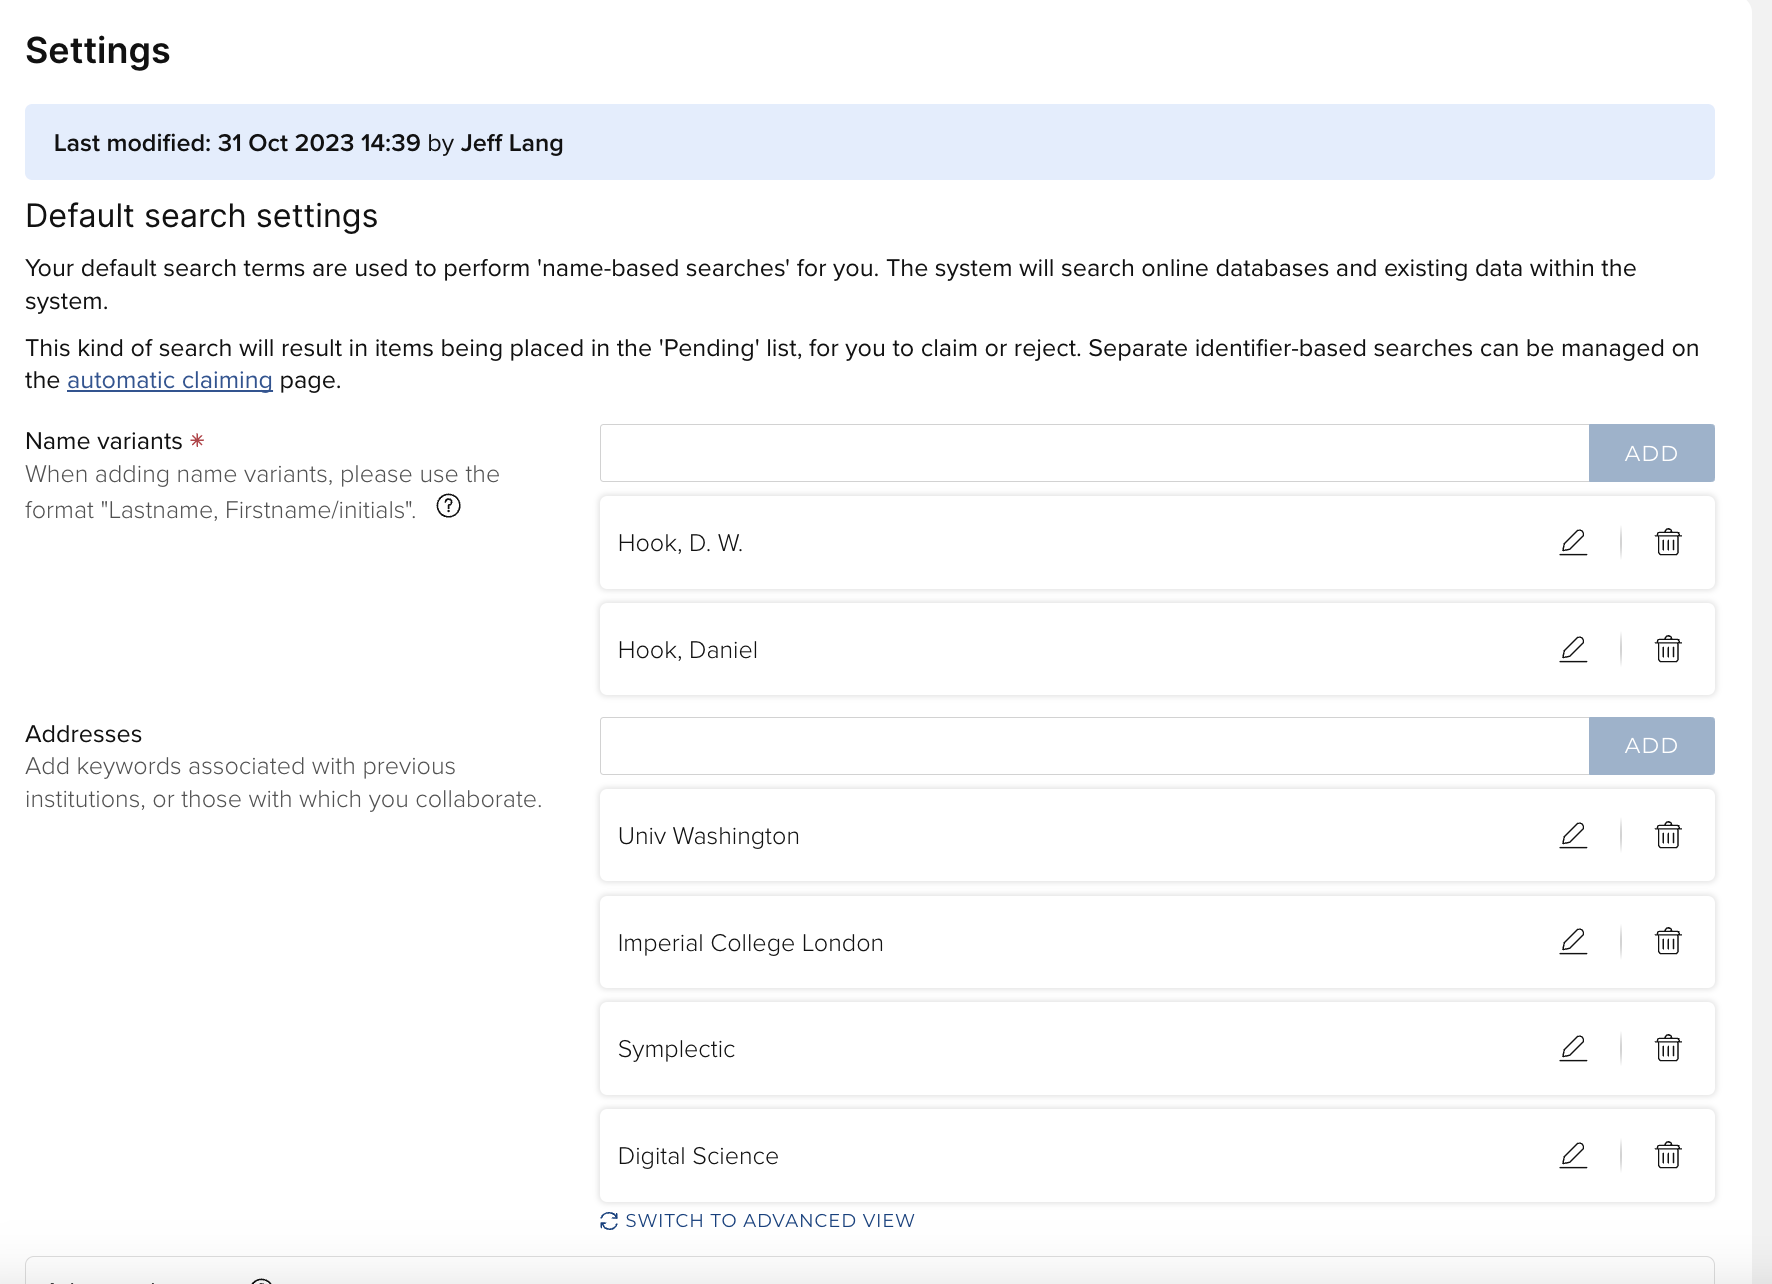
Initial search settings are created automatically when the HR feed is first applied to the system. Typically, the initial import will create two Name variants: one with the author's full name in the LAST NAME, FIRST NAME format and one with the last name and initials. It is also recommended that the system be configured to add Address terms, usually with the institution's full name (such as 'University of Washington') and the most common abbreviated version ('Univ Washington').
Authors or their delegates can later manually add additional address variants as needed:
Tip: Enter every variant of your name that you can find used in the data sources you are searching. For example, hyphenated names should be entered both with and without the hyphen.
Tip: Commas should be placed between last names and other names.
Tip: Do not enter email addresses in the Addresses field.
Tip: If your institution is in a city that uses the name of the city (such as "City College London"), then postal code or zip code can be a useful address term.
What is Submitted?
The resulting search string will be submitted to each active database (with appropriate syntax) in this basic form:
(name OR name) AND (start date) AND (address OR address)
N.B. The synchroniser is not able to restrict results based on a relationship between a single author and a single address term. In other words, in the search statement AU=Smith, JS AND AD=Cambridge, the synchroniser will retrieve any record where there is anyone named "Smith, JS" and any address term "Cambridge." If the record has 200 authors and one is named Smith, JS and another author is affiliated with Cambridge, the record will be retrieved.
After retrieving relevant publications from each database, the system will match together identical publications from different databases into single records, and then email you concerning the results.
If the results do not include all your recent publications, you can consult the following sections to work out how to improve your search settings and get a more accurate result.
Making Changes to Your Initial Settings
You are free to change your search settings in any way you like, or create separate queries for each database.
Edit the Search Settings
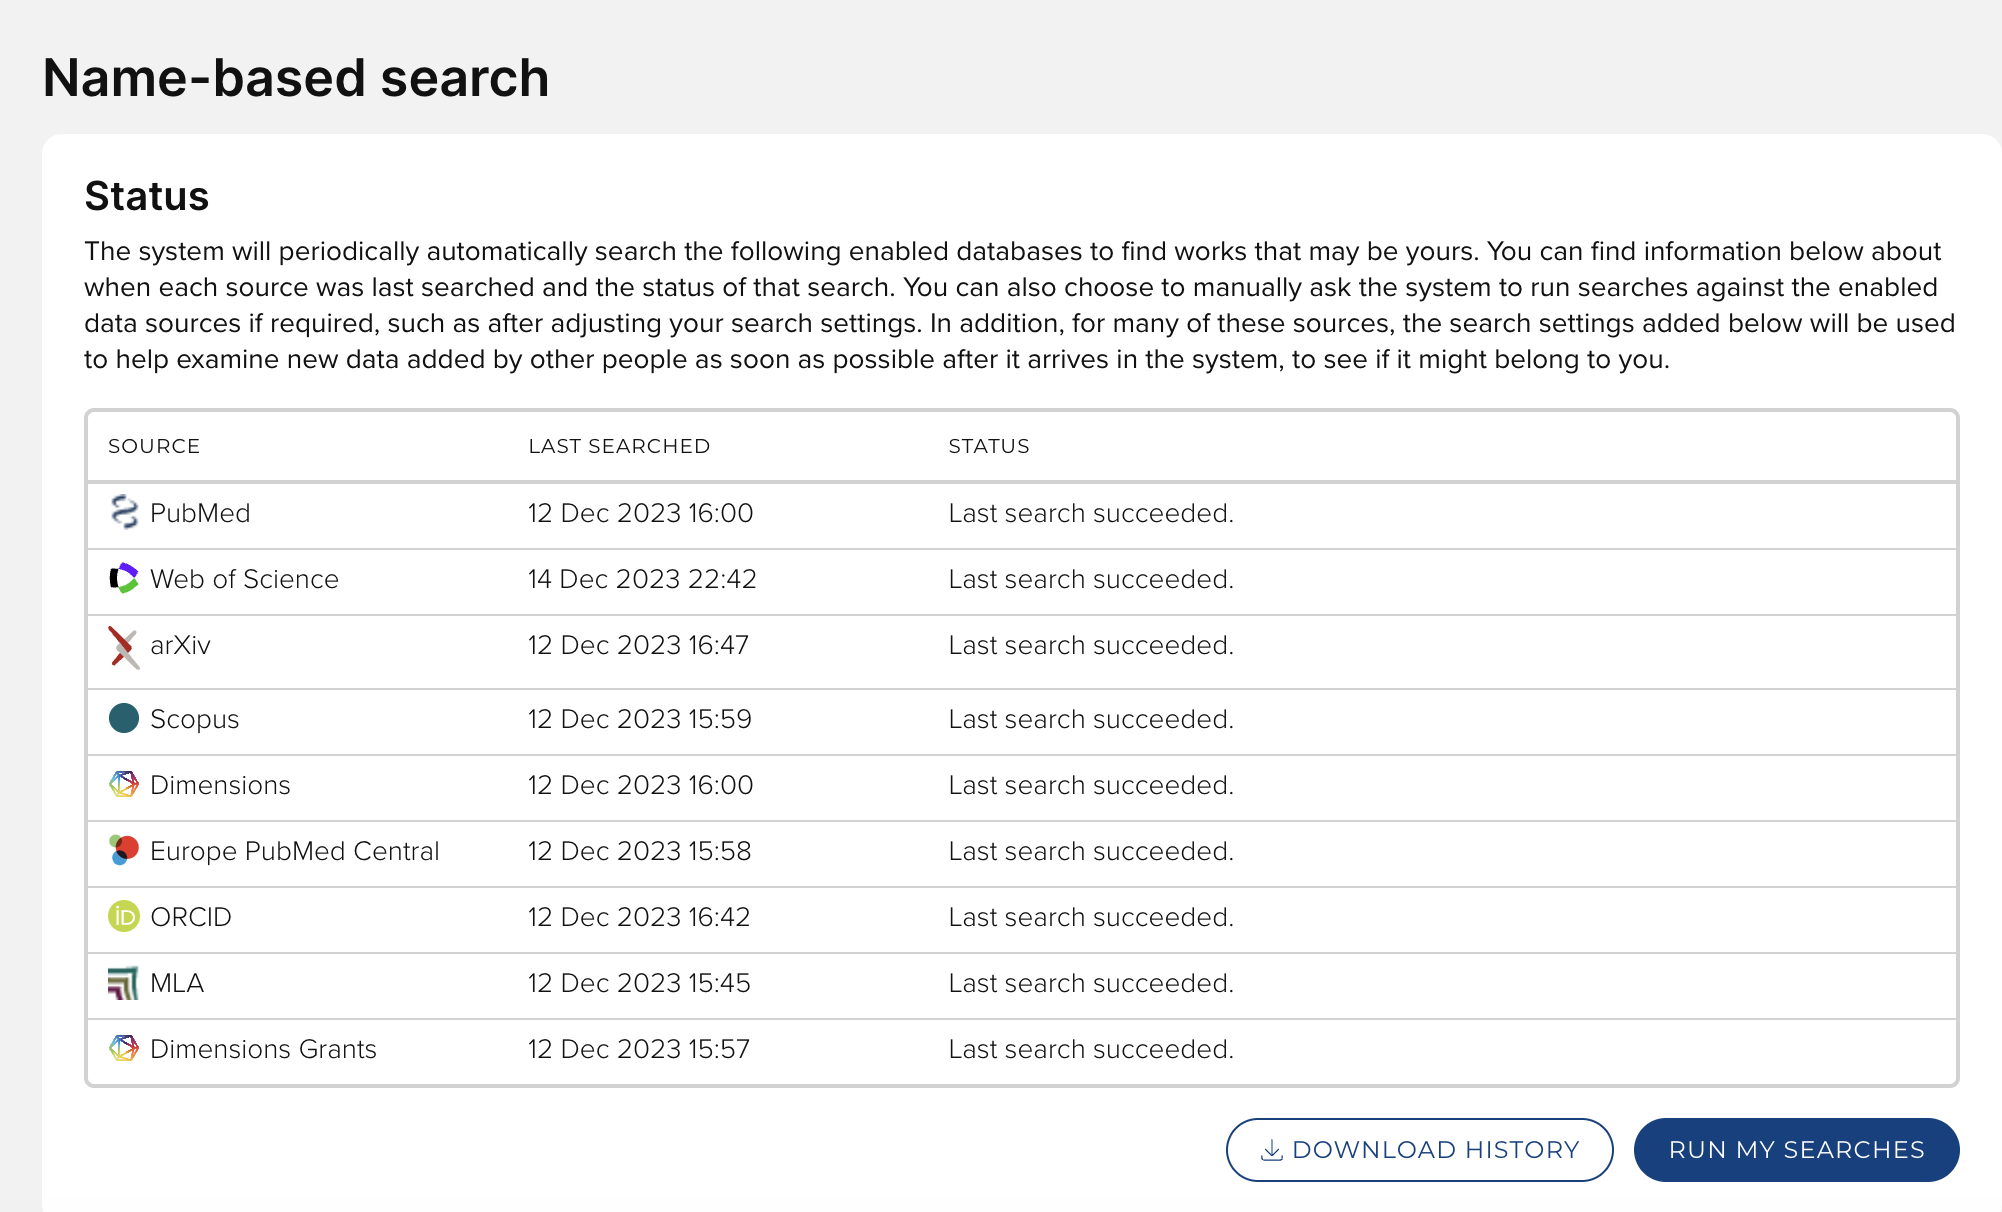
To get started, navigate to Profile & work > Tools & settings > Search settings. The Status section at the top of the screen shows your recent search history.
In the Name-based search settings section, you can make changes to your initial search settings. The changes that most often need to be made are to add Name variants and to add previous institutions to the Addresses area.
Advanced Terms such as Start Date, Keywords and Journals can be used to restrict the number of articles returned by a search.
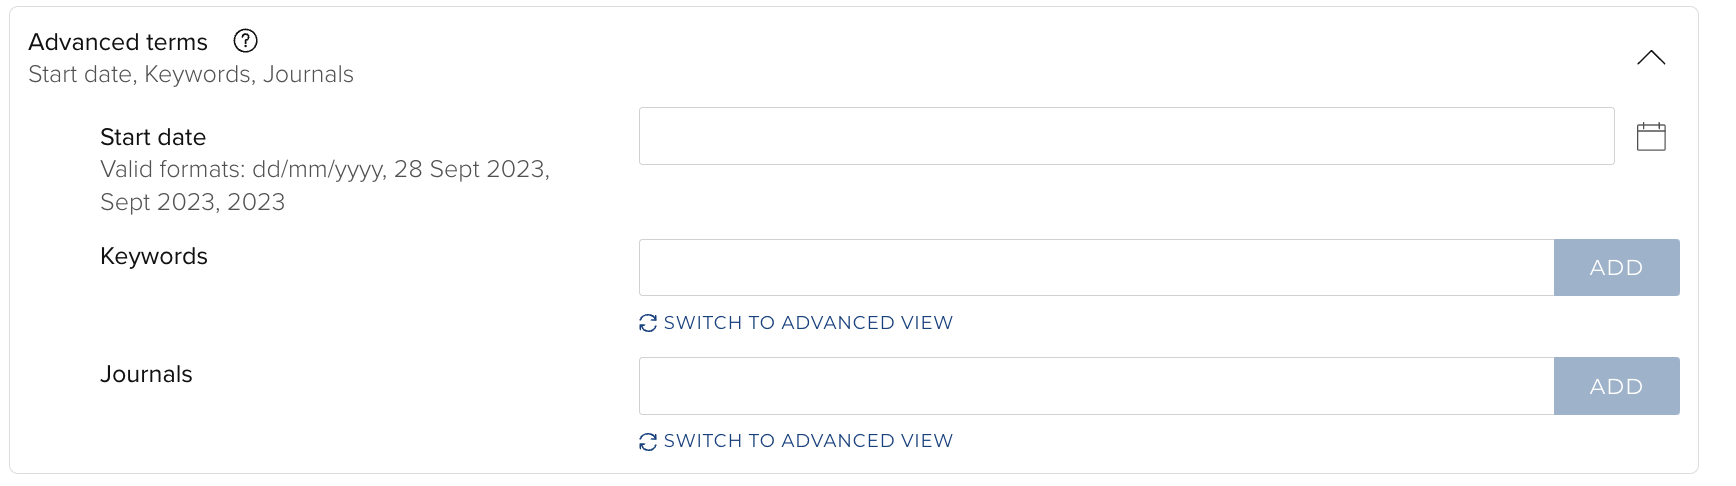
Entering a Start date will limit the return to articles with a Publication date on or after that date. Entering Keywords and/or Journals will return articles only indexed with the specific terms or published in specific journals.
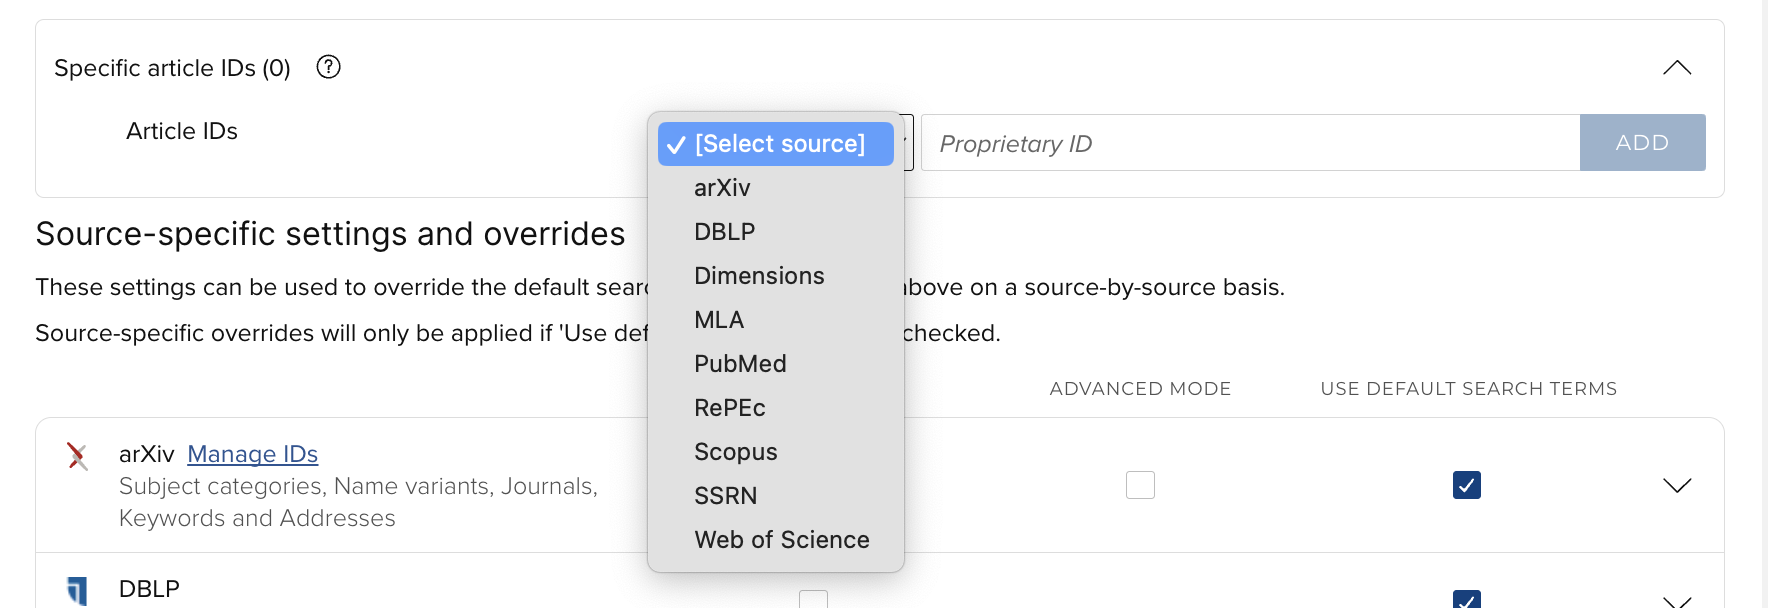
Specific article IDs can be used to retrieve individual articles that can't be harvested using name-based search settings. For more details about Specific article IDs, see Appendix A, below.
"Simple" mode can also be over-ridden by selecting the Advanced mode for a specific database and constructing a Boolean query. This can be very useful for creating extremely targeted searches, such as the kind that can retrieve items published with Group Authorships.

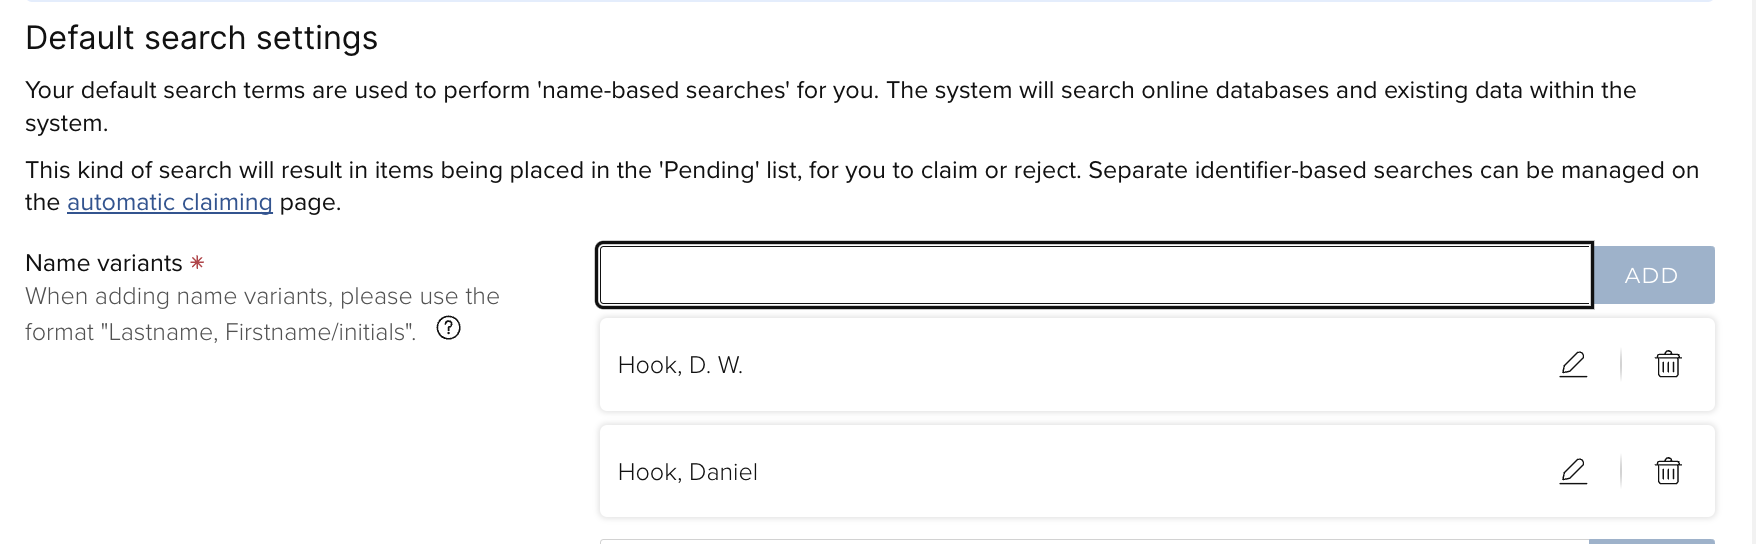
Name variants
To add a new variant of your name and initials, type in the box (using the format ‘Lastname, A. B. C.’ or 'Lastname, Firstname B. C. etc.) and then click the 'Add' button.
Incorrect variants can be removed by clicking on the trashcan icon.
Names cannot be edited. To change a variant, simply remove the incorrect version and add the new, correct version separately.
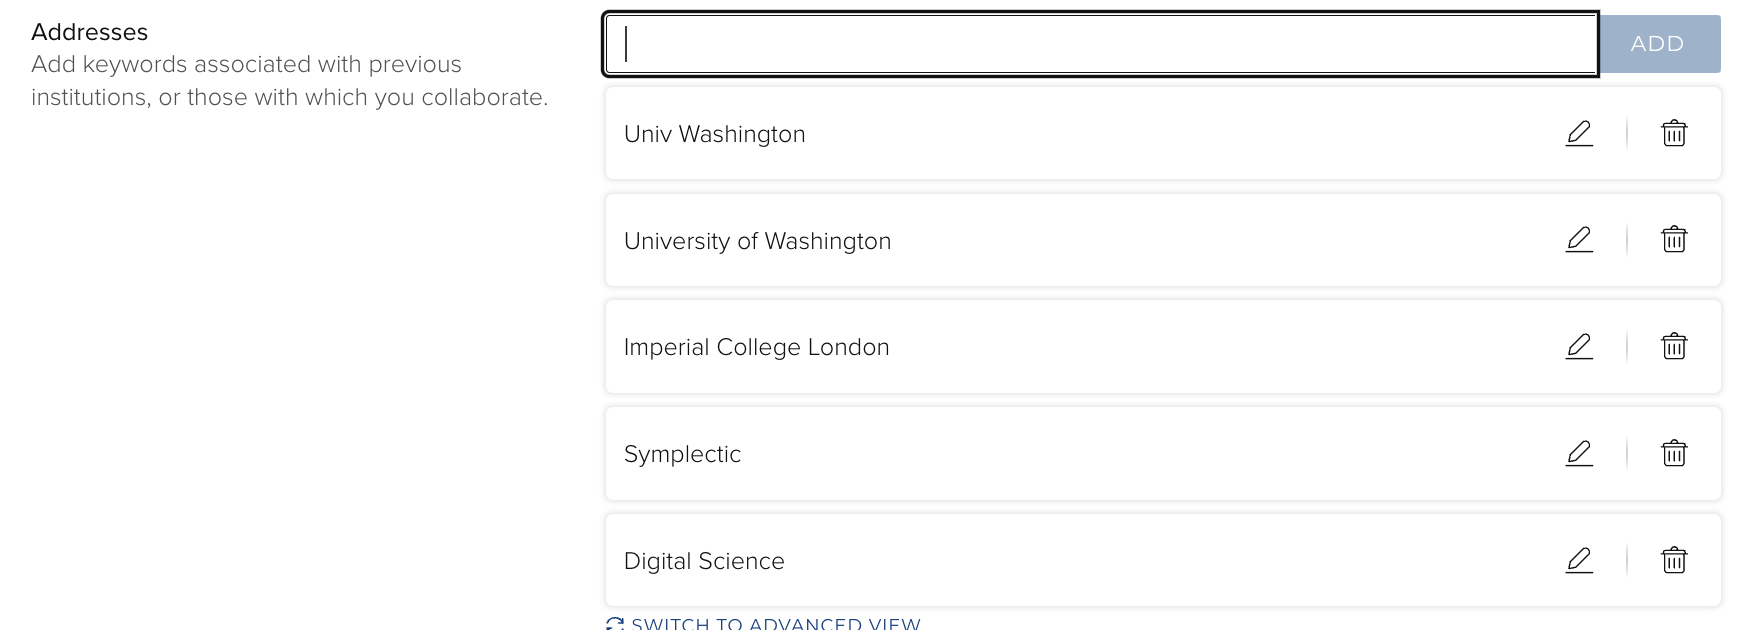
Add Addresses
To add details of an institution name that frequently appears on your publications, type each new keyword (e.g. the name of the institution or research centre) into the box, then click on the 'Add' button. Depending on which databases your institution uses, it can be valuable to enter both full and abbreviated names of institutions. In particular, harvest from the Dimensions data source works best with the full institution name while Web of Science works best with abbreviated names.

Online Database IDs
Online database IDs refer to the identifiers associated with specific items in the datasources, not authors. If a small number of individual publications do not fit your usual search terms for any reason, it is not necessary to change your search settings in order to ensure they are found in the online databases. See Appendix A: Find individual publications using ID numbers for more details.
Author identifiers
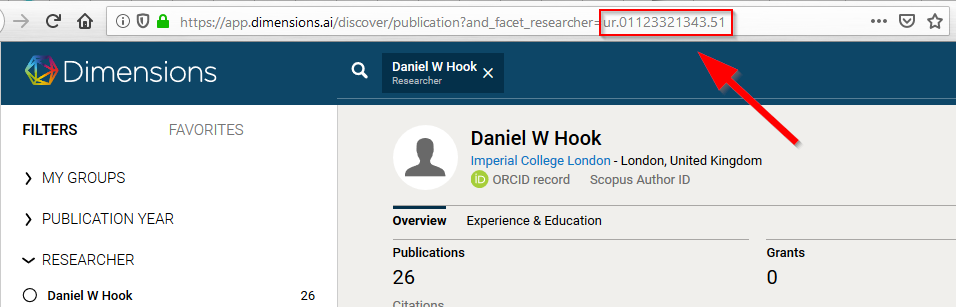
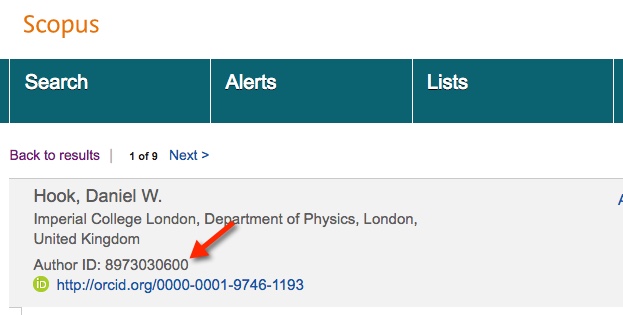
Five databases (arXiv, Dimensions, Scopus, SSRN and Web of Science) offer the option of entering author identifiers that will automatically retrieve documents that have been tagged by the database provider. For arXiv, Dimensions, Scopus and SSRN, the identifier can be found by searching for the author in the user interface.
Web of Science uses an identifier called ResearcherID, which can sometimes be found in Web of Science records, but a more reliable source is the Publons website (https://publons.com).
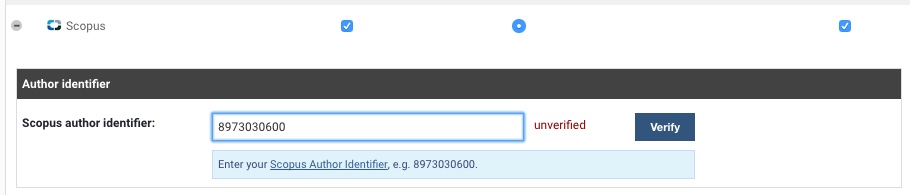
In Search settings, go to the Source-specific search terms section and click on 'Manage ... ID(s)' link beside the database name. This will take you to the Automatic claiming settings.
For Scopus, SSRN, and Web of Science, there is a verification process whereby you will be presented with an abbreviated list of recent publications for your review. If you click the Verify button, all the documents in that database that have been tagged with your identifier will be harvested and placed in the Accepted folder rather than the Pending folder.
Important note: Author identifier searches do not replace name and address searches. They are treated as a Boolean OR search, meaning the synchronizer retrieves the documents matching the author identifier and, where appropriate, deposits those publications in the Approved folder. Subsequently, the synchronizer retrieves documents that meet the other criteria (Author Name AND Address, for example) and deposits those publications in the Pending folder.
ORCID
If your institution has arranged an ORCID membership, then the ORCID configuration will appear in the list of available data sources.
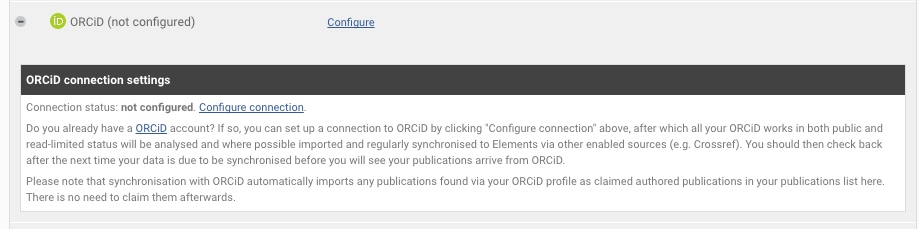
Linking your Elements account to ORCID requires that someone who knows the author's ORCID identifier and password complete the configuration process. Identifiers cannot be uploaded via an API. Also, Elements does not harvest publications directly from ORCID, but rather uses the identifier to import records from data sources which include ORCID identifiers in their metadata (such as PubMed, Scopus and CrossRef). Synchronization will automatically import publications found into the Mine folder.
When you have finished editing your search terms, be sure to click the "Save" button before leaving the page.
What Happens Next?
When you click on 'Save', a message will be posted at the top of the screen, showing that your details have been placed in a queue to be submitted to the online databases. If you would like to search immediately, click the blue "Run my searches" button. Otherwise, the search will occur 30 minutes after you saved the new search settings.
This built-in delay allows you to finish editing before a search takes place. This means that there may be a delay of up to a few hours (depending on the frequency of your institution’s scheduled search) before results are delivered to your "Pending" file.
The system will email you as normal if it finds new publications.
View Your Search History
At any point, you can download a history of all the online database searches carried out on your records.
This can be a useful way of keeping track of how the changes made to your search terms have increased the accuracy of your search and brought back more results.
Click on the link at the top of the search settings screen to download the latest version of your history.
The information is provided in CSV format, which can be opened in spreadsheet programs, such as Excel.
The table shows:
Dates and times of searches for each database
Results of each search
The number of new records found
The number of results matched by the system to existing records in:
approved
declined
pending
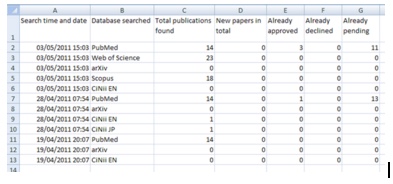
An example of a search history is shown below.
After the searches on 19/04 and 28/04, this user approved three of the publications found and left some in the 'pending' area. These were then matched against the results of the most recent search on 03/05, as shown in the final three columns.
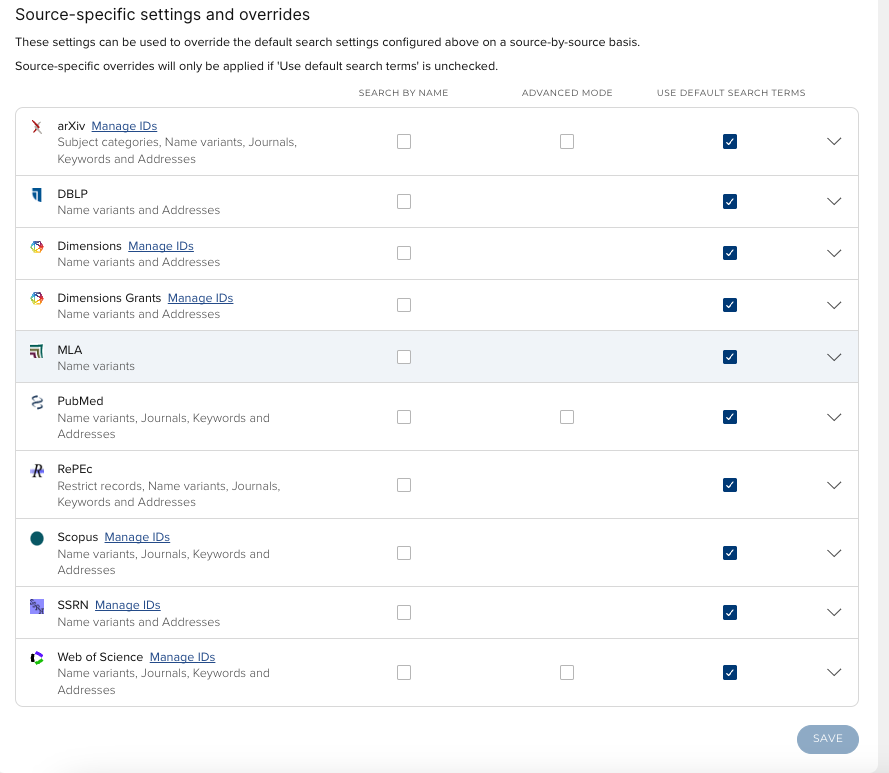
Initially, all the databases will use the common search terms. However, each database can be separated from the common terms so that different search terms can be entered.
This can be useful, for example, if you have a stored 'advanced' search query for one of these databases, which you know accurately brings up all your publications.
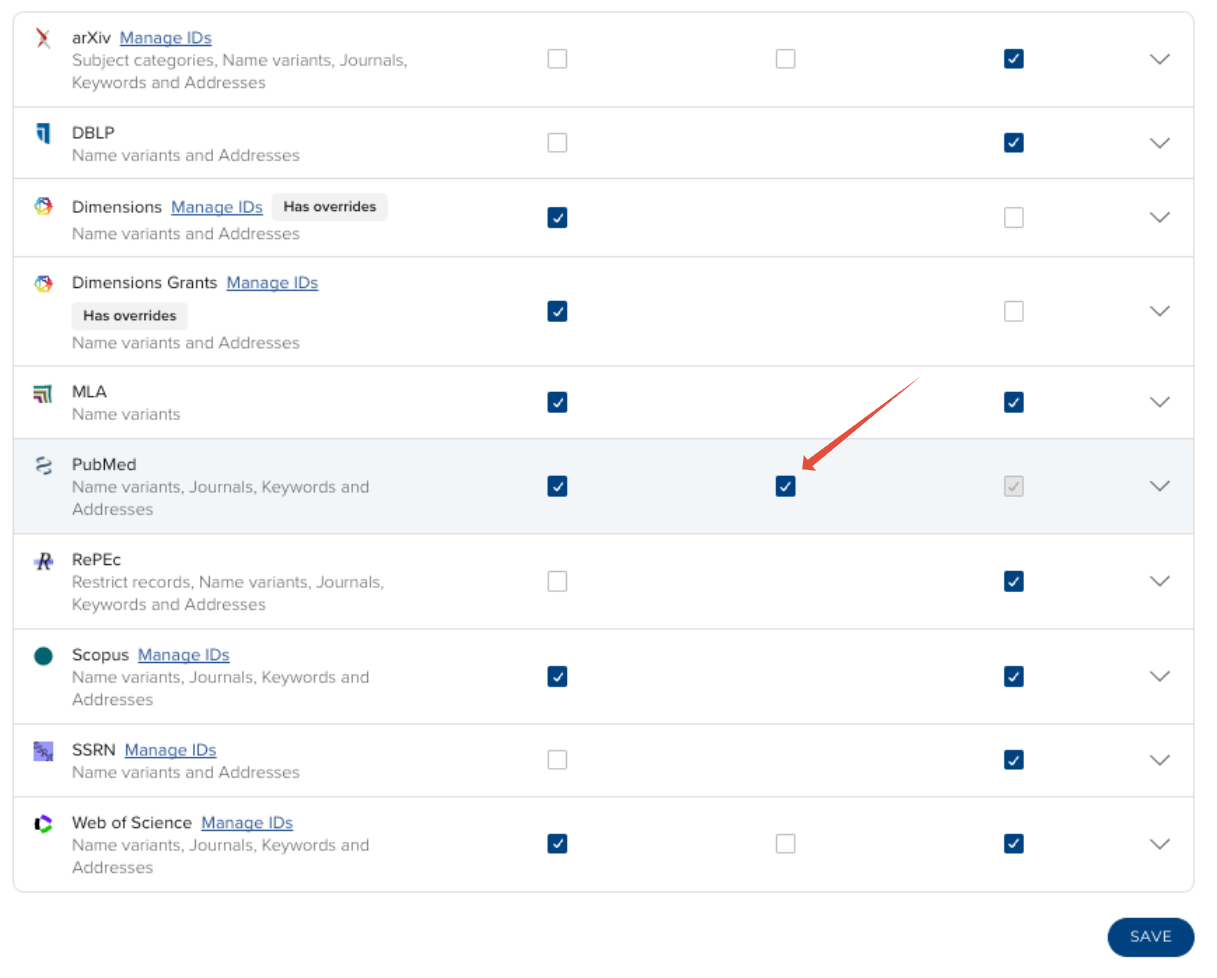
You can also switch each database on or off, depending on its relevance to your research. This is done via the checkboxes in the table at the bottom of the screen.
Usually, your institution will activate all the relevant databases for new users by default, but it may not have a subscription to all the services, so you may find one or more of the databases switched off when you first use the system.
Viewing Search Terms for a Database
To view the search terms for an individual source database, click on the 'plus' sign on the left of its name to expand the view.
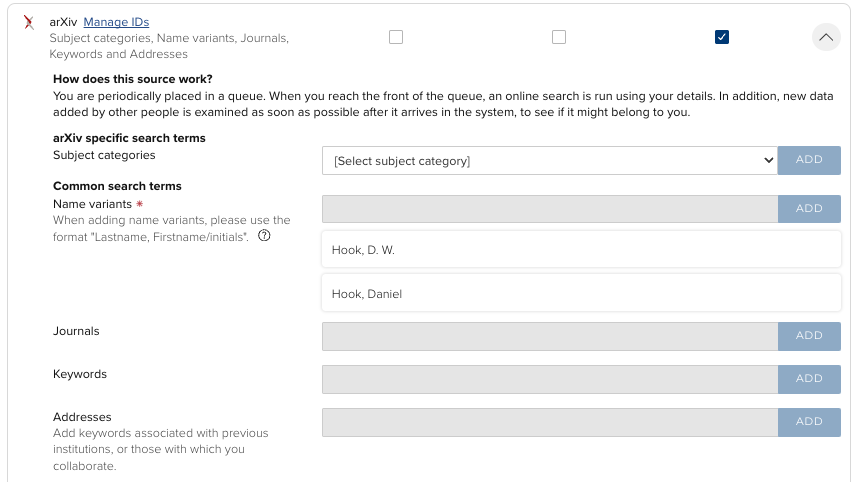
You will see a new section of the screen with any source-specific search terms at the top (the example shown is arXiv) and a set of search terms, including name, address, keywords and journals, below.
Adding Source-specific Search Criteria
Some bibliographic databases have search criteria that can be added without unlocking the common search terms.
In the example above (ArXiv), you can add your personal Author Identifier and any categories under which you publish to the search criteria, and these will be submitted to the relevant database at the next search.
Unlock and Change the Common Search Terms for a Database
Most bibliographic databases have fields that can only be altered after first being unlocked.
Begin by clicking on "Advanced mode."
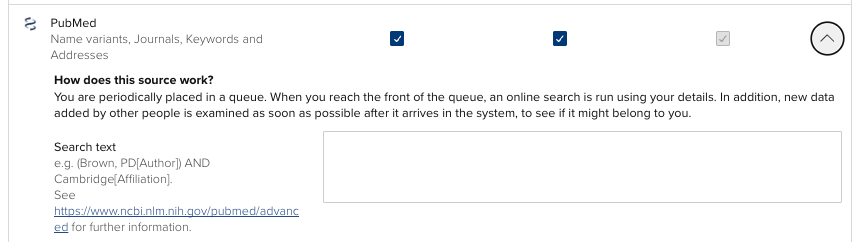
Then, click the arrow symbol next to the database name and the database-specific search text option is displayed.
Common reasons for doing this include when an additional name variant is used only by this database, or when you want to define a more limited range of journals.
Once you have finished editing the terms for a database, click on Save. These alternative search terms will be used during the next search.
A note on Web of Science and Unicode characters
If your name contains accented letters that are found only in the full Unicode set of characters, Web of Science may stall, returning no results from that database. If this happens, it will be shown on your main summary screen in an alert with a message something like 'the query was rejected as illegal' or 'unexpected token'.
To solve this problem, unlock WoS from the common search terms and change any accented characters to the plain 'ASCII' versions with no accents. This change should mean your name is found successfully in this database from then on.
How do I turn off searching for a user?
In Search Settings, turn off searching by unchecking the currently searched box for each database.
Please note: Turning off name-based search terms will not necessarily disable all searches if the author has claimed author identifiers (such as a Scopus author identifier or ORCID) under Automatic claiming.
Also: If a database has been deactivated using named-based searching, but is searched using an author identifier (such as an ORCID), the the searched database will appear in the Status section at the top of the page.
The search settings screen will be updated with the following message indicating you have turned off searching.\

Appendix A: Find individual publications using ID numbers
If a small number of individual publications do not fit your usual search terms for any reason, it is not necessary to change your search settings in order to ensure they are found in the online databases.
All the following databases have a system of identification codes for their online records, and these can be found via their web interfaces and then entered into your search settings screen for download.
arXiv
CiNii
DBLP
Europe PubMed Central
PubMed
RePEc
Scopus
SSRN
Web of Science
Entering IDs
The area for entering database IDs is found within the 'Common search terms' section of the search settings screen.
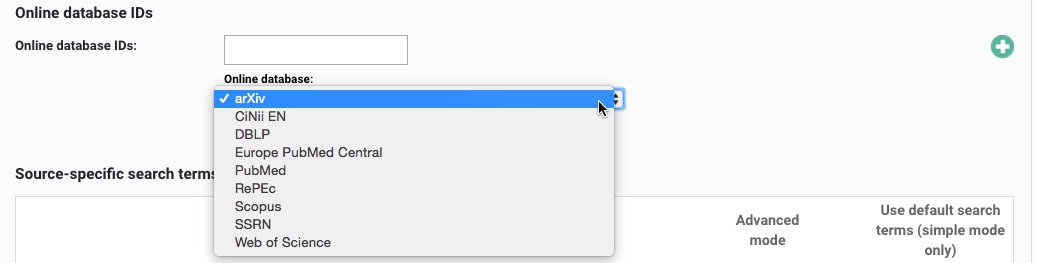
Enter an ID into the text box, select the appropriate database from the drop-down menu and click on the plus button (+) to add it to the list.
Save the search settings when you have finished entering IDs.
What Happens Next?
All the IDs you have added will be submitted in the next online search.
The new publications pulled from the database will be put in the 'pending' area of your records, along with any other publications found, and you will receive an email alert.
You will need to approve all the publications found using this method for them to appear in your publications list.
The IDs that have successfully brought in publications will disappear from your search settings screen once the publication details have been downloaded.
Finding IDs for Each Database
Each online database will store an ID against each publication it holds. However, this is easier to find for some databases than others.
The advice below aims to help you find the correct number for a missing publication using the relevant web interfaces.
Please note: accessing these services may require an institutional subscription.
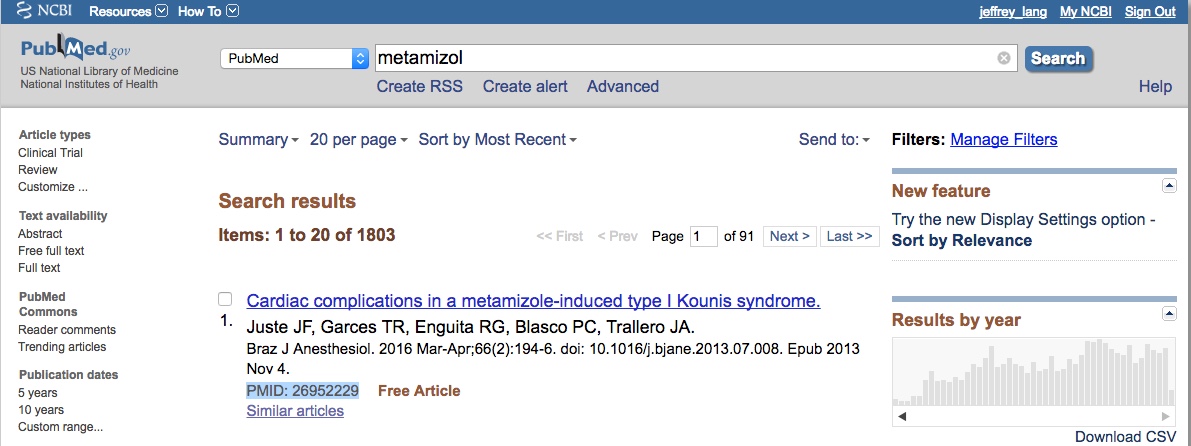
PubMed
PubMed shows ID numbers next to each record in the search results listing, as well as prominently on each individual publication screen.
The 'PMID' number is usually 8 digits long (do not include the phrase "PMID" in the ID field within Symplectic Elements). PubMed IDs are found in search result lists:
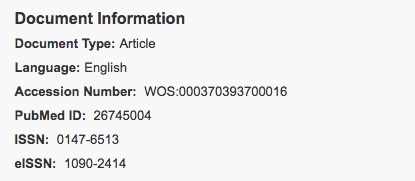
Web of Science
WoS displays an 'IDS' number on the HTML page for each record (e.g. 758YZ), but this is not their unique ID number. The number you want is known as the 'ISI number' or 'Accession Number.'
The Web of Science Accession Number displays in the citation record. The Accession Number for the record shown below is "000335672600003" (do not include quotes or the word "WOS" in the ID field within Elements).
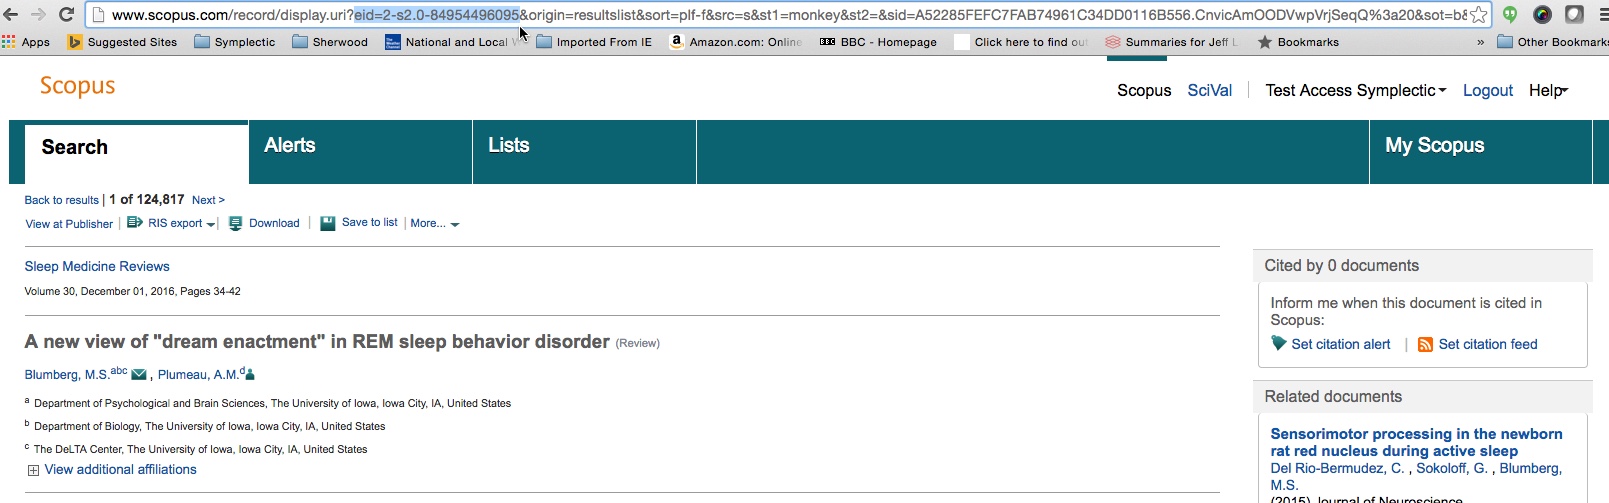
Scopus
The Scopus database does not supply a formal system of IDs. However, the URL for a publication page does contain an identifier that Elements is currently using to identify and collect publications.
This is labelled 'eid' within the URL and is usually of this form:
2-s2.0-76249086347
Copy and paste this from a relevant Scopus publication page into the ID field and the system will download the details.
These may not be permanent IDs, so please make sure to check the publication is correct before approving it for your list. The Scopus reference in the URL can be used as an ID:
ArXiv
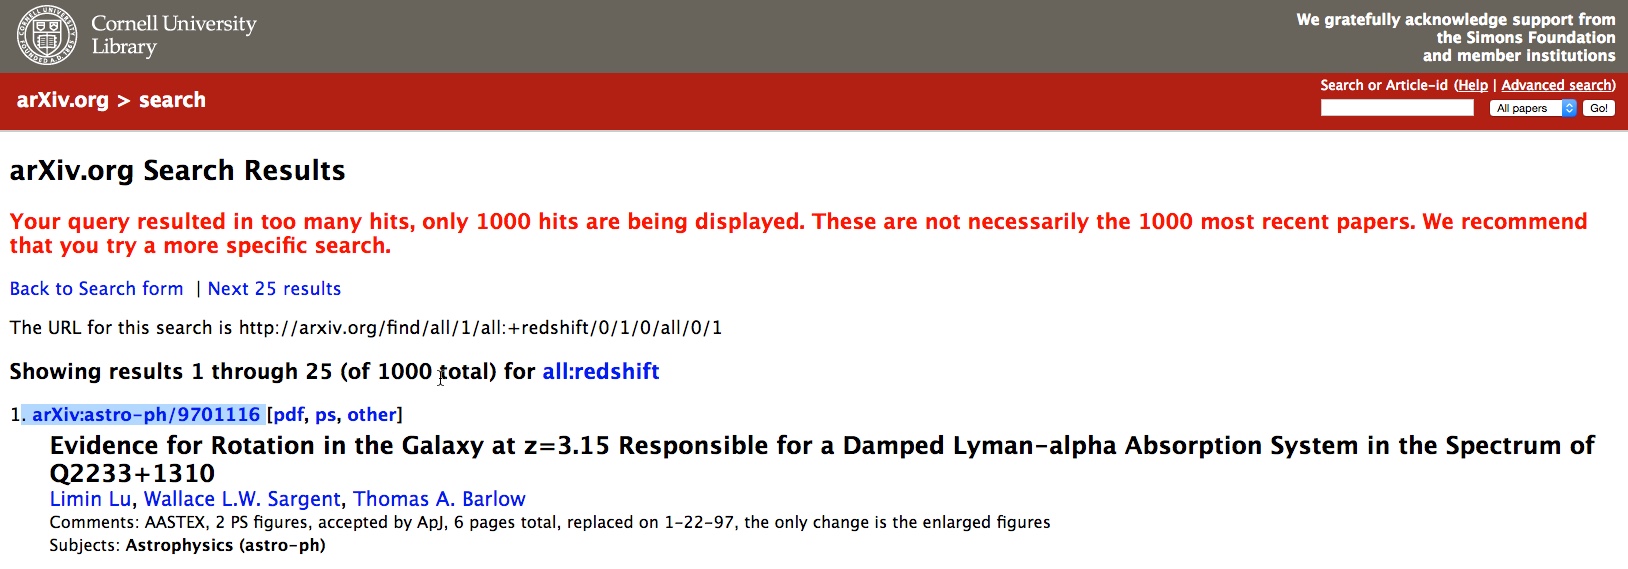
The ArXiv web interface shows IDs next to each record in the search results, as well as prominently on each individual publication screen.
The ArXiv ID is in this form:
1002.2745
(Do not include the phrase "arXiv" in the ID field within Elements). ArXiv IDs are shown in the search results:
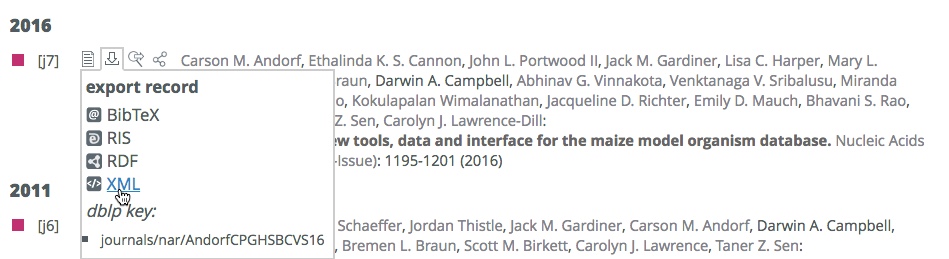
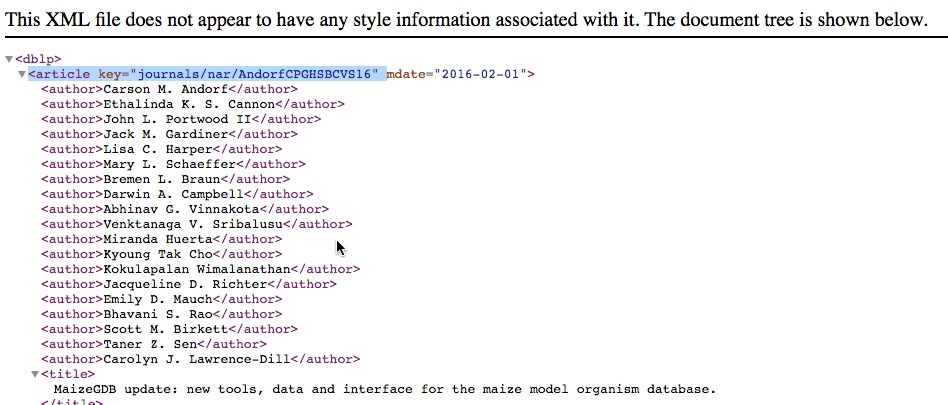
DBLP
The DBLP database stores a reference 'string' instead of a number, and this can be entered into the ID field within Elements as normal.
Within the search results, click to view the bibliographic data as XML and the page that opens up in your browser will show this string (labelled 'article key' at the top of the record).
The string will generally be in this form:
journals/speech/DarwinC90
(Do not include quotes in the ID field within Elements).
For DBLP, click to view the XML record:
CiNii
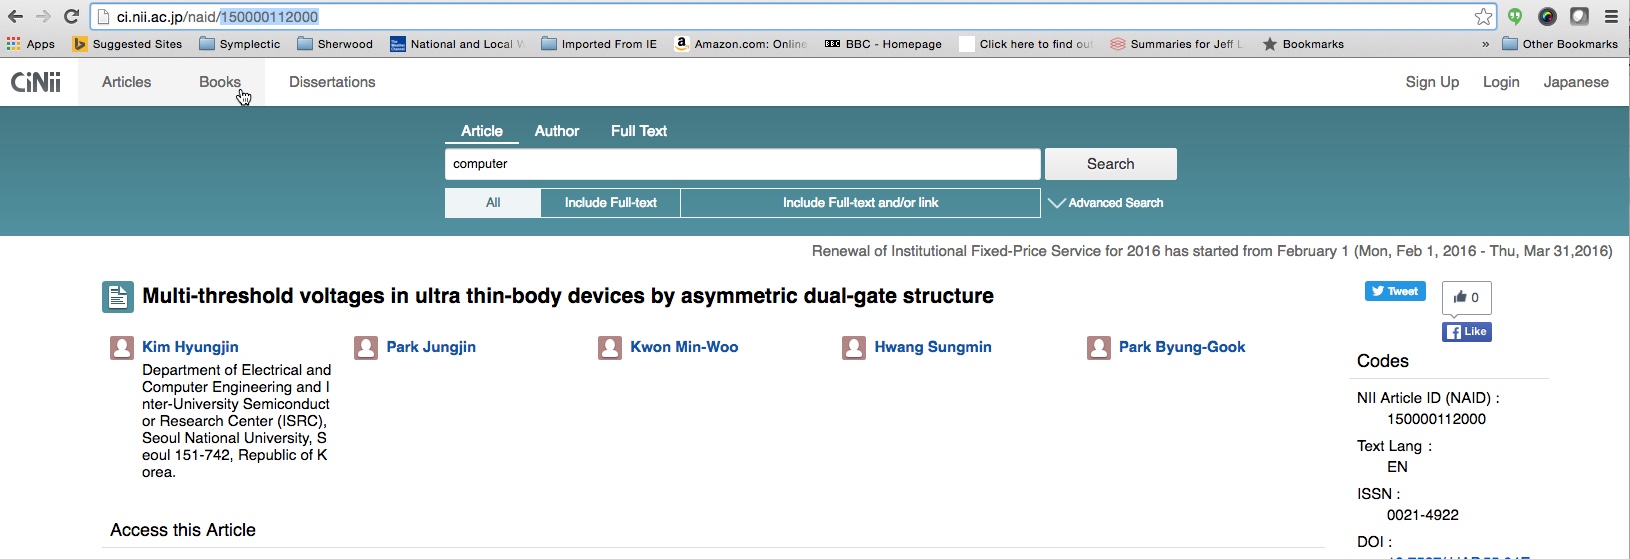
The CiNii databases show their ID numbers in the URL of each 'full details' screen. It will usually be a simple number. In CiNii, use the reference in the URL:
RePEc
In RePEc locate the record for the item. Search https://ideas.repec.org.
Click the title to pull up the record.
Expand the Bibliographic Info segment. The Handle is the label for the RePEc identifier.
Copy and paste the full string – starting with RePEc: and ending with a number.
What happens for incorrect IDs?
If an ID is submitted to a database, but does not match any publications in that database, it will remain in the list on your search settings screen.
You can then identify and delete incorrect IDs and add any new correct versions.
A database must be active for your records before an ID number search can be carried out.
Activate a database by checking the box in the header bar for the database on the search settings screen.
Troubleshooting FAQ
This section provides a brief troubleshooting guide to some of the most common problems experienced by users in searching the online databases.
If your query is not covered here or elsewhere in this guide, please contact your institution’s support staff, via the link on the 'help' page within Elements.
Problem: one publication is not found
Possible causes:
The publication is not (or not yet) listed in the online databases that are activated for your searches.
The publication has already been downloaded, and accidentally put in your 'declined' area.
The publication has not been found because its details differ from the others that have been found.
This may be because the details have been submitted differently for publication, or because of an error in the data held in the online database (e.g. a spelling mistake in your name, or an initial left out).
Solutions in brief:
Check your 'declined publications list.
Check that the publication is available and that the databases in which it appears are switched on for your records.
Check the details of the publication, as they appear on the database web interface.
Compare carefully between these details and your search settings.
Add any new details to your search settings (e.g. add a new name variant, to match how you are listed on the publication).
Problem: a small number of publications is not found
Possible causes:
The publications are not (or not yet) listed on the online databases.
The publications have already been downloaded, and accidentally put in your 'declined' area.
The publications have not been found because they differ from the others.
This is most likely because of a different name variant you sometimes use, or because a group of your papers are listed against a collaborator’s institution.
Solutions in brief:
Check your 'declined' publications list.
Check the details of a sample of the missing publications, as they appear on the database web services.
Compare carefully between these details and your search settings to identify any common differences between this group of publications and your search settings.
Add any new details to your search settings (e.g. add a new name variant, to match how you are listed on the publications).
Problem: publications are not found at all for one or more databases
Possible causes:
Searching for the database has been switched off.
The 'advanced search' option has been accidentally activated, and an empty search string is being submitted.
The 'advanced search' option has been activated and an incorrect search string has been added.
Your search settings contain 'special' characters that the database cannot process (this is only possible for the Web of Science database)
Solutions in brief:
Go to your search settings page, and make sure the box 'Search this source' is checked in the header bar for the database.
Check the 'advanced search' option has not been selected (this radio button is found in the table row for the database).
If the advanced search is intended to be used, check the syntax of the search string, using the web service for the database to make sure it brings back appropriate results.
Check your 'common search terms' for special characters (letters with accents, for example) that Web of Science cannot process. If these are present, you will need to separate Web of Science from the common search terms and replace these search terms with ones that use plain letters only.
Problem: no publications are found for any database
Possible causes:
Searching is switched off. This may have occurred when your record was first created. Your institution will usually switch on the databases for users defined as 'academic staff' and therefore likely to publish. If you have a dual role within your institution, which is not easily classified, you may need to activate the databases in your records by hand.
Publications have been found in the past, but have all been placed in the 'declined' area by mistake.
Your search terms are being submitted but are so narrow that they do not bring back any publications.
Your search terms are so wide they bring back too many publications, triggering a fail-safe within the system.
Other errors may have occurred for your search terms.
Solutions in brief:
Go to your search settings page, and make sure the box 'Search this source' is checked in the header bar for each database.
Check your 'declined' publications list.
Check your common search terms and make sure you have suitable name variants entered.
If there is an 'address' term, check this is relevant to your publication history and add/remove institution name and address terms as appropriate (for example, you may be new to your current institution and need to add the name of your previous workplace instead).
If there are keywords, consider removing these completely. These can make the search very narrow, since each category of search term is added using the 'AND' logic operator (see page 7).
If there are only name variants, check the top of your 'search settings' page to see if an error is being reported due to too many results being obtained.
If a database reports finding more than 2,000 results for a search, the system will operate a fail-safe and not download all these details. You should therefore add 'address' terms or keywords to narrow your search to find a smaller number of publications.
If an error has occurred for any other reason, this will also be reported at the top of your search settings screen. If you cannot resolve the issue listed in the error, you should contact your institution’s support staff, via the link on the 'help' page within Elements, quoting the error message in your email.
Note: at the top of your search settings screen, database errors are reported in this form:
The last automated searches took place on 15 Jun 2010 at 12:51. The following issues occurred:
Web of Science: Too many search results (6026).