
Repository Tools 2: Configuring EPrints
Introduction
The EPrints data source allows the harvest of publications from your EPrints institutional repository to Elements, via a Repository Tools 2 (RT2) integration. If you have a licence for the Repository Tools Module, the RT2 integration can also be configured to allow users to deposit publications from Elements to your EPrints repository.
The RT2 repository data sources do not function in the same way as the publisher/aggregator data sources and it is important that they are set up and configured correctly.
Important notes before you start
Please ensure you do not enable this data source without following the preparation, crosswalking and configuration processes. We strongly recommend that all of these steps are first performed and tested in a Test environment before they are applied to your production instance of Elements. Please ensure you have read and completed the steps outlined in Repository Tools 2: EPrints as a data source.
Step 1: Manage Data Source: EPrints
The EPrints data source is configured using the page "Manage data source: EPrints".
Elements 6.x: Open Access > Repository > EPrints
Elements 5.x: System Admin > Data > Data Source Management > EPrints
Note: We recommend that you disable this data source while changing settings. This will prevent Elements from pre-emptively processing changes while you are altering settings.
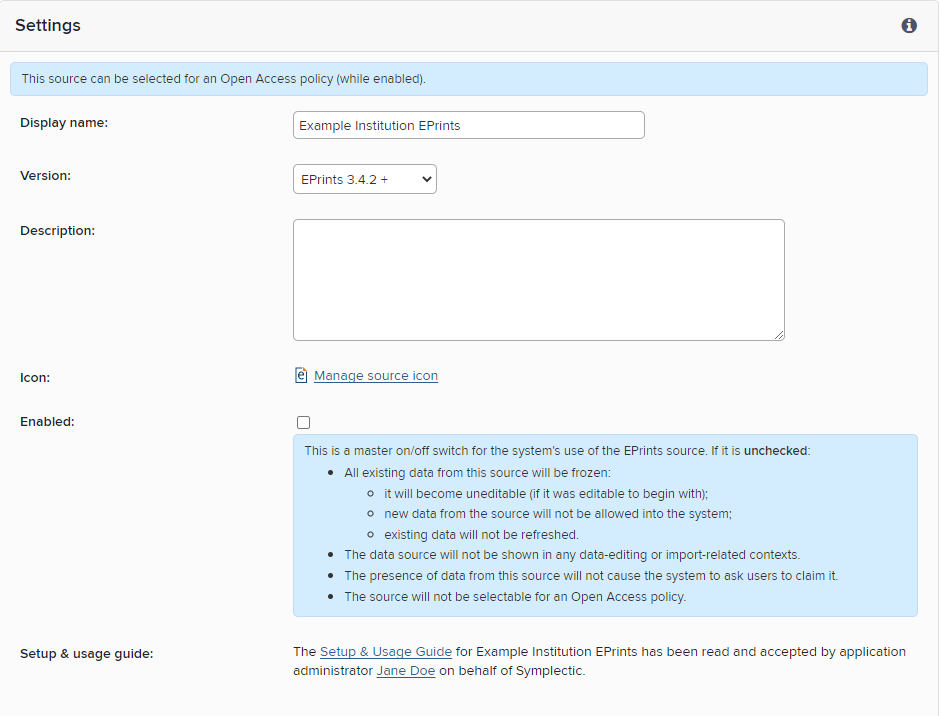
Display name: The name that Elements should use for your EPrints repository.
Version: Choose the option that corresponds to the version number of your EPrints instance.
N.B. If your EPrints system is running on version 3.3.14 or 3.3.16, choose the "3.3.15" option. If running another version which is not represented in the dropdown options, contact Symplectic for advice.
Description: An (optional) brief description of your repository.
Icon: You can optionally replace the default EPrints icon with one consistent with your repository's branding. You can upload either (a) a square SVG vector image file, or (b) a 16x16 pixel PNG or JPEG image file.
Enabled: Check this box to enable the connection between Elements and your EPrints repository.
N.B. When the connection is enabled for the first time, Elements will immediately start a full harvest of public items from the repository. Therefore, make sure that the RT2 connection is correctly configured, including crosswalks and relevance scheme, before enabling the connection.
Setup & usage guide: Before you can enable the connection, you will need to confirm that you have read the Setup and Usage Guide for EPrints. This contains important information about the setup of your connection between Elements and EPrints.
Step 2: Configure connection settings
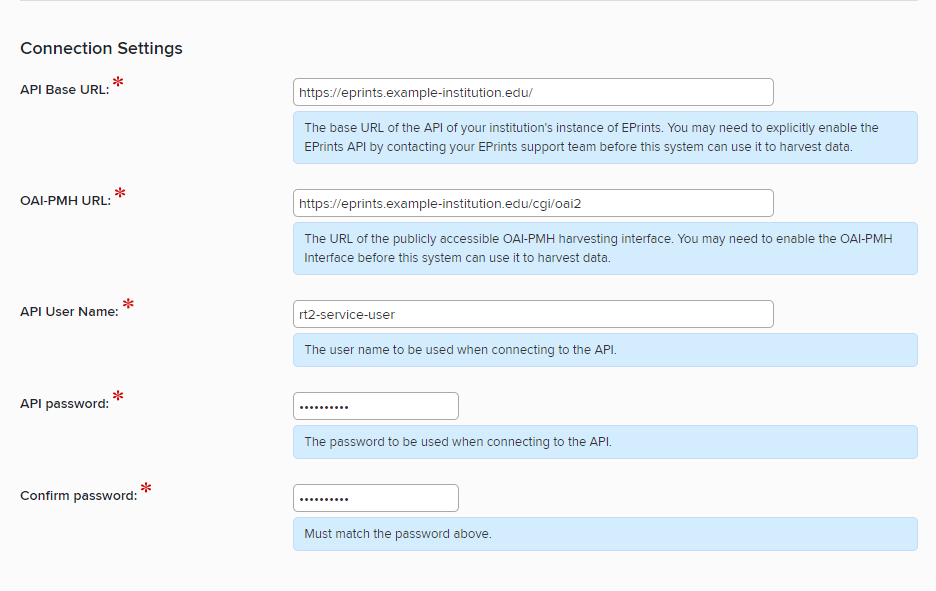
API Base URL: The base URL or the EPrints CRUD API. Typically, this will be the same as the base URL for the EPrints website but it may vary. You may need to contact your EPrints service team to enable the CRUD API interface associated with your instance of EPrints, and to obtain suitable credentials allowing Elements to be configured to use it.
OAI-PMH URL: The URL of the EPrints OAI-PMH endpoint.
API User Name: The name of the EPrints admin user to use when harvesting or depositing data.
API Password, Confirm Password: The password for the API user specified above.
Step 3. Configure harvest settings
These settings control how items are harvested from your EPrints instance.

Differential harvest enabled: If checked, Elements will perform an hourly check for changes to public items (including newly archived items) in EPrints.
Sets to harvest: Select Elements should harvest all public repository content or from named OAI-PMH sets only. If harvesting from named sets, enter the name of each set to harvest from on a separate line in the text box.
A list of sets can be obtained from the OAI-PMH API - use the base URL plus "
?verb=ListSets" e.g.https://eprints.example-institution.edu/cgi/oai2?verb=ListSets. List sets to harvest using thesetName, not thesetSpec.Tip: to prevent accidental harvesting during initial setup, select "Named sets" and enter a single name which does not correspond to any set in EPrints. If the RT2 EPrints connection is accidentally enabled, this will prevent any items from being harvested.
Use cached values for the embargo date: This controls whether to use a cached value for the embargo date, if embargo dates are removed in the connected system when the file becomes live. This feature was implemented specifically to counteract an optional process in Eprints which deletes embargo end dates upon lifting them. If you are regularly running the scheduled job lift_embargos on the connected EPrints system, then this option must be checked in order for embargo dates to remain accurate.
Use verbose logging when harvesting: whether Elements should save a copy of data that is harvested before and after the harvest crosswalk mapping has been performed. This option can be helpful when testing crosswalks. It should be turned off in general use.
Step 4. Configure User Group Settings
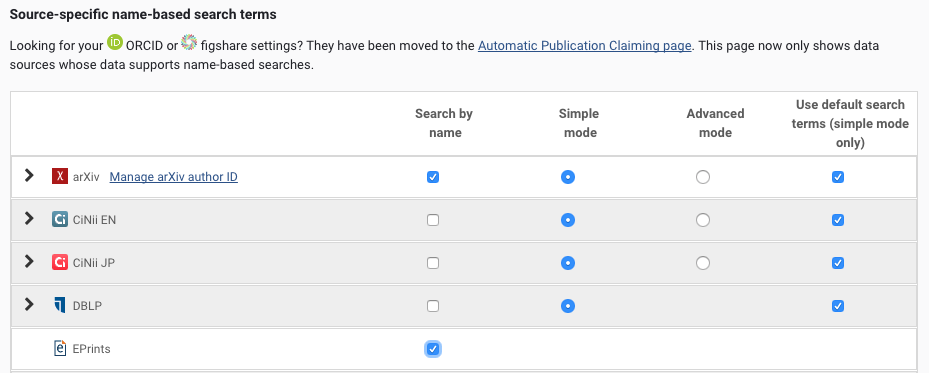
Once Elements has harvested the records from EPrints, the offline search functionality within Elements will match those records to users. To do so, the data sources and user search settings need to be configured to enable EPrints search which will assign EPrints items to the appropriate authors in Elements.
Review the Default Data Sources (reached via the System Admin menu) for users of Elements, to make sure that your users have access to search against EPrints data. You may also wish to review access on a per-group basis as indicated in the help text.
Users will now have access to search EPrints data. Next you need to bulk update your users search settings by group to enable that search on their behalf. To do this, visit the "bulk update search settings" link on the Manage Data Sources page:
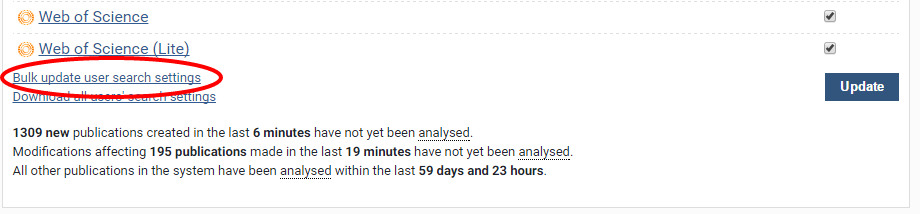
On the next page, select EPrints and the users or groups of users for whom you wish to enable EPrints data searches. Choose to "Enable search for the selected users" and click update.
Review the search settings of at least one relevant user, to confirm that their search settings now indicate that EPrints data should be searched for the user:
Please note that currently, unlike for other data sources, only system administrators are able to alter the state of the checkbox shown above.
Step 5: Configure deposit settings (Optional, Repository Tools Module licence required)
These settings control how items are harvested from your EPrints instance.
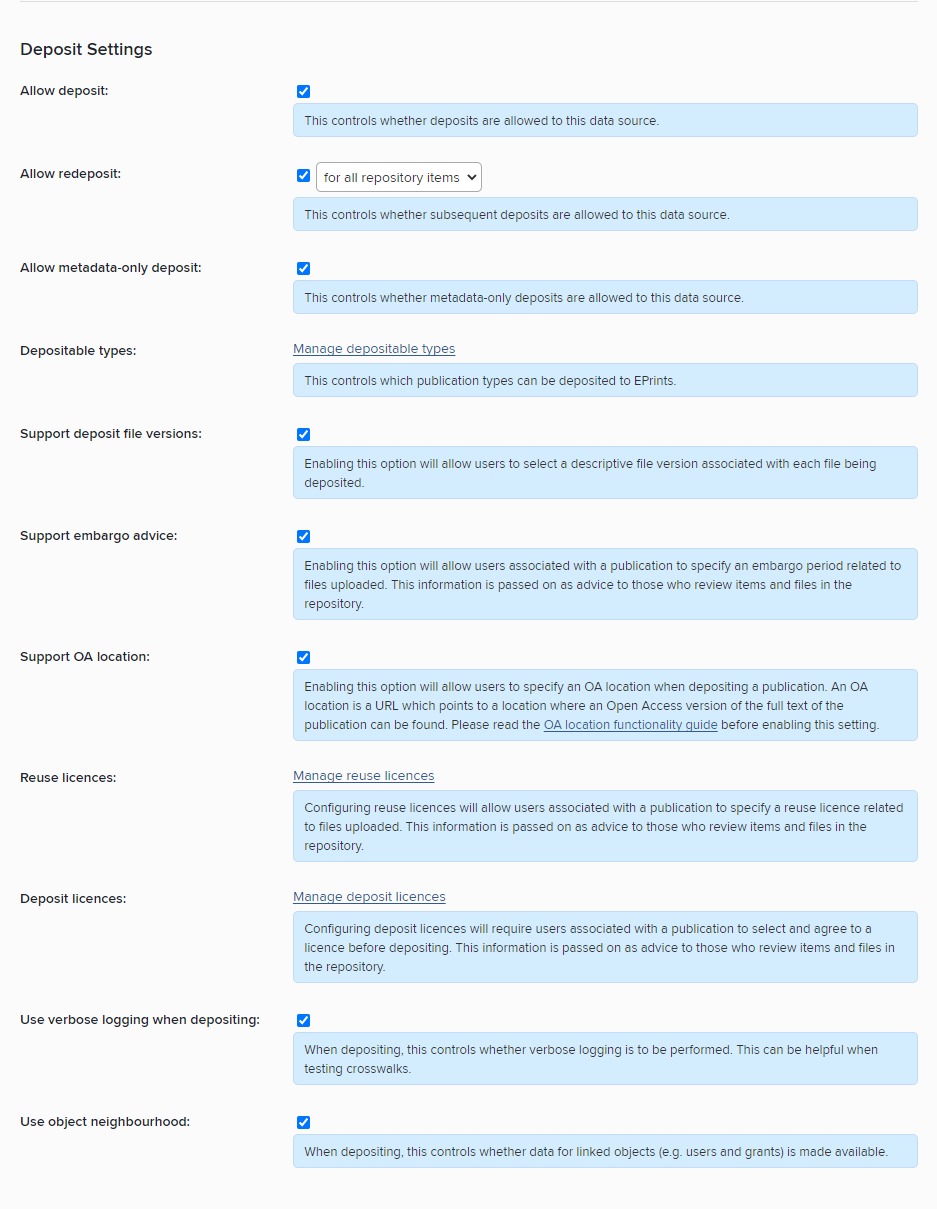
Allow deposit: Select whether to enable deposit to your EPrints system.
Allow redeposit: Select whether to allow depositors to send additional files to the repository after the initial deposit. With this option enabled, users will see a 'View Deposit' button next to the repository status when viewing a deposited publication. This button will take users to a new 'Redeposit' page where additional files can be uploaded and added to the repository item.
The publication in question will maintain its existing repository status (eg. In Review or Live); this is not altered by the subsequent deposit. Instead, all files added via redeposit are automatically restricted to repository staff only and have the description added identifying who deposited the additional file. Institutions can then set up their own event-based trigger or include the file in a scheduled email of 'items of interest' to easily identify it for review.Allow metadata-only deposit: If this option is enabled, users will be able to make metadata-only deposits to EPrints, i.e. to deposit items that have neither an file attached, nor the URL of an Open Access location.
Depositable types: Opens a new page where you can choose which publication types can be deposited from Elements to EPrints via RT2.
Support deposit file versions: If this option is enabled, the deposit page will include a dropdown from which users can select the version of the file and/or OA Location they are including with the deposit (e.g. "Published version", "Accepted version").
Support embargo advice: This allows institution to choose to allow users to suggest an embargo period when making a deposit. The embargo period ID and name should be crosswalked to the repository to be reviewed and enacted by administrators. Please note this can be crosswalked into the file description field using the file-level metadata crosswalking capability.
Support OA location: Allow users to deposit with a link to a location where an OA version can be found. This can be as well as or in place of a file.
Reuse licences: This allows institutions to select which reuse licences a user can select from when depositing a publication. By checking one or more boxes on the Manage Reuse Licences page, the reuse licence functionality will appear on the deposit page. The reuse license ID and name should be crosswalked to the repository to be reviewed and acted upon by administrators.
Deposit licences: This allows institutions to require users to agree to a deposit licence when depositing a publication. Institutions are asked to define a unique ID for the licence, a name of the licence and to upload the licence file. Once enabled, the license will appear on the deposit page. The license ID and name should be crosswalked to the repository to record which license was agreed to at the point of deposit.
Use verbose logging when depositing: whether Elements should save a copy of data that is deposited before and after the crosswalk mapping has been performed. This option can be helpful when testing crosswalks. It should be disabled during general use.
Use object neighbourhood: This allows institutions to choose to crosswalk metadata about users, grants, or publications related to the publication being deposited.
Grant Repository Tools module access
You will also need to ensure that users are given access to the repository tools module in order for them to see the deposit button. To do this, go to System Admin > Group Management > Module Access, check the Repository Tools box and select the users or groups of users you wish to grant access to.
N.B. in older versions of Elements, the Module Access page is in the menu under User Management, not Group Management.
Further reading
For help with updating and testing EPrints crosswalks - see Repository Tools 2: Updating and Testing Crosswalks.