
Elements Upgrade and Patching Guide
This article provides step-by-step instructions on how to upgrade and patch Elements.
Upgrade: a scheduled release of new features
Patch: a fortnightly release of bug fixes
The central difference between the two, is that a patch is 'faster' as it does not require the Index to be rebuilt.
Step 0: Prepare for upgrade
Read the upgrade advice for the version you are upgrading to (Elements Upgrade Group). Make sure you understand the changes that are introduced in a new version of Elements. These may include the deprecation of an Elements API endpoint, which will impact downstream systems (e.g. Altmetric/EFI).
Step 1: Take a backup of Elements
Back up your current Elements database.
Back up the Elements binaries from <Main_Installation_Folder>.
Step 2: Download the upgrade pack
Download the latest upgrade pack from the Elements Upgrade Packs forum on the Symplectic Support site and expand the zip file. For the rest of this article, we will call the expanded folder <Latest_Build_Folder>.
Note: See the first section of the Elements Installation Guide for suggestions on where to expand the zip file.
Note: It might be necessary to "unblock" the ZIP file before expanding. This can be done by right clicking the file and selecting Properties.
Note: It is recommended that you follow the upgrade pack topic so that you are notified of any patches that are issued.
Step 3: Enter maintenance mode
There are two ways to put your current, running instance of Elements into maintenance mode.
1. Via web.config
Uncomment the "notice" flag in the file <Main_Installation_Folder>\Website\web.config. In other words, replace:
<!--add key="notice" value="Site under maintenance. Please come back shortly."/-->with:
<add key="notice" value="Site under maintenance. Please come back shortly."/>then save the file.
Note: Once this flag is set, all users except the system user will be expelled and locked out from the system.
2. Via app_offline file
An easier method to stop Elements running is to use an undocumented feature of IIS, that stops the web server from serving requests:
Go to <Main_Installation_Folder>\Website\
To stop Elements, rename file to 'app_offline.htm'
To start Elements, rename file to 'app_offline.htm.online'
Please note that this approach will serve the static website defined by the file. This can be customised (HTML, CSS) as you please.
Step 4: Run the Setup utility
Run the Elements Setup utility, <Latest_Build_Folder>\Setup\Setup.exe. Ensure that Services.msc is not open.
Step 4.1
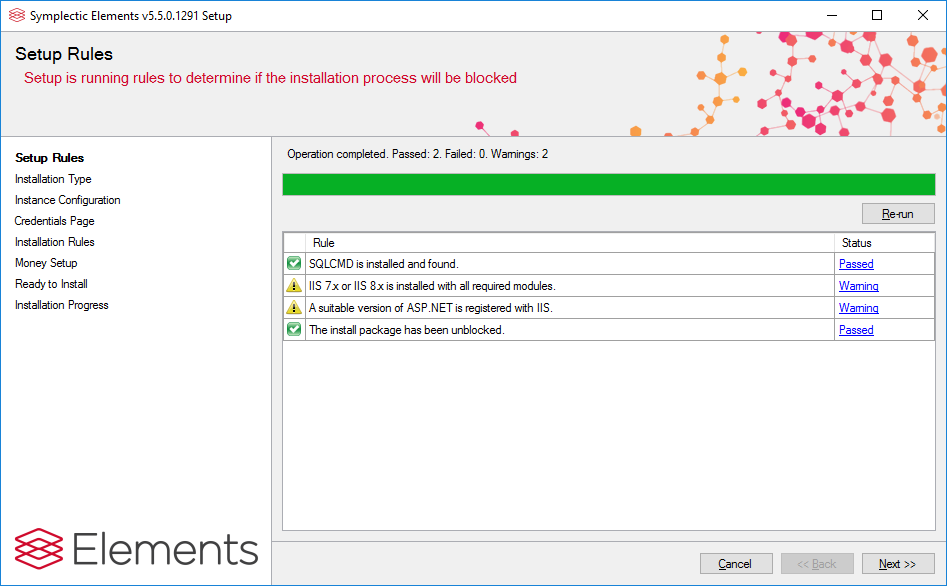
The “Setup Rules” page runs checks to ensure your system is correctly configured to run the utility. The status of each check is one of three possibilities:
Passed: this part of the system configuration is correct.
Warning: the check detected a potential issue. Installation can proceed, but you should make yourself aware of any consequences first, or fix the issue.
Failed: the check failed. You must correct the system configuration before installation can proceed.
You can click on the status to get more information about issues and errors.
Step 4.2
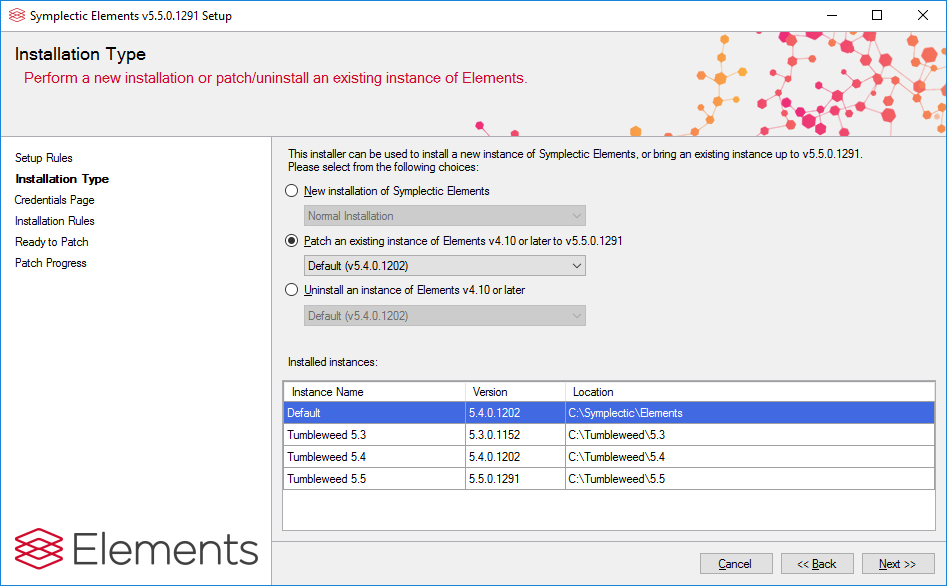
Select "Patch an existing instance of Elements". Should several instances of Elements exist on the same server, please ensure that you select the correct instance to upgrade from the drop-down list.
Step 4.3
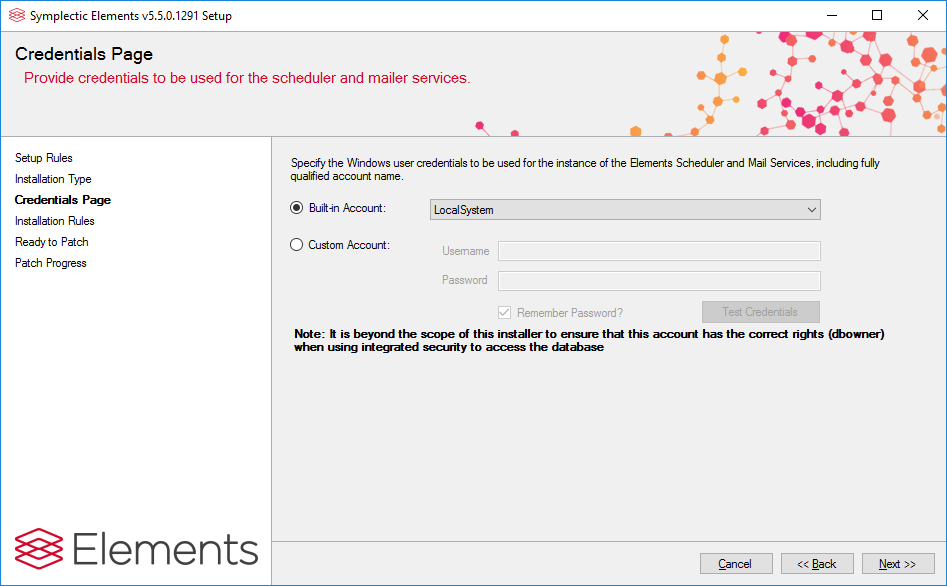
On the Credentials Page you should specify the Windows account used to run the Elements Scheduler and Mail Services. This may be built-in account (i.e. Local System, Local Service or Network Service), or a custom account. If the latter, you will need to specify or confirm the Windows user credentials for the custom account.
Note: if you are unsure which account is being used, run Windows Services Panel (services.msc) and locate the "Symplectic Elements Scheduler" and "Symplectic Mail Service" services for your Elements system. The account running each service will be listed under 'Log On As'.
Step 4.4
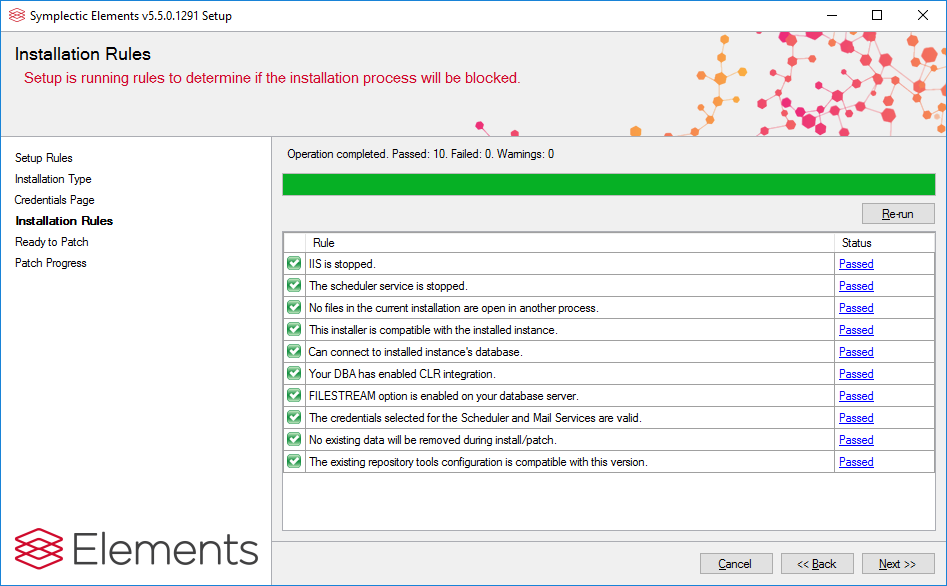
The “Installation Rules” page will run a series of checks on your system to ensure the upgrade can be completed successfully. Please click on any “Warning” or “Failed” status messages that might appear.
Step 4.5
In order to successfully upgrade the system, a number of programs may need to be shut down such as Internet Information Services (IIS) and the Elements scheduler service. You will be prompted to do this by the utility. In particular when stopping Internet Information Services (IIS), you will be presented with the following window:
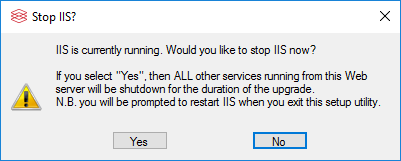
If you only host one Elements instance on your server, it is safe to select “Yes” and proceed.
If however, you host more than one Elements server on the same server, shutting down IIS will shut down all access to all instances. For this reason, the option “No” allows you to proceed with the install without shutting down IIS. However, it is absolutely necessary to ‘stop’ the website of the instance you are upgrading in IIS Manager before proceeding further.
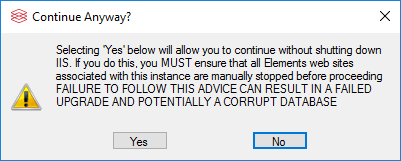
Note: If you are uncertain about any of the above, please raise a support ticket.
Step 4.6
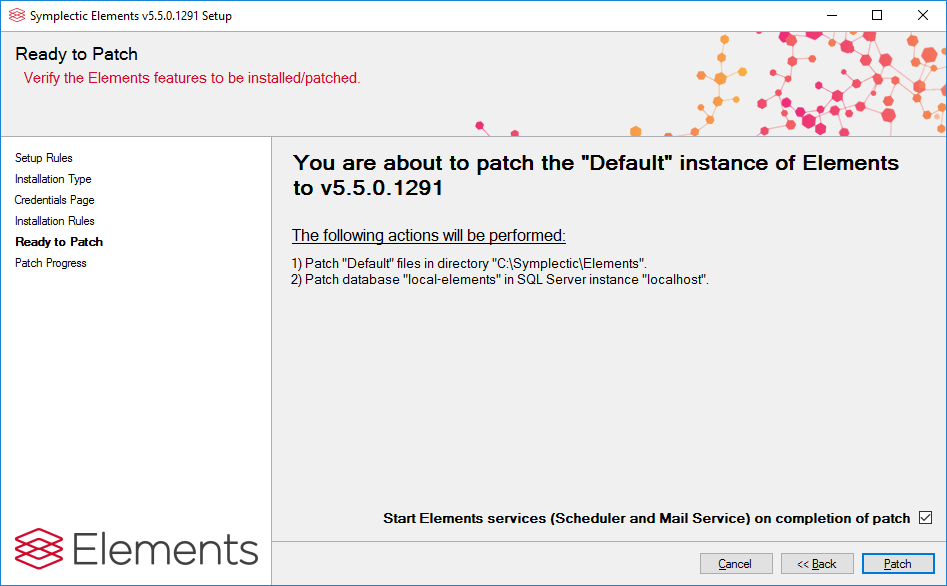
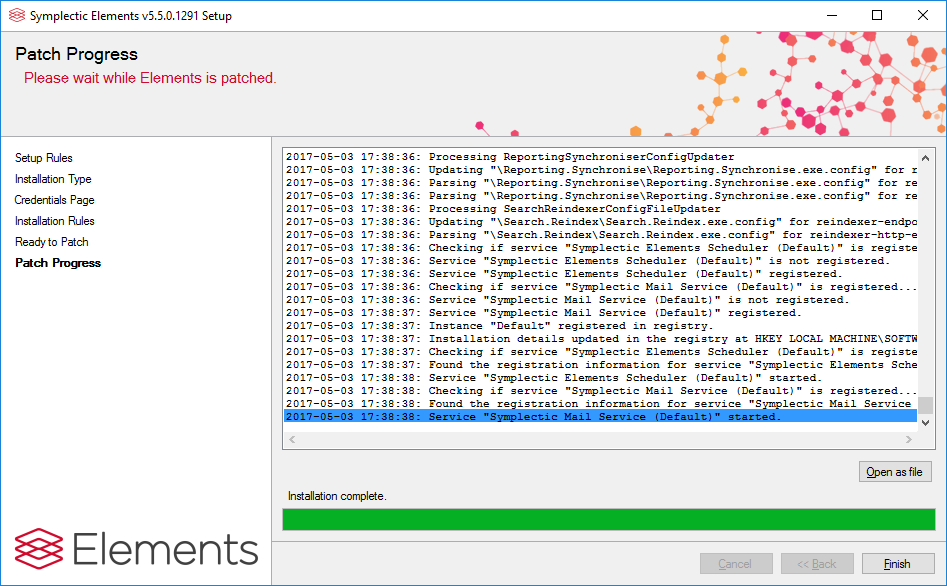
You will be presented with a confirmation page that you must review before proceeding. Once you are satisfied with the actions the utility will perform, click “Patch” to begin the update.
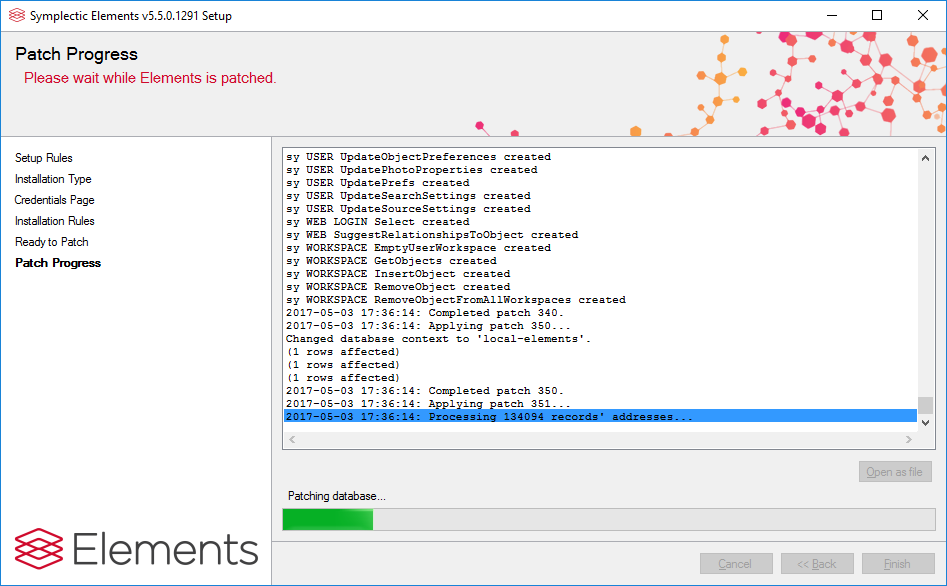
You will see a progress report as the Setup utility upgrades Elements.
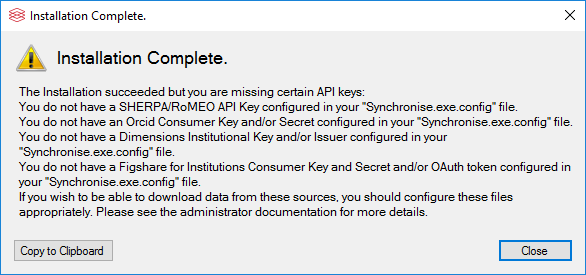
Once the installation is complete, the Setup utility will show a message reporting on the results of the process. Review this message to see if any further action is required. You may decide to ignore warnings if they are not relevant to you (for example, if you do not plan to use a data sources that is not configured).
Once you have made a note of any further actions, click on "Finish" to close the installer.
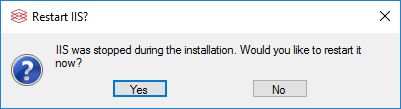
As the installer closes, you will be prompted to re-start IIS if you stopped it earlier. Click "Yes" to restart the Elements web application.
Your Elements system is now upgraded. However, before the system is opened up to users again, there are some further steps that must be completed to ensure that data is presented correctly in the new version of Elements. Log in to the Elements instance using an account with System Administrator rights.
Step 5: Build a new Index
Note: If you are simply patching an existing version, you do not need to do this step unless instructed to in the patch description.
If you have upgraded to a new version, navigate to System Admin > Jobs & Scheduling > Search Index Management. Unless it is already running, in the "Reindexing all data from scratch (full reindex)" section, click on "Reindex all data from scratch".
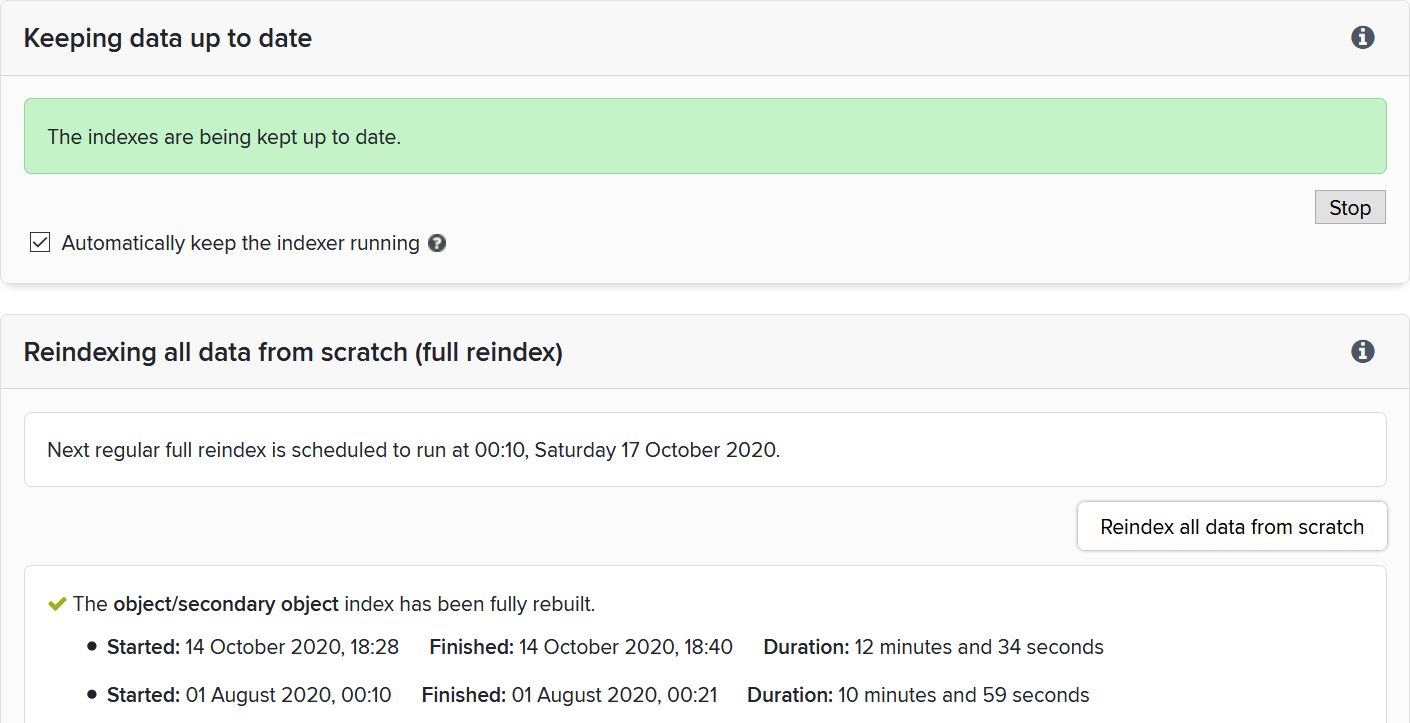
Note: we recommend scheduling full reindex runs on a weekly schedule. To avoid performance issues, you should schedule these at times when the system is not in heavy use.
Step 6: Rebuild the Reporting database (and reload it)
If you are using the Reporting database, you will need to rebuild it following an upgrade or a patch.
Navigate to Search & Reporting > Configure Reporting > Reporting Synchronisation. In the "Rebuilding the reporting database (structure synchronisation)" section, click on the red "Rebuild the reporting database" button.

Note: Please see Reporting Tools administration for full details of reporting database rebuilds.
For Elements v5.19 and later, a subsequent installer page will ask for separate SQL Server login credentials for use by dashboards when Elements is running. Integrated Security is not supported for these credentials. Enter the username and password of a SQL Server login (may exist at the present time, or which can be added later) on the same instance of SQL Server to which the reporting database will be installed. Make a secure note of the username and password you used at this step.
For Elements v5.19 and later, in order to ensure Elements dashboards can correctly and securely connect to the new reporting database, the Reporting database has to be 'dropped and reinstalled' on the server, as described in the How to Install the Reporting Database article.
Step 7: Redeploy CV functionality
If you had deployed the CV export functionality in your old version, you will need to redeploy "Elements CVs" using the Reporting Setup Utility. See How to configure CVs in Elements for details of this process.
Step 8: Review Scheduled Jobs
Check the status of Scheduled Jobs, particularly the background services, they should be active and running.
Step 9: Exit maintenance mode
Reverse the method chosen to enter maintenance mode in Step 3.
Your Elements system is now upgraded and fully functional and you can inform your users that it is once again available.