
Repository Tools 1: Module Administration - Repository Connection
N.B. This article relates to the Repository Tools 1 (RT1) protocol, which is no longer supported as of Elements 6.11. New repository integrations should use Repository Tools 2 (RT2).
This article outlines how you manage the properties of new and existing Repository Tools 1 (RT1) Repository Connections along with file version labels and licensing configurations.
Licence Settings
To see if you are licensed for the module, go to System Admin > Setup > Licence. Repository Tools is listed last under "Open Access." If you don't see it, please raise a support request.
System Settings
Module Access
To ensure that academic users can deposit items first you will want to enable access for the appropriate users or groups. Navigate to System Admin > User Management > Module Access and select the Repository Tools module. Then, add the required group(s) or user(s). Review the Manage module access article for more detail on enabling system wide access.
Configure Repository Connection
Navigate to Open Access > Repository Tools > RT1 Repository Connection.
Add a new Repository Connection - configure a connection and populate the properties in each section based on the details you see in the Existing system connection screens below.
Existing Repository connection - Select existing connection to open the edit properties screen or delete existing connection. This may have been configured during installation.
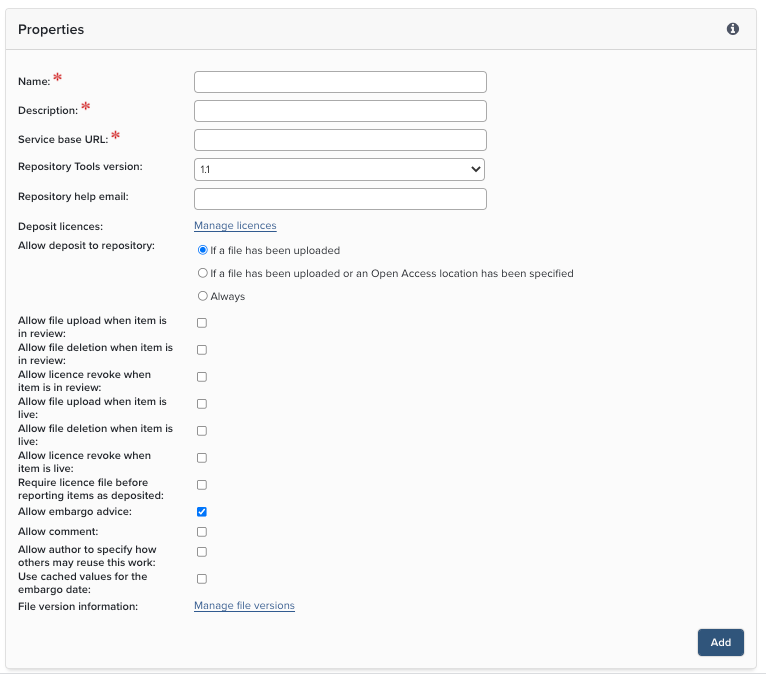
Repository system connection properties
Name - this name will appear as your system connection name on the repository section area of the view object screen, the brief summary screen and end user profiles.
Description - the description is only used in the system properties screen.
Service Base URL - the location of the repository connector. Make sure you are acting on the advice of technical staff within your institution, or Symplectic’s consultants, before changing the details of the Service Base URL.
Repository Tools Version - version v1.1 should be selected. You can download the Repository Tools API 1.1 Schema from the API Schema article.
Repository help email - change this to your local repository email address.
Available licences - at least one licence must be selected for the Repository Module to allow deposits. Licences configured under Manage Licence can be enabled with the checkbox.
Allow deposit to repository - this section allows you to specify the conditions under which a user may make a deposit to the repository. The first option mandates that a file is uploaded before the user can deposit. The second option mandates that either a file is uploaded or the user has specified the URL of an existing Open Access full text. The final option allows deposit with no conditions (metadata only item).
Allow file upload when an item is in review - uncheck to prevent end users having the ability to upload the files when an item has not been made live (in workflow)
Allow file deletion when an item is in review - uncheck to prevent end users having the ability to delete the files when an item has not been made live (in workflow)
Allow licence revoke when item is in review - Enabling this option will allow users associated with a publication to revoke the publication licence when the publication is in review in the repository.
Allow file upload when an item is live - uncheck to prevent end users having the ability to add files in the Elements deposit menu. If checked, the action of adding or deleting files by an end user will create a repository clone and new permanent URL. Repository Administrators can still perform these actions directly in the Repository without creating a clone or new URL.
Allow file deletion when an item is live - uncheck to prevent end users having the ability to delete files in the Elements deposit menu.
Allow embargo advice - check to allow deposits to include an embargo period. The periods available are fixed and are not editable. The values are passed as metadata text in the Repository Crosswalk to be applied manually by Repository Administrators.
Allow Comment - Check to include a free text input box when full text is deposited. This can be used by the end user to communicate information about embargoes or alert Repository Administrators to queries and questions.
Allow author to specify how others my reuse this work - Check to include the option to apply a Creative Commons licence to full text deposits.
Use cached values for the embargo date: This controls whether to use a cached value for the embargo date, if embargo dates are removed in the connected system when the file becomes live. This feature was implemented specifically to counteract an optional process in Eprints which deletes embargo end dates upon lifting them. If you are regularly running the scheduled job lift_embargos on the connected EPrints system, then this option must be checked in order for embargo dates to remain accurate
Manage File Version Labels
The following configuration options are available for deposits that contain files or have an OA location:
File version labels - Select to configure file version labels for publications types.
Usage - Select from the following options: "Required", "Optional", "Do not use"
File versions - Add the versions for default files as a comma-separated string of text. This allows you to use terminology that is familiar at your institution.
File version help text - You can create help text that will show as a tool tip.
Override by publication type - To override by publication type, add file versions as a comma-separated string of text and click the plus (+) icon. In the screen shot below, "Theses" will display unique version types. Override types can be deleted, indicated by the red cross.
Manage Licences
You can enable more than one licence, and you must have at least one licence to be active on the system properties screen for repository deposits to become available to end users. The following options for licence configuration are available:
Add a licence
Select licence file for upload - Click on the "Choose File" button and locate the licence file you wish to make available (Note: any file format is accepted)
Enter a label for this licence - Add text. The text will be viewable on the repository deposit screen in the licence agreement section.
Enter a description for this licence - Add help text. This text will be viewable in the licence agreement section.
Select repository - Check to enable.
Add licence to the list - When you've completed your selections and added text, click this button to add the licence to the licence availability screen.
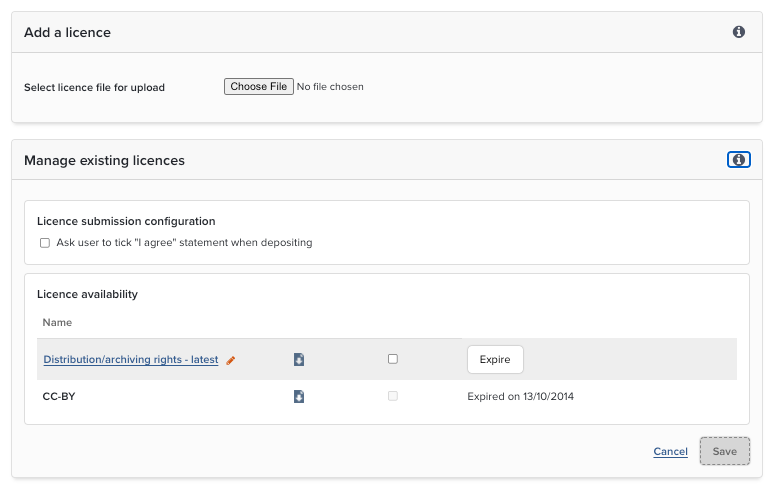
Manage existing licences
Licence submission configuration: Ask users to tick "I agree" when depositing - Enable this for visibility of the agreement check box on the deposit page along with the clickable link to the licence terms document
Licence Name - Edit the label and descriptions by selecting the name of the licence and modifying the text
Download Icon - Download a copy of the licence
Repository - Activate to enable the licence for the appropriate repository
Activate/Expire - New licences will need to be activated before they are available for use. You can expire a licence, but it cannot be deleted as older deposits may have used this licence file.
More Information
Configuration Overview