
Repository Tools 2: Configuring Figshare for Institutions
The following is a guide on how to configure the Elements Repository Tools 2 integration with Figshare for Institutions
Prerequisites
Compatible versions
You must be running v6.2 or later to be able to integrate with Figshare for Institutions.
We strongly recommend upgrading to the latest possible version before beginning an integration to ensure you benefit from the full range of functionality.
User account alignment
Certain user/account identifiers must match between the two systems in order for items to be harvested and deposited correctly.
The user accounts in your Figshare for Institutions portal contain a property called institution_user_id. If you are sending an HR Feed to create user accounts, this may be referred to as "UniqueID" there. This property has two purposes:
It is used to match user accounts to the identifying header or token released by your Single Sign On system when a user is successfully authenticated.
It gives each Figshare user account a unique identifier that as set by, and known to, your institution.
When searching Figshare, Elements uses its own user data to search Figshare for an account with this institution_user_id. It's therefore necessary to tell Elements which user data field corresponds to this identifier. This is done using the "Shared identifier" connection setting.
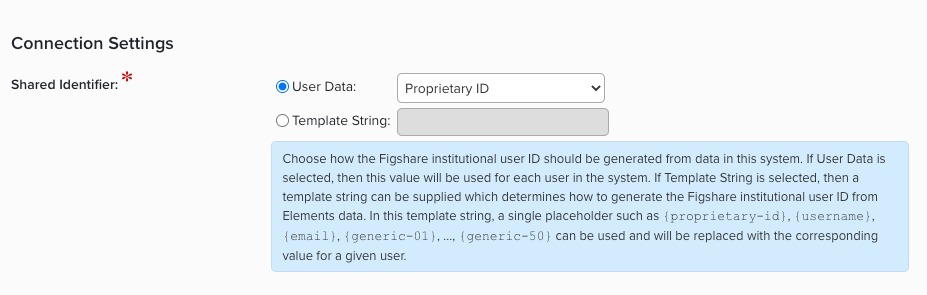
Given its role in SSO authentication, institution_user_id is often the same as the Username supplied to the Elements HR feed. In this case, account alignment can be achieved by setting the "Shared Identifier" connection setting to "Username".
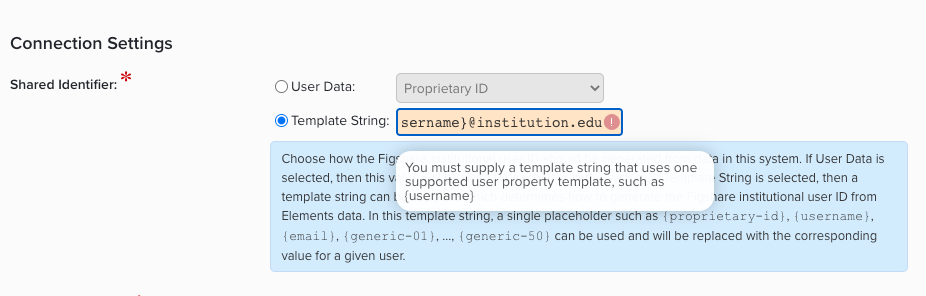
Another common configuration with many SSO systems is that a token such as 'myusername@institution.edu' is sent to both Elements and Figshare, but that Elements will strip off the domain part before comparing with Username to log in the user. In these cases, it's necessary to add the domain back on to the Elements Username before comparing with Figshare institution_user_id to align the accounts. This can be achieved using a template string:
Licensing
Setting up a harvest-only integration with Figshare for Institutions does not require any additional licensing. To use the RT2 deposit functionality you will need an Elements licence that includes the Repository Tools Module. You can check whether or not your existing licence includes Repository Tools via System Admin > Setup > Licence; if Repository Tools is not licensed please raise a support request for additional information. Note that a Statement of Work (SoW) outlining the work plan will be issued for clients who choose to use Symplectic's integration service.
Important notes before you start
Please ensure you do not enable this data source without following the preparation, crosswalking and configuration processes. We strongly recommend that all of these steps are first performed and tested in a Test environment before they are applied to your production instance of Elements.
Connecting to the figsh.com staging environment
If you are connecting a non-production Elements instance, you should connect to the figsh.com staging environment rather than the figshare.com production environment. To achieve this, two small edits are needed in two Elements configuration files.
Symplectic-hosted clients: raise a support ticket requesting that Figshare for Institutions config be altered to use the Figshare Stage environment, specifying the Elements instance to be affected.
Self-hosted clients: on your Elements application server, do the following:
Starting from your Elements application folder, locate the two files:
\Website\web.config\Sync.Synchronise\synchronise.exe.configIn both files, locate the lines:
<!--the figshare-institutions-api-url points to core Figshare API URL. Do not alter.-->
<add key="figshare-institutions-api-url" value="https://api.figshare.com/" />
In both files, replace the value with
"https://api.figsh.com/"and save the files.This action will log all users out of the Elements web application. Log in using a System Admin account, go to System Admin > Operations > Scheduled Jobs, scroll down to the "Background services" section, then stop and restart the Synchroniser. This will ensure that the application acts on the config changes.
Request authentication credentials
To connect Elements to to your Figshare for Institutions portal, you need authentication credentials specific for your institution. Please raise a ticket with Figshare support, requesting credentials for your Elements/Figshare integration. Remember to specify whether you are requesting credentials for the Stage or Live environment. In response, you should receive a the following:
Consumer ID
Consumer Secret
Access token
You will need these credentials in the next step.
Configure Data source settings
Go to the Figshare for Institutions data source management page, by going to System Admin > Data Sources > Data Source Management and clicking on "figshare for Institutions" in the list of publication data sources.
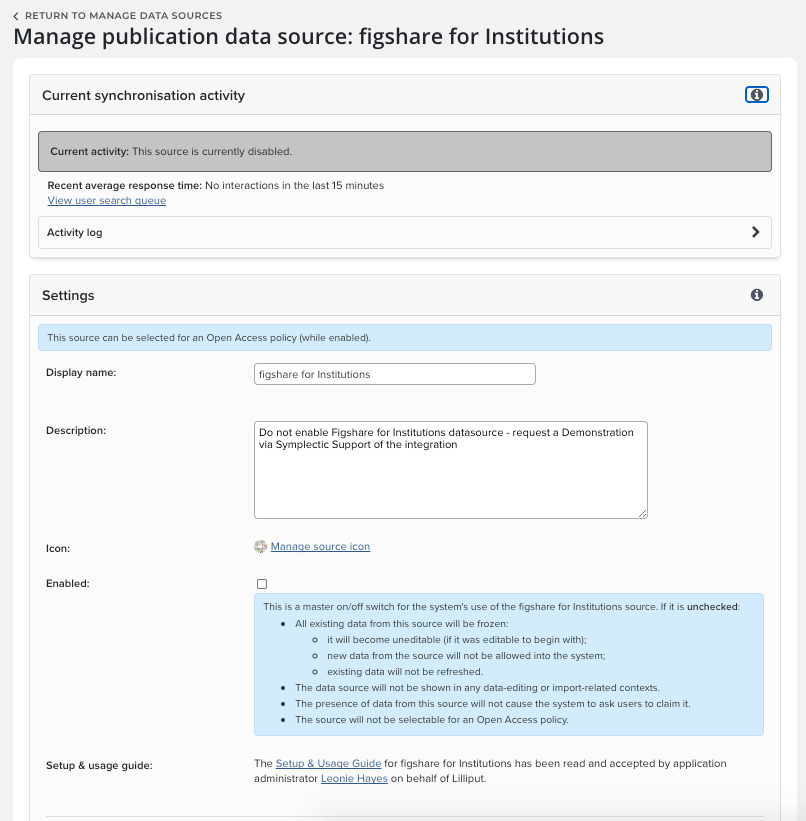
Display name: Enter a display name for your repository. You can leave this set to "figshare for Institutions", or change it to the local name of your institution’s Figshare portal.
Description: An (optional) brief description of your repository.
Enabled: Leave this checkbox disabled until you are happy with your crosswalks and wish to enable search and harvest.
Setup & usage guide: You should confirm that you have read the Setup and Usage Guide. This contains important information about the setup of your connection between Elements and Figshare.
Connection Settings
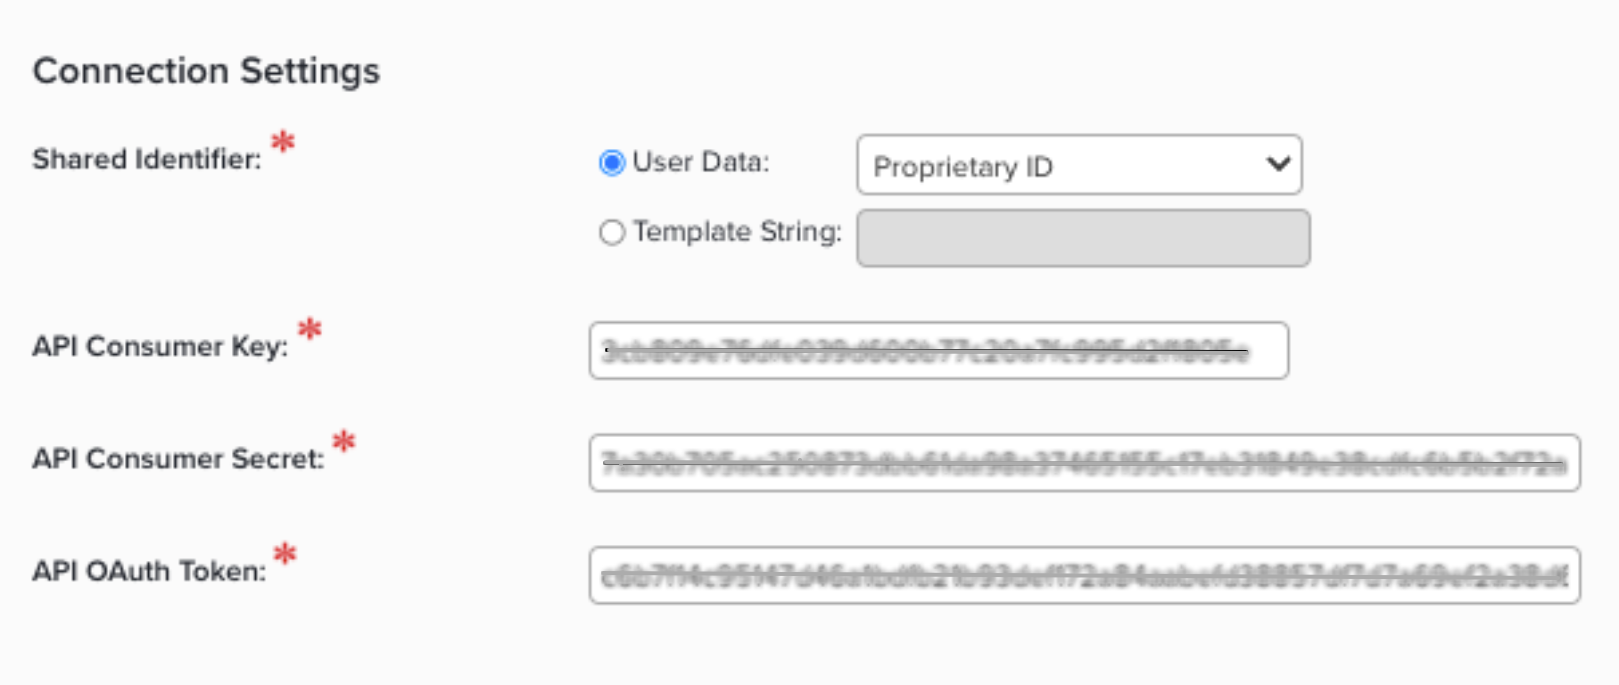
Shared Identifier: the identifier shared between Elements and Figshare to align user accounts between the two systems. See above.
API Consumer Key: enter the Consumer ID generated earlier.
API Consumer Secret: enter the Consumer Secret generated earlier.
API OAuth Token: enter the Access token generated earlier.
Remember to click update when you are done editing the settings. Once this has been performed the data source will be authorised to connect to your institution’s Figshare for Institutions instance.
Harvest Settings
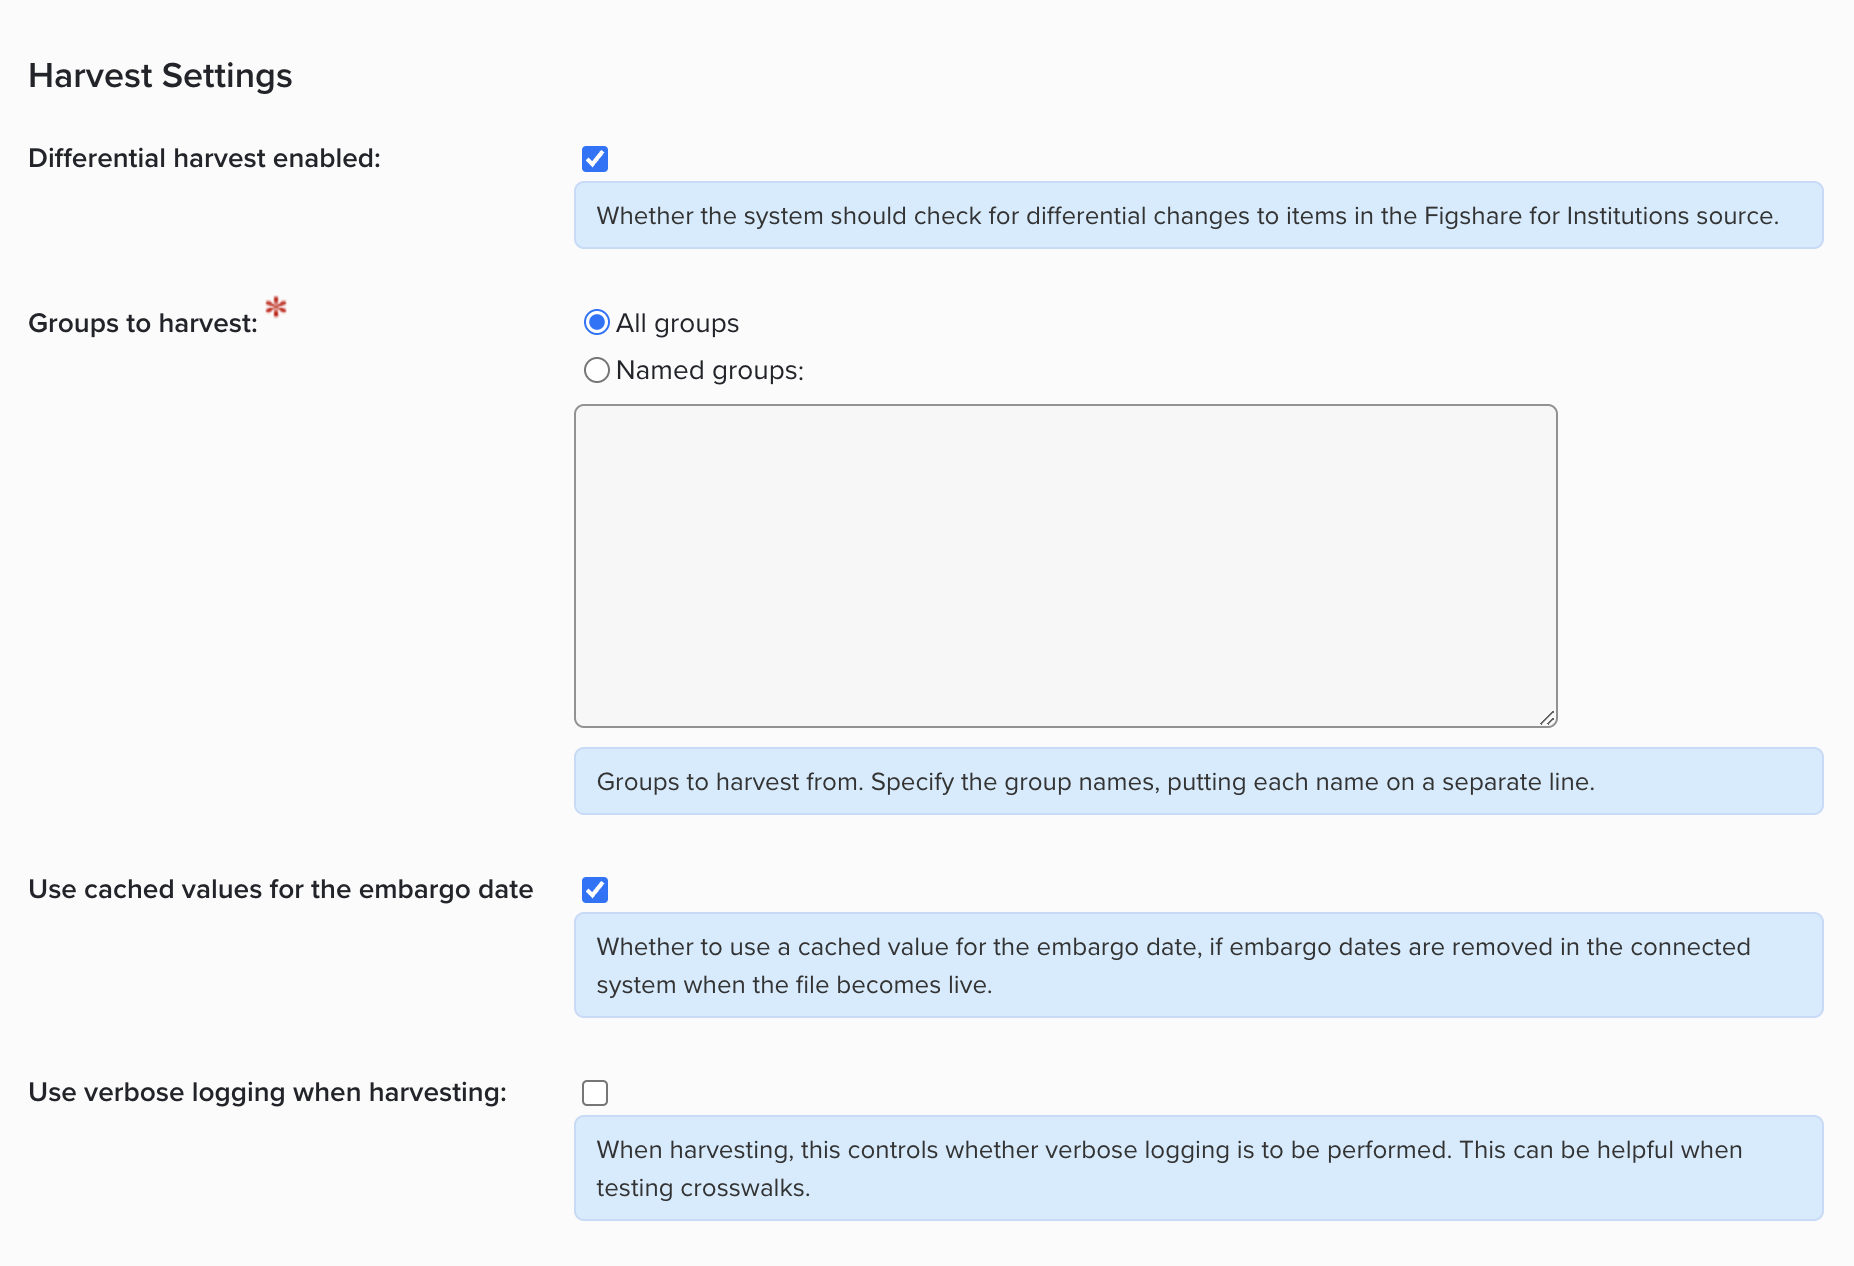
Differential Harvest: Enable this so that changes in your repository can be detected and updated in Elements.
Groups to harvest: allows you to specify all or selected groups
Use cached values for the embargo date: This controls whether to use a cached value for the embargo date, if embargo dates are removed in the connected system when the file becomes live. This feature was implemented specifically to counteract Figshare's deletion of embargo end dates upon lifting them. This option must be checked in order for embargo dates to remain accurate.
Use verbose logging when harvesting: When this box is checked, a copy of the crosswalk input and output will be stored for every harvested publication. This can be useful when testing crosswalks but potentially uses a lot of disk space. We therefore recommend that you disable this option before starting large-scale harvesting.
You will also need to configure the User Group settings to enable the data source offline search; instructions on how to enable search are detailed below.
Deposit Settings
If you will be allowing users to deposit to Figshare via Elements, you will need to configure the deposit settings.
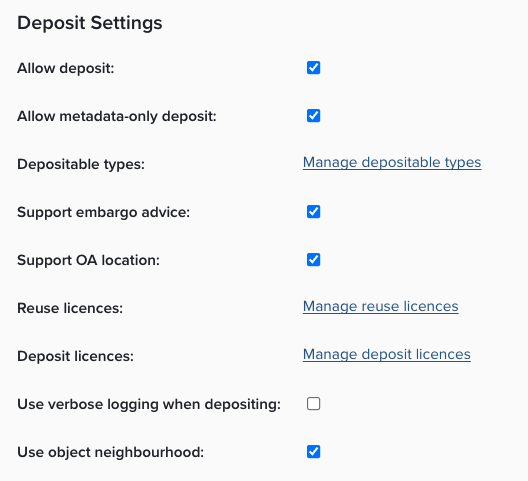
Allow deposit: Enable the checkbox to allow deposit to your Figshare portal.
Allow metadata-only deposit: Enable this if you wish to allow users to deposit without a file.
Depositable types: allow you to to configure which publication types are permitted to be deposited to your repository. Users will only see deposit buttons for items permitted to be deposited
Depositable types: Select the Manage depositable types and use the checkboxes to determine which types are able to be deposited. Types disabled will not display the deposit button in the list or full view for users.
Support embargo advice: This allows institution to choose to allow users to suggest an embargo period when making a deposit. The embargo period ID and name can be crosswalked to the repository to be reviewed and enacted by administrators.
Support OA Location: Enable, if you wish to allow users to deposit without a file, including a URL to locate an Open Access copy of the full text.
Reuse licences: Opens in a new tab. This allows institutions to select which reuse licences a user can select from when depositing a publication. By checking one or more boxes on the Manage Reuse Licences page, the reuse licence functionality will appear on the deposit page. The reuse license ID and name can be crosswalked to the repository to be reviewed and enacted by administrators.
Deposit licences: Opens in a new tab. This allows institutions to require users to agree to a deposit licence when depositing a publication. Institutions are asked to define a unique ID for the licence, a name of the licence and to upload the licence file. Once enabled, the license will appear on the deposit page. The license ID and name should be crosswalked to the repository to record which license was agreed to at the point of deposit.
Use verbose logging when depositing: whether Elements should save a copy of data that is deposited before and after the crosswalk mapping has been performed. This can be helpful when testing crosswalks.
Use object neighbourhood: This allows institutions to choose to crosswalk metadata about users, grants, or others publications related to the publication being deposited.
Customise the crosswalks
In order to feed information from your repository into Elements, we need to tell the systems how that data from the repository should appear in Elements. Essentially we specify how each piece of metadata we want to copy from the repository into Elements should be mapped from its repository value into an Elements field. Similarly, we need to map metadata from Elements to the repository so it is transferred correctly when outputs are deposited.
We use a crosswalk map file to specify how these fields are mapped. To find out more about how to plan and prepare your harvest and deposit crosswalks review Repository Tools 2: Repository as Data Source and the Repository Tools 2: Defining Crosswalks Guide
The Figshare for Institutions integration includes default crosswalks. Each institution can choose whether to customise their crosswalks and the extent to which they wish to customise them.
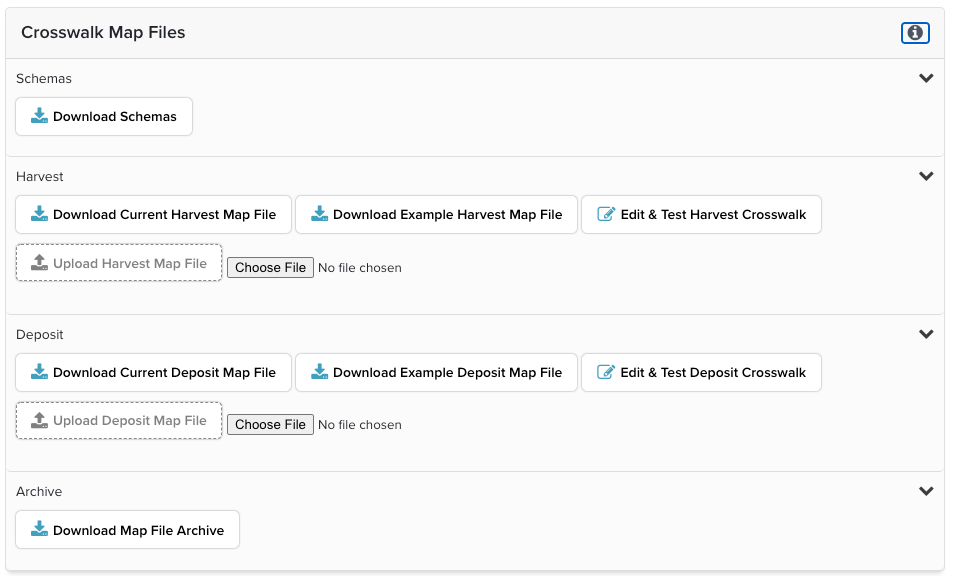
Elements provides you with a series of administration tools which allow you to:
Download a copy of the crosswalk schemas and crosswalk map files
Upload your customised crosswalk map files
Edit and Test Harvest Crosswalk - from 5.14.1 you can edit and test the crosswalks in the Elements interface
Download the Map file Archive
Download the verbose harvest logs (which can be turned on when working on your crosswalks)
Configure automated metadata updates (Elements 6.9 and higher)
Starting with Elements 6.9, it is possible for Elements to automatically update Figshare items when metadata changes in the corresponding Elements publication. This option is highly configurable in terms of allowing you to specify which items should (and shouldn't) be updated, which metadata changes should trigger an update, and which Figshare fields Elements is allowed to update. For more information, see:
Enable the Figshare for Institutions data source
Once you are happy with your crosswalks, you enable the data source using the checkbox and clicking update. You will then need to enable search for users.
To enable the data source, log in as a System Administrator and got to System Admin > Data > Data Source Management. Check the box next to figshare for Institutions to enable it for searches, and then click the 'Update' button to apply the change.

Grant Repository Tools module access
You will also need to ensure that users are given access to the repository tools module in order for them to see the deposit button. To do this, go to System Admin > Group Management > Module Access, check the Repository Tools box and select the users or groups of users you wish to grant access to.
If you have an existing repository integration, using either RT1 or RT2, this access may already have been granted. If the integration is harvest-only, Repository Tools module access is not required.
N.B. in older versions of Elements, the Module Access page is in the menu under User Management, not Group Management.
Enabling deposit
For a user to be able to deposit publications to Figshare via Elements, two things must be true:
The global "Enable deposit" box on the figshare for Institutions data source management page must be checked, and
The user must have been granted access to the Repository Tools module.
To grant Repository Tools module access:
Go to System Admin > User Management > Module Access
Under "Choose module", select "Repository tools"
EITHER (a) select the group(s) to be granted access and click "Add group(s)"
OR (b) select a user to be granted access and click "Add user"