
Repository Tools 2: Configuring Automatic Metadata Updates including Relevance Schemes
Introduction
Elements provides the capability to automatically push metadata updates to some repositories*. This provides a mechanism to enable changes in metadata values in Elements,whether as a result of automated harvesting or of manual curation, to be reflected automatically in your repository. A licence for the Repository Tools Module is required for this capability to operate.
Repository platform | Minimum Elements version required for RT2 automated metadata updates |
|---|---|
DSpace 5.x / 6.x | 5.16.0 |
DSpace 7.0 - 7.6.1 | 6.9 |
EPrints 3.3.15+ | 5.15.0 |
EPrints 3.4.0 / 3.4.1 | Automated metadata updates not supported * |
EPrints 3.4.2+ | 6.4.0 |
Figshare for Institutions | 6.8.0 |
* API changes in EPrints 3.4.0 / 3.4.1 mean that automated metadata updates are not possible in those versions.
Important notes before you start
Before starting to configure automated metadata for your repository ensure that you have already fully configured and tested your harvest and deposit operations. The automatic metadata updates capability uses both deposit and harvest functionality during its operation. We strongly recommend that all of these steps are first performed and tested in a Test environment before they are applied to your production instance of Elements.
How do Automated Metadata Updates Work?
Automated Metadata Updates are implemented using a multi-step process. Understanding this process is important before you start to configure your environment.
The overall process for handling a change to an object is shown below:
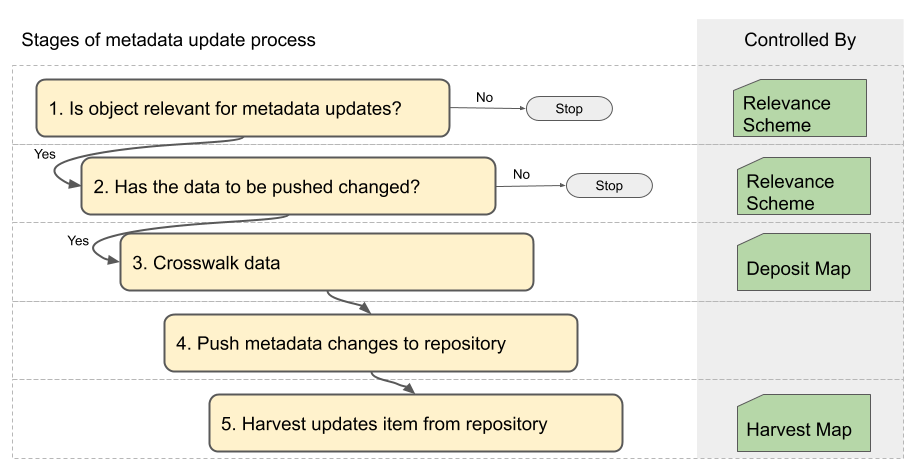
The process is controlled by three key configuration files:
Relevance Scheme file
This file identifies which objects are relevant for automated metadata push, and detects when an update needs to be made to the repository.Deposit Crosswalk Map file
This file identifies how an object should be cross-walked from Elements into a format suitable for your repository. Some additional configuration is needed beyond that required for manual deposits to support Automated Metadata Updates.Harvest Crosswalk Map file
This file identifies how an item should be cross-walked from your repository into a format suitable for Elements. No additional configuration is needed to support Automated Metadata Updates.
Step 1: Navigate to Manage Repository Data Source
The repository data source is configured using the repository's data source management page: to find this, go to System admin > Data sources > Data source management and click on the repository's name in the "Publication sources" list.
Note: We recommend that you disable the data source while changing settings and configuration files. This will prevent Elements from pre-emptively processing changes while you are altering settings.
Step 2: Edit and Test the Relevance Scheme
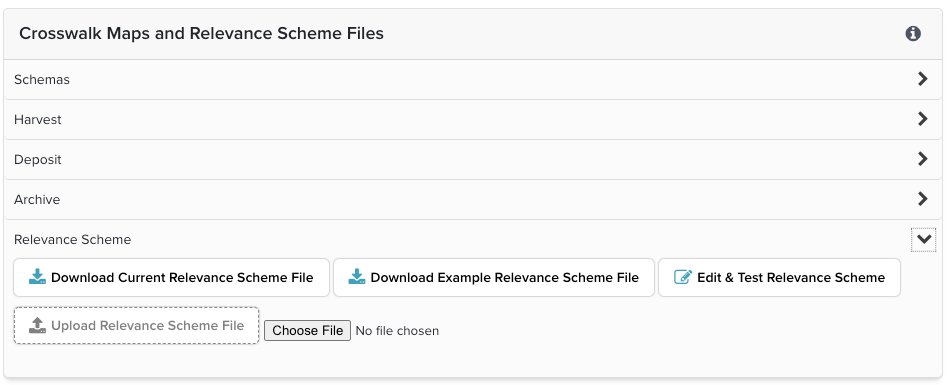
Once on the repository's data source management page, scroll to the "Crosswalk Maps and Relevance Scheme Files" section and expand the "Relevance Scheme" sub-section. There are four options:
Download Current Relevance Scheme File
Download the current, in-use relevance scheme as an XML file. If a custom relevance scheme has never been saved or uploaded, this will be the Example Relevance Scheme File.Download Example Relevance Scheme File
Download the example relevance scheme that is included with the system.Edit & Test Relevance Scheme
Opens the relevance scheme editor page. This provides a convenient way to edit the relevance scheme and also to validate and test your changes. See below for more details.Upload Relevance Scheme File
If you wish to use a relevance scheme that is stored externally to Elements, you can upload it here (e.g. to revert to a backup of a previous relevance scheme).
The Relevance Scheme Editor
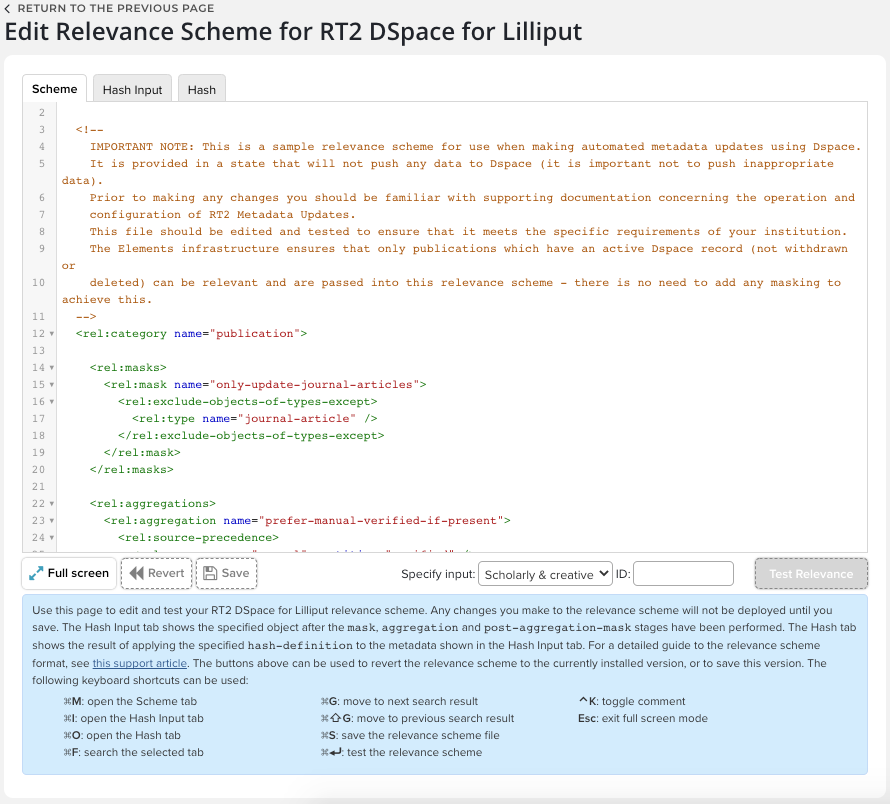
The "Edit Relevance Scheme" page provides an interface to edit and test the relevance scheme. The page has three tabs:
Scheme
This tab is an intelligent XML editor where you can edit the relevance scheme file. All changes to the file are validated before being saved.
In addition you can test the operation of the relevance scheme by inputting the Elements ID of a publication, then clicking the Test Relevance button. If the scheme is valid, this will apply the relevance scheme and populate the Hash Input and Hash tabs. If the scheme is invalid, the editor will give you feedback to help you fix this.Hash Input
This tab shows the data from the publication being tested (in Elements API format) following all masking and aggregation processes specified by the relevance scheme. This is the input data that is used to calculate the hash value that is used to detect changes in data. If the publication is not relevant, no data will be shown, but a message will indicate, at a high level, why it is not relevant.Hash
This tab shows the hash value calculated for the publication used for the test. If no value is shown, no hash has been calculated, which indicates that the publication is not relevant. A change in the hash value is the trigger for an automatic metadata update.
Some important points to note:
The test function on this page only performs the relevance and hash calculations - no actual metadata updates will be triggered by this page.
Clicking "Save" or pressing Ctrl+S will put the edited scheme into immediate effect as the current relevance scheme being used by Elements to trigger automatic metadata updates.
You can revert the editor to the current relevance scheme at any time by clicking the "Revert" button.
For more details see Repository Tools 2: Defining Relevance Schemes Guide
Step 3: Edit and Test the Deposit Map
The deposit map file requires the definition and use of one or more field authority lists for use with metadata updates. A field authority list specifies which repository fields can be updated from Elements by the metadata update process.
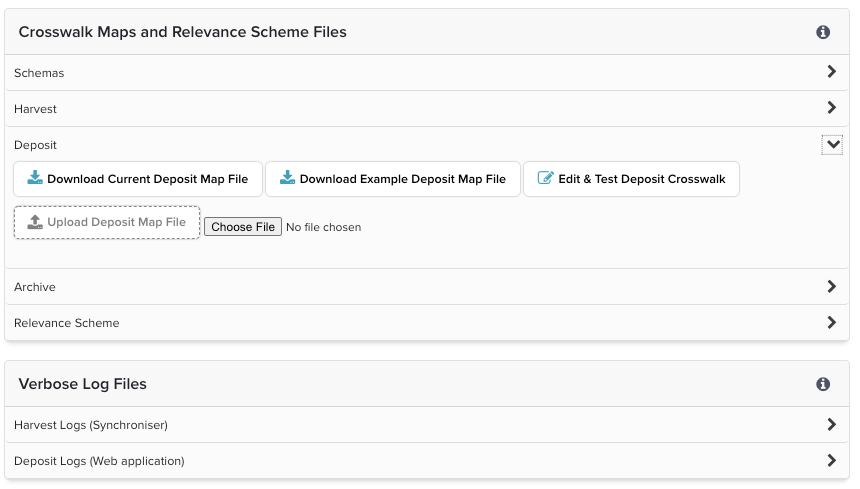
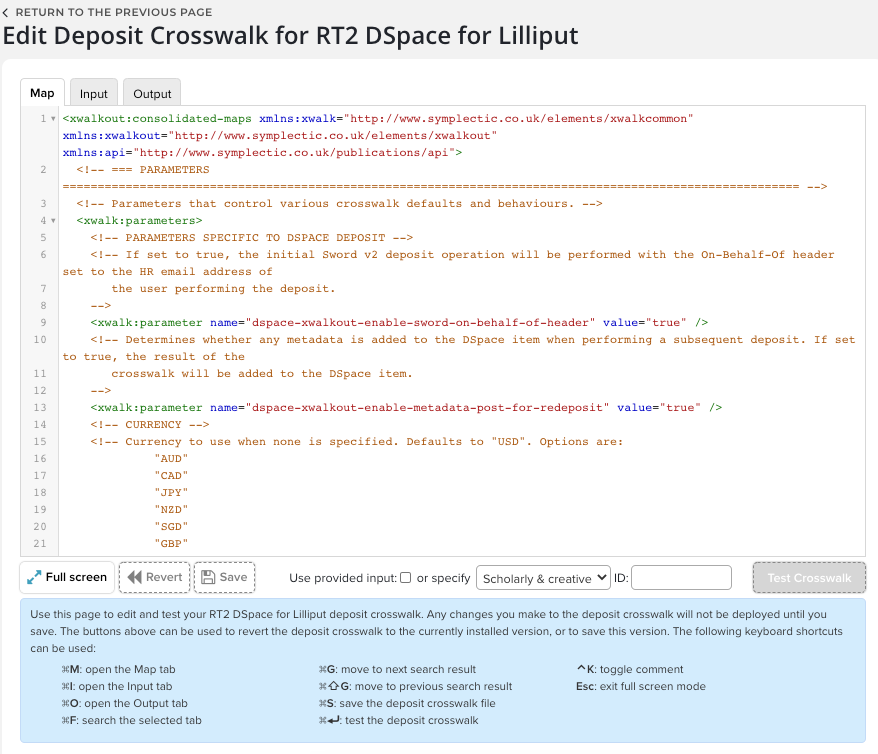
The deposit map file is edited and tested using the Edit & Test Deposit Crosswalk page. This provides a tabbed interface to edit and test a deposit map file:
See for more details see:
Step 4: Enable Automated Metadata Push
The operation of Automated Metadata Updates is controlled using the Enabled checkbox in the Settings for Automated Metadata Updates to Data Source section.
Note: If you disabled the data source while making and testing your relevance scheme and deposit map files, as recommended, don't forget to enable the data source as well.
