
Publications Module - Manage Types
This article outlines how publications types can be configured and managed. A vanilla/plain installation of Elements includes 23 default publication types, pre-populated with default underlying fields. Those publication types are (alphabetically):
Artefact
Book
Chapter
Composition
Conference
Dataset
Design
Exhibition
Figure
Fileset
Internet publication
Journal article
Media
Other
Patent
Performance
Poster
Presentation
Preprint
Report
Scholarly edition
Software/Code
Thesis/Dissertation
The following options are available through the "Manage publication types" page via System admin > Data category settings > Publications > Publication types.
Change the order of publication types
Create a custom publication type
Clone an Elements default publication type
Delete a custom publication type
Within each publication type, you can:
Add new fields to the publication type, or edit existing fields
Edit the properties of the publication type
Edit the data entry form for Manual records of that type
These settings apply for your whole institution. They cannot be changed for individual Primary Groups and therefore do not appear under "Module settings" on the edit page of a Primary Group.
Note: If you make changes to underlying fields, types, or fields within types (including the name of fields), you should check whether your queries, custom reports, custom dashboards and other downstream systems will be affected by the changes.
TABLE OF CONTENTS
Manage publication types
Change the order of publication types
Use the blue handles next to each type to change the order in which publication types will be listed in the system. When you have the correct order, click on the ‘Save order’ button to confirm the change.

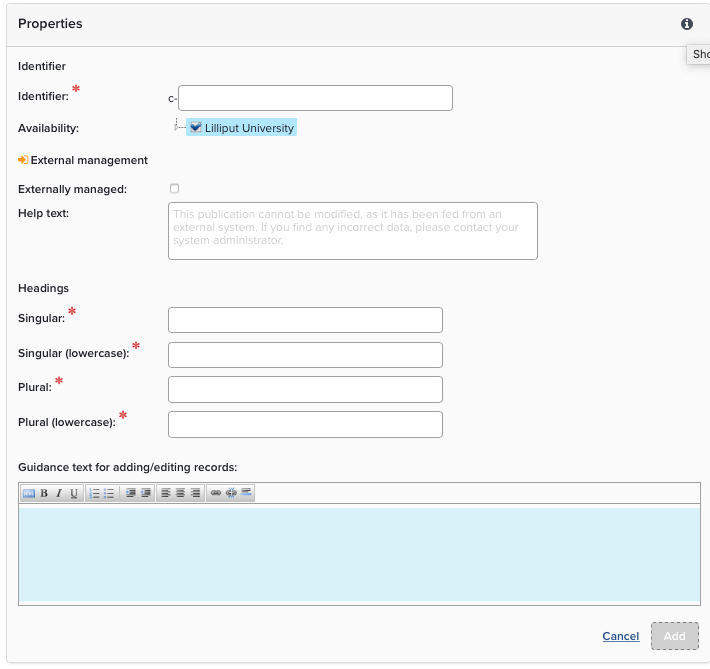
Create a custom publication type
To add a new publication type, click the link at the top or bottom of the "Manage publication types" page.
Note that this requires you to add all information defining the new type; if you want to create a custom type that's very similar to an existing one, we use the "Clone" method described below instead.
Add the following information:
Identifier: the internal identifier by which this type will be referenced. Not displayed to end users (i.e. users without Admin roles). This cannot be edited later. The prefix "c-" is added to all custom publication types.
Availability: Use the group structure tree to control user access to the type. By default, the type is available to all users of the system. To remove the availability of this publication type from a specific user group, uncheck that group in the tree. To remove the availability of this publication type from the whole organisation, uncheck the root node of the tree. If a type is not available to a user, that user cannot create publications of that type; cannot switch any publication to that type; and it will not be shown to the user as an option in search filters.
Note: An user can still view, and be linked to, publications of a type that is unavailable to them. Such publications may also be included in the results of unfiltered searches by the user.
External management: if this box is checked, publications of this type cannot manually be created, edited, split, merged, or have their types changed. Additionally, existing publications cannot have their types changed to any externally managed type. The "Help text" box allows you to customise the help text that explains this to users.
Headings: the display name of the publication type. You must enter all four combinations of singular/plural and proper case/lower case.
Guidance text for adding/editing records: text that will appear in manual entry forms to guide users on choosing and using the appropriate publication type.
Select Add to create the new publication type.
You can add fields to the type to create its data structure - see "Add a new field or edit field properties" below for how to do this.
Once you have created all the fields you need, choose the title field and date options described under "Edit the properties of a publication type" below.
Finally, edit the data entry form for Manual records as described below.
Clone a publication type
Sometimes you may wish to add a custom publication type with properties very similar to an existing publication type. For example, a new type of "Creative Works" might have a data structure that is very similar to "Artefacts". To streamline the process of creating a new publication type, click on the "Clone" link to the right of an existing publication type; this will add a new cloned entry to the bottom of the list. Click on the name of the cloned publication type to edit it further. Note that the cloned publication type inherits most of the properties of the original, including the name, except for formatting. You will need to click on the "Format as" dropdown and select the formatting type you wish to use.
Delete a custom publication type
The 23 default publication types cannot be removed, but any custom type your institution has added can be. Click the dustbin icon next to the publication type on the main 'Manage publication types' screen. You will receive a pop-up warning that any data associated with the publication type will also be deleted.

Click through this warning only if you are sure you wish to remove the type and all associated data.
Edit a publication type
From the "Manage publication types" page, click on the name of any type to go to its "Edit publication type" page.
Edit field properties or add a new field
Each publication type uses a particular set of the underlying fields that are available for publications. In addition, the display name and other properties of each underlying field can vary across the publication types. This allows data that is similar in meaning to be named appropriately for the different types. For example, where a Journal Article has "Abstract", a Media object might might have "Description". For both types, the underlying field is "abstract" but the display name changes to fit the publication type. For each type, you can customise the fields used to match your institution's terminology and data structure.
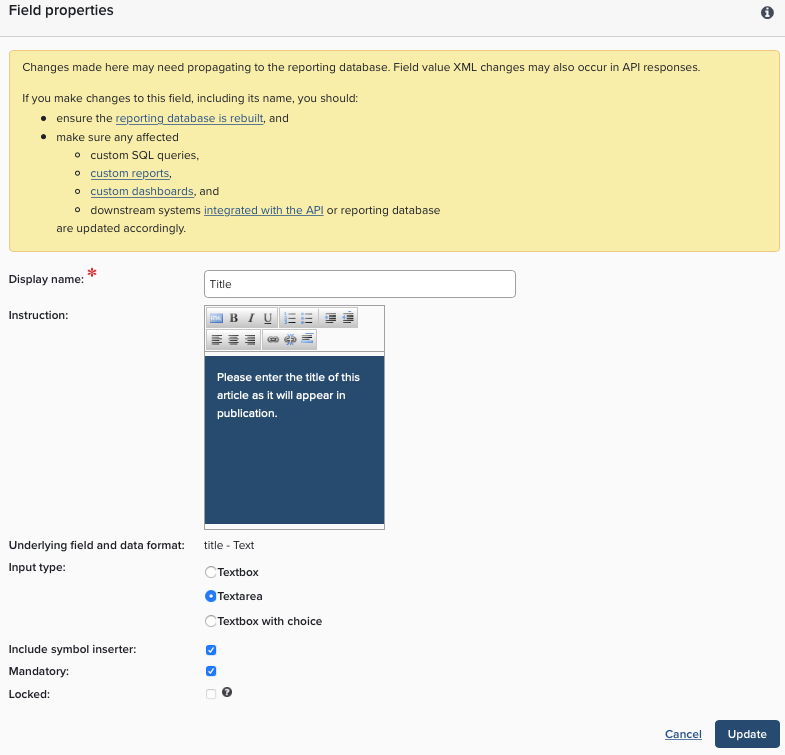
Scroll down to the "Fields in edit forms" section. Click on a field's name to edit it, or click on the link at the bottom of the page to "Add a new field to this publication type". Edit/add the following information as needed:
Display Name: customise the display name of a field to suit your institution's terminology. For example in the Artefact type, you could change the field display name from "Author" to "Creator". The underlying field will remain as "author" but when viewing and entering data "Creator" will be displayed. When adding a new field pick a suitable display name.
Instruction: help or guidance notes for the field, which will be displayed in the data entry form for Manual records. Use this to help your researchers enter complete, accurate and correctly formatted data.
Underlying field and data format: the underlying field in which data will be stored, and its corresponding data format. This can only be set when creating a new field.
Input type:for certain data formats, you can select the style of input in the data entry form. For example, a field with data format 'Text' can be entered via:
Textbox - a single line text input box (e.g. for an article's title).
Textarea - a larger text input area, suitable for longer and multiline input (e.g. an abstract).
Textbox with choice - a text field where manual input is restricted to specific choices.
Include symbol inserter: if checked, a symbol inserter button will be displayed in the data entry form to assist with entering specialist symbols. Only offered for appropriate data formats and input types.
Suggestions: Should Elements offer suggestions as the user types? For example, if 'Journal' is selected, Elements will suggest titles from its list of known journals. Only offered for appropriate data formats and input types.
Mandatory: if this box is checked, the field cannot be empty when completing the data entry form.
Summary: if this box is checked, the field will display on the summary view in My Publications and the View Object screen.
Locked: if this box is checked, the field is locked. It cannot be modified when editing a record, and will be hidden when editing if it is currently empty. A mandatory field cannot be locked.
Complete this task outside the normal usage hours of your system wherever possible, since as soon as you have made your changes, they will become visible to users of the system.
Edit the properties of a publication type
The following properties can be configured for each publication type:
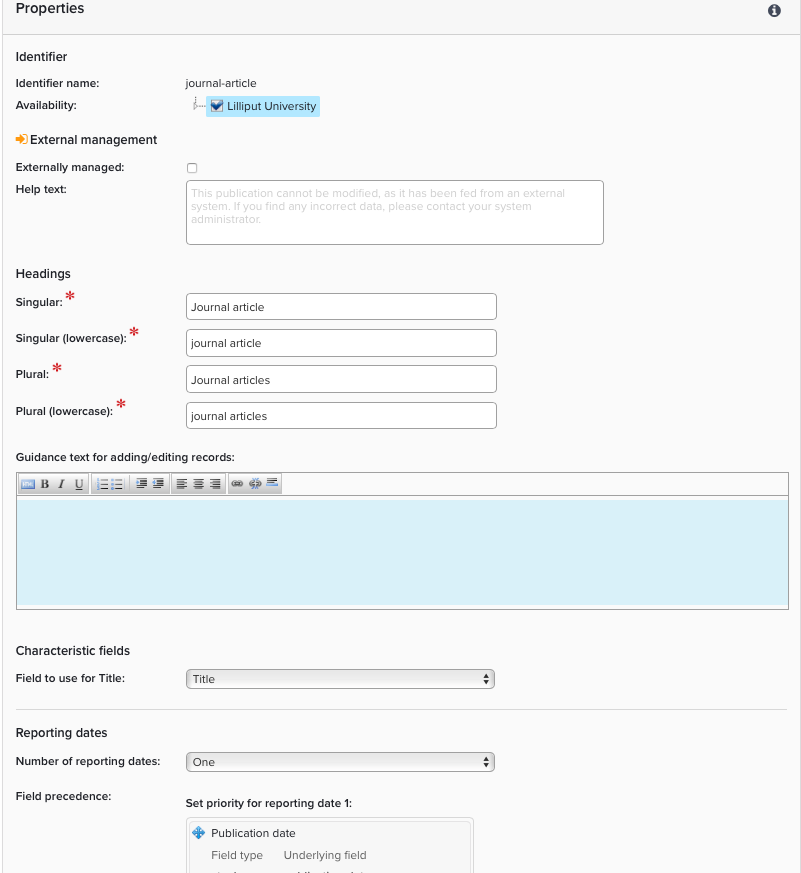
Availability: see "Create a custom publication type" above.
External management: see "Create a custom publication type" above.
Headings: see "Create a custom publication type" above.
Guidance text for adding/editing records: see "Create a custom publication type" above.
Characteristic fields: select which field will be shown as the Title of the type.
Reporting date fields select which field(s) will be used as Reporting date(s) for this type. For a more in-depth discussion of Reporting Dates, please see Reporting Dates - What, Why and How?
Number of date fields: how many reporting dates does the type have? For example, reports on books may use only their publication date, whereas reports on conferences may use their start date and end date. Can be None, One or Two.
Use field (date 1): the field to use for the first reporting date (if the number of date fields is One or Two).
Use field (date 2): the field to use for the second reporting date (if the number of date fields is Two).
Combine required dates and status (Status decides required date): if this option is checked, publication-status will decide which one of acceptance-date, publication-date and online-publication-date fields is a Mandatory field. These four fields will then appear together in the Essential Data section.
Click 'Save' to confirm these changes.
Edit the data entry form for Manual records
When a user creates or edits a Manual record, they enter data via a form, the layout of which is particular to each publication type. The 'Fields in edit forms' section controls how fields are displayed in this form. Fields can be placed in one of three sections:
Essential data: these fields are displayed at the top of the form, in the order specified here. Use this section for data fields that you consider to be the most important. Mandatory fields must always be in the 'Essential data' section (although 'essential' fields are not necessarily mandatory).
Additional data: these fields are displayed in an expandable section below the 'essential' fields, again in the order specified here. Use this for data fields that are less important to you.
Not used: these fields are not displayed at all the manual data entry form. Use this when you specifically do not want any manually entered data in a field. Data can still be imported to these fields from external data sources, the API and bulk imports.
Using the blue handles, drag and drop fields into the required sections and order them appropriately. Click on 'Update' to confirm the changes.
Note:Elements default fields cannot be deleted but you can prevent manual data entry into these fields by dragging them into the "Not used" section.
Creative and Contributor Roles
When creating a Manual record, it is possible for users to include information on the role that author had on the publication. This helps Elements capture a more complete picture of the contributions to a specific output. If enabled, users will be able to choose from a list of creative roles, and/or contributor roles.
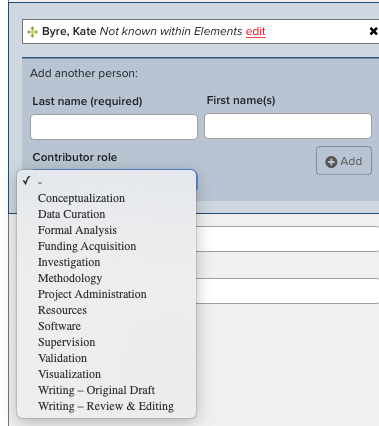
These lists are disabled by default and can be enabled for each publication type. Select the publication type that you would like to add roles to – then, select the ‘Authors’ field. From the ‘Edit field’ page you can select the roles check boxes to make these lists available for the publication type.
The list of available roles are:
Creative
Actor
Animator
Artist
Calligrapher
Choreographer
Cinematographer
Composer
Conductor
Costume Designer
Curator
Dancer
Designer
Director
Exhibitor
Film Editor
Illustrator
Instrumentalist
Librettist
Lighting Designer
Lyricist
Musician
Other
Performer
Photographer
Printmaker
Producer
Production Personnel
Programmer
Recording Engineer
Screenplay Author
Screenwriter
Set Designer
Singer
Sound Designer
Videographer
Vocalist
Contributor
Conceptualization
Data Curation
Formal Analysis
Funding Acquisition
Investigation
Methodology
Project Administrator
Resources
Software
Supervision
Validation
Visualization
Writing - Original Draft
Writing - Review & Editing
Add keywords from label schemes to manual record entries
When adding keywords to manually added publication records, users can now have the option of choosing values from label schemes. More information about labels. This expanded use of labels helps categorise research outputs at the time of entry.
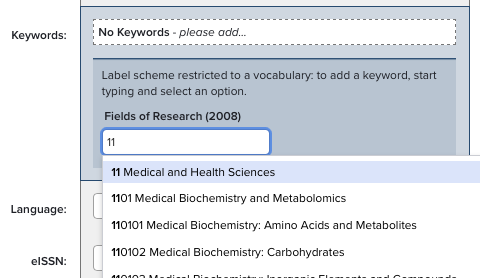
This functionality can be enabled for each publication type. Select the publication type that you would like to update – then the ‘Keywords’ field. From the ‘Edit field’ page you have the option of enabling any of the available label schemes to be used.
This functionality supports the use of label schemes with and without a controlled vocabulary (pre-defined set of values). Use of a controlled vocabulary for keywords helps improve data consistency. For label schemes that have a controlled vocabulary the user will be presented with an autocomplete textbox to add values.
More Information
You can change type and field names to whatever suits your institution's terminology. Editing "Headings" on the "Edit publication type" page, or "Display name" on the "Edit field" page has no effect on Elements data structure. It's still the same type and underlying field underneath, just wearing a different mask.
One note of caution - if you make changes, some downstream systems may depend on a query that could break if you alter the type or field name. Make sure that you have change control procedures in place so that relevant parties know when you make modifications.
For a configuration overview and other FAQs see the Publications Module Settings.