
Repository Tools 2: Configuring DSpace
Introduction
The DSpace data source allows the harvest of publications from your DSpace institutional repository to Elements, via a Repository Tools 2 (RT2) integration. If you have a licence for the Repository Tools Module, the RT2 integration can also be configured to allow users to deposit publications from Elements to your DSpace repository.
The RT2 repository data sources do not function in the same way as the publisher/aggregator data sources and it is important that they are set up and configured correctly.
Important notes before you start
Please ensure you do not enable this data source without following the preparation, crosswalking and configuration processes. We strongly recommend that all of these steps are first performed and tested in a Test environment before they are applied to your production instance of Elements. Please ensure you have read and completed the steps outlined in Repository Tools 2: DSpace as a data source.
Step 1: Manage Data Source: DSpace
First, locate the management page for the DSpace RT2 data source:
There are two routes through the main menu to the management page:
Open Access > Repository Tools > DSpace
System Admin > Data Sources > Data Source Management. In the "Publication sources" list, click on the DSpace data source.
From this page, you can configure how the data source appears to end users; set up the connection to the repository; upload or edit the crosswalks which control the transformation of metadata between Elements and the repository;
Note: We recommend that you disable this data source while changing settings. This will prevent Elements from pre-emptively processing changes while you are altering settings.
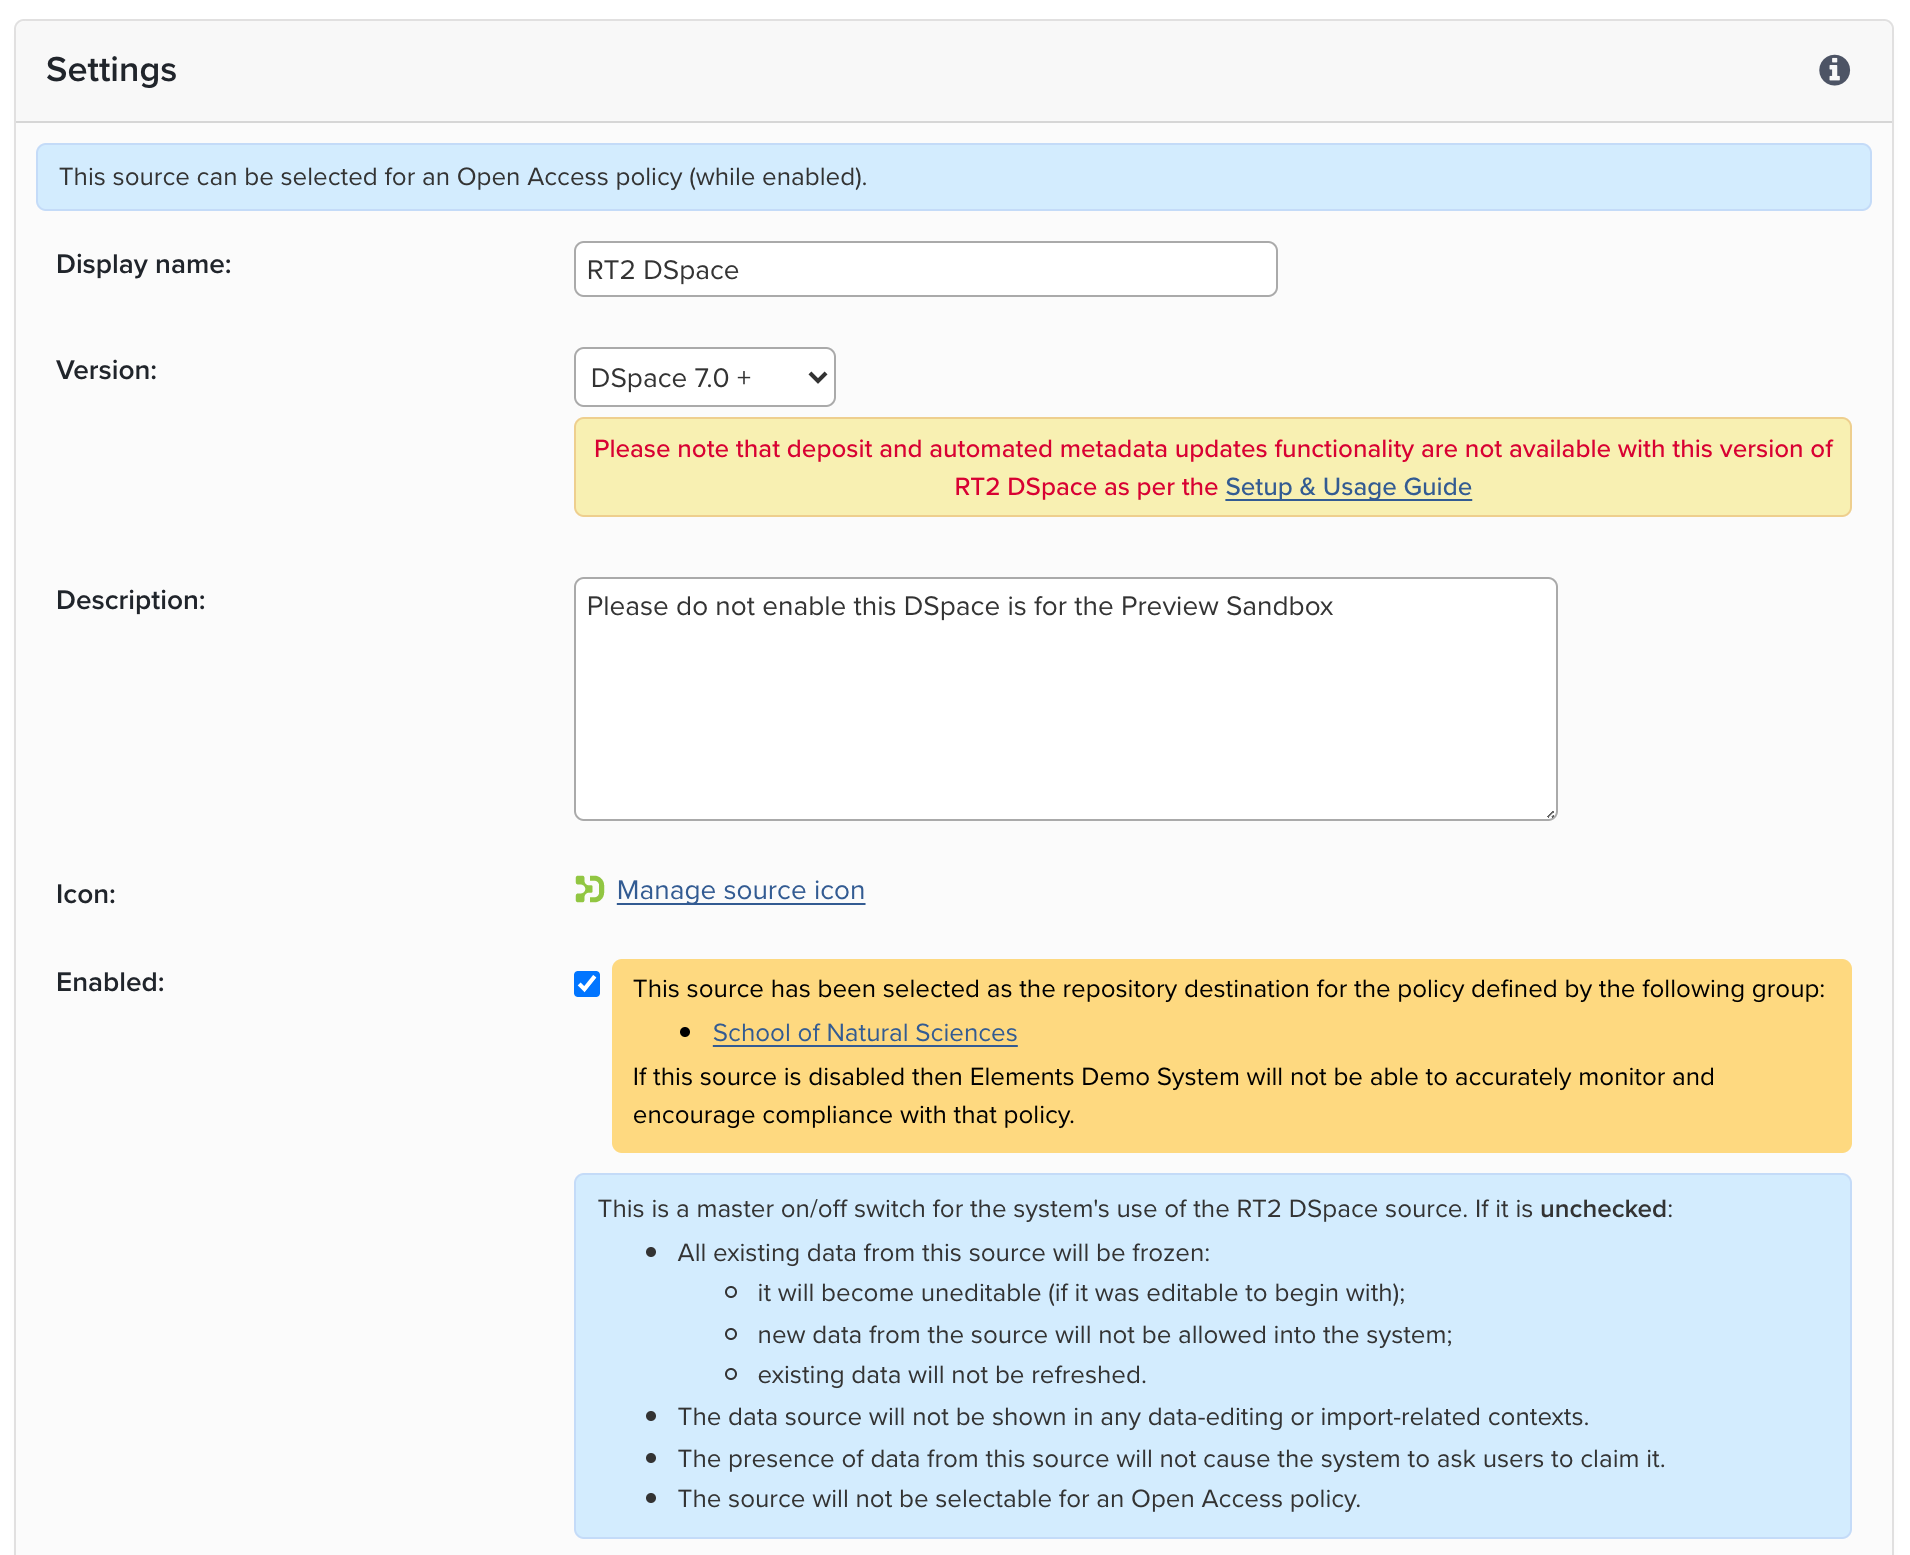
Display name: The display name that Elements should use for your DSpace repository. This display name will replace the word "DSpace" in all references to the repository in the user interface.
Version: Select the option that correctly reflects the version number of your DSpace repository.
Description: (optional) A brief description of your repository. This should be targeted at end users, to help them understand what the data source is. Detailed deposit guidance can be configured elsewhere.
Icon: (optional) You may upload a custom icon to replace the default DSpace icon.
Enabled: Checking this box enables the connection between Elements and your DSpace repository. When enabled for the first time, Elements will immediately start a full harvest of all public items (or of selected collections; see below).
Setup & usage guide: You should confirm that you have read the Setup and Usage Guide for DSpace. This contains important information about the setup of your connection between Elements and DSpace. The data source cannot be enabled until someone has accepted this setting.
Step 2: Configure connection settings
These settings define the main connection mechanism between Elements and your DSpace system.
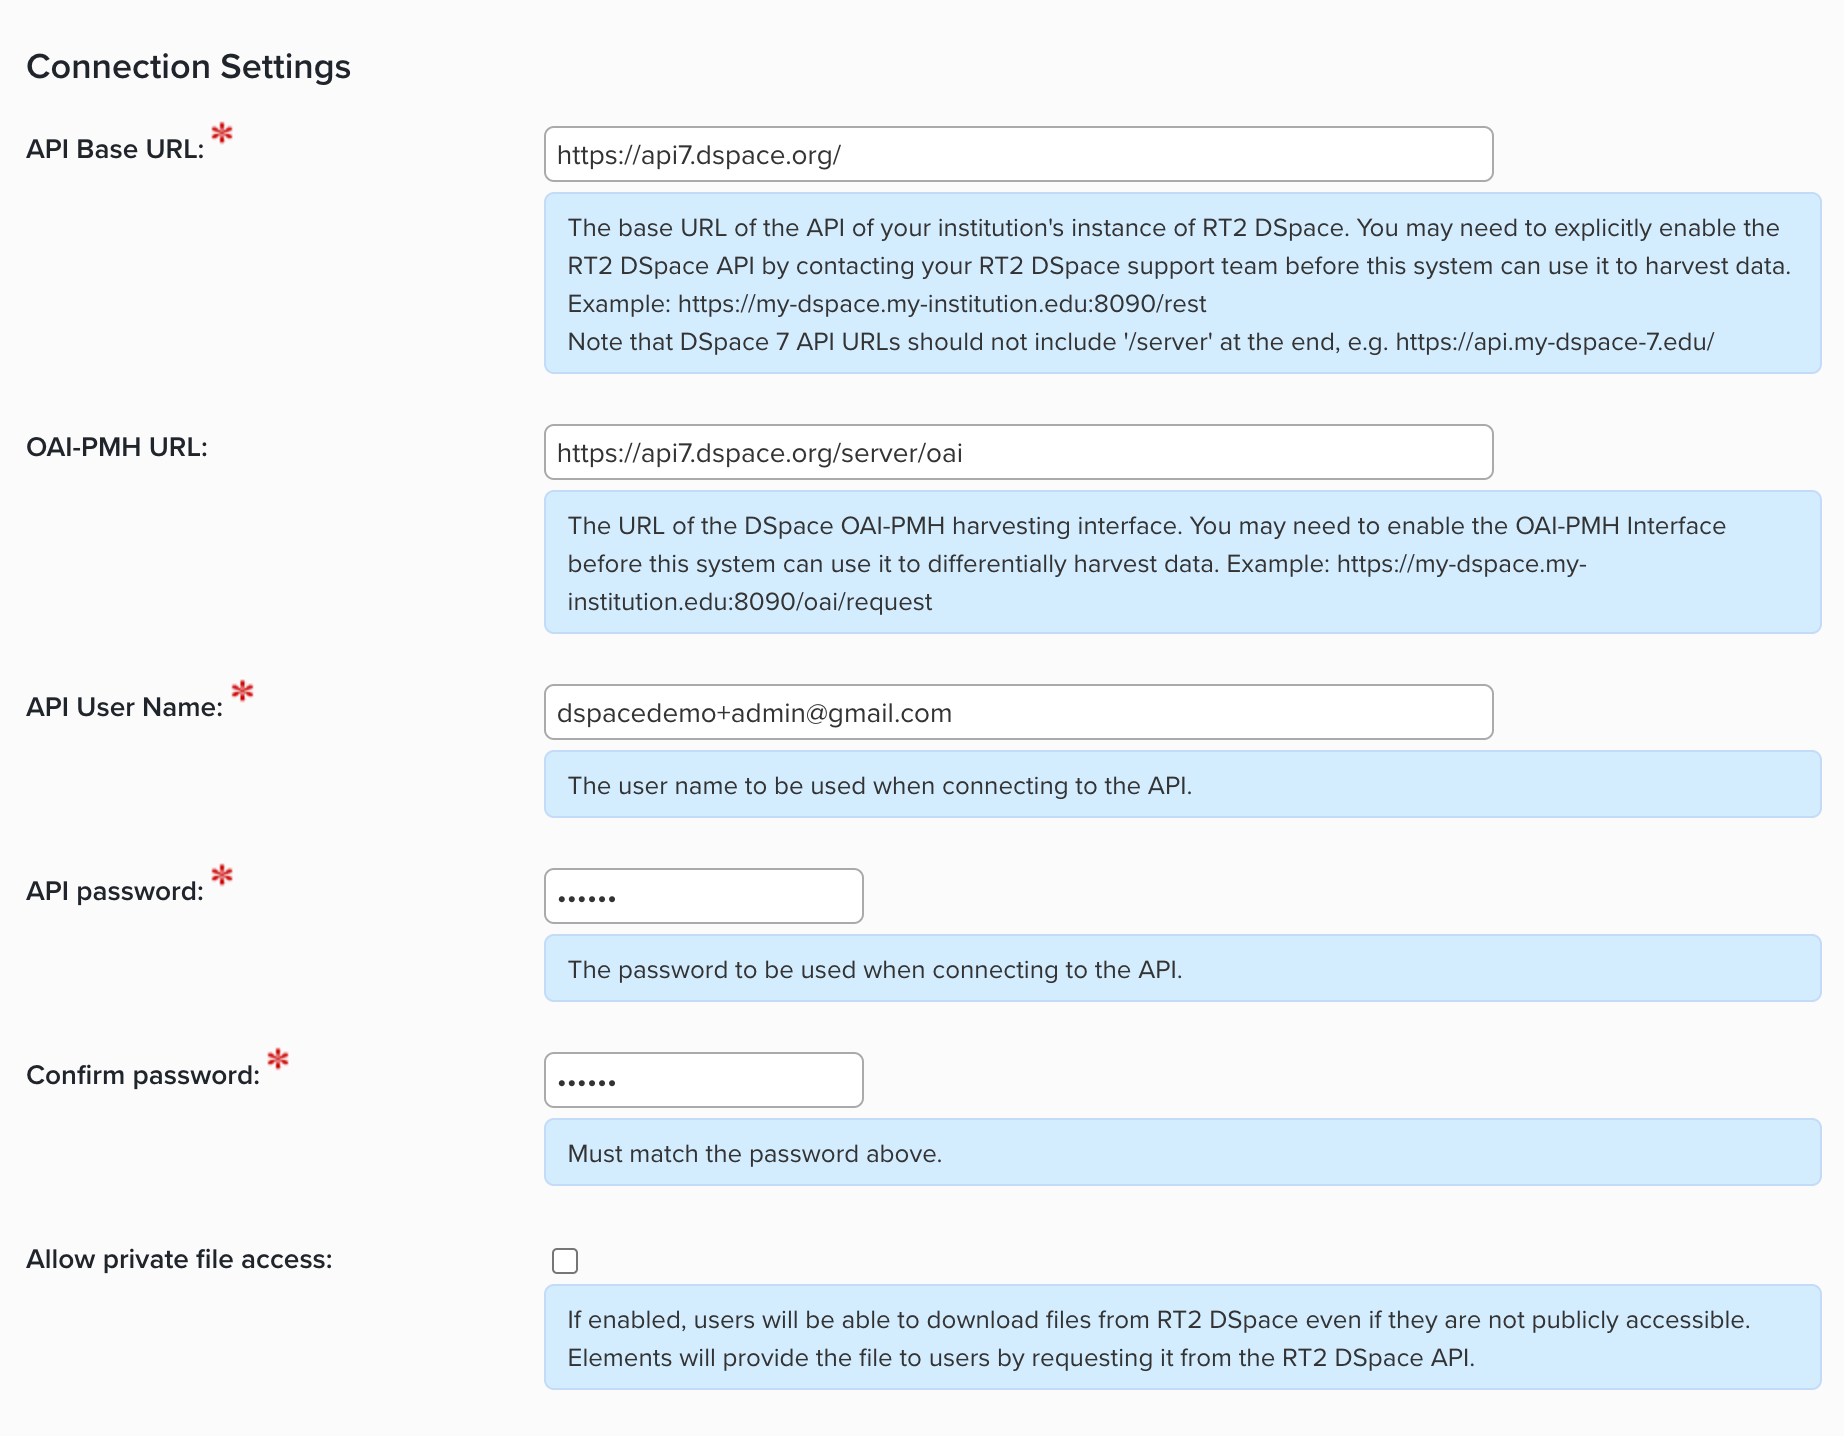
API Base URL: Your API Base URL can be determined by contacting your DSpace service team and asking for the base URL of the DSpace REST API. You may need to contact your DSpace service team to enable the REST API interface associated with your instance of DSpace, and to obtain suitable credentials allowing Elements to be configured to use it.
Note: If you use DSpace 7, this base API url should not include /server at the end of the URL. It should just be the domain and no subdirectories.
OAI-PMH URL: The base URL of the DSpace OAI-PMH endpoint, which is used during differential harvest.
API User Name: The name of the DSpace user to use when harvesting and depositing data.
For a two-way integration (i.e. harvest and deposit), this DSpace user should have admin permissions. This is required to ensure that Elements can read and write all the necessary data for the RT2 connection to function.
For a harvest-only integration, read-only access is sufficient, although at an elevated level. Elements should have permission to read private, as well as public, items. This ensures that Elements can infer the correct repository status for items that are deleted, withdrawn or taken back into the review process.
API Password, Confirm Password: The password for the API user specified above.
Allow private file access: By default, Elements will not provide download links to private files (e.g. files under embargo) and DSpace would not allow access even if it did. Checking this box allows users who have edit rights on a publication to bypass DSpace's file security and download the repository item's private files via Elements. This setting is provided as a convenient way for users to view and manage their own deposited files, and for reviewers and assessors to easily access deposited files as needed to perform their roles. You must notuse it to provide unauthorised or illegal access to private files. The links to download private files will only be shown to (a) users with approved links to the publication and (b) users with one of the following roles:
Research Information Verifier
Research Information Administrator
System Administrator
Symplectic Configuration Support
Step 3. Configure harvest settings
These settings control how items are harvested from your DSpace instance.
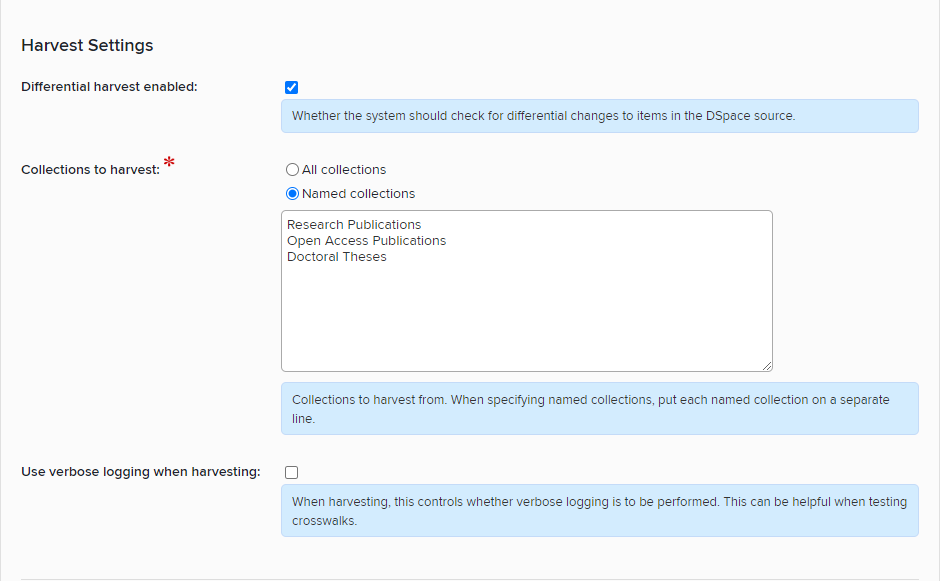
Differential harvest enabled: Check this if you want to use the DSpace differential harvest. This is an hourly check for changes to live items in your DSpace system and ensures that these changes are reflected in Elements on a timely basis. N.B. Because differential harvest relies on the DSpace OAI-PMH endpoint, it can only every be as up-to-date as the DSpace OAI index. OAI indexing does not happen automatically within DSpace, it must be scheduled. We recommend scheduling an OAI reindex at least once every 24 hours, to ensure timely harvesting and accurate results in the OA Monitor.
Collections to harvest: Select whether to harvest from all collections or only from named collections. If harvesting from named collections enter the names of the collections to harvest from. Be sure to:
Put each collection name on a new line
Copy the collection name exactly (including capitalisation)
Trim off any leading and trailing spaces added while copy/pasting
Use verbose logging when harvesting: Whether Elements should save a copy of data that is harvested before and after the crosswalk mapping has been performed. This can generate a large number files on the Elements application server, so should generally be used only when testing the harvest crosswalk on a small test collection.
Step 4. Configure User Group Settings
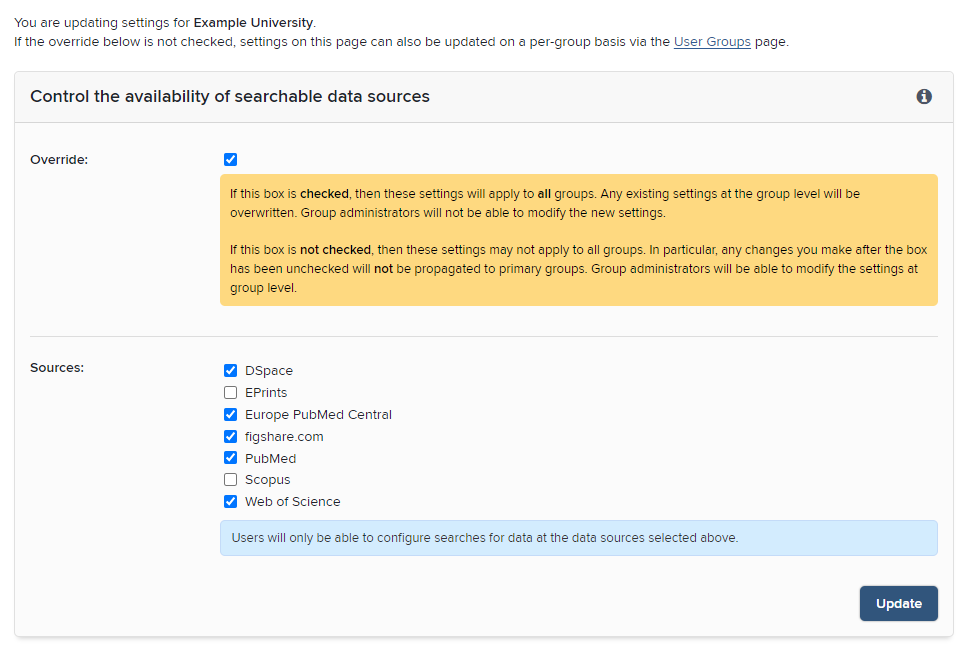
Once Elements has harvested the records from DSpace, the offline search functionality within Elements will match those records to users. To do so, the data sources and user search settings need to be configured to enable DSpace search which will assign DSpace items to the appropriate authors in Elements.
Review the Data Sources for users of Elements, by navigating to System Admin > Data Sources > Data Source Availability, to make sure that your users have access to search against DSpace data. You may alternatively wish to review access on a per-group basis as indicated in the help text.
Users are now allowed access to search DSpace data but search has not yet been configured. Next you need to bulk update your users' search settings to enable that DSpace search on their behalf. To do this, go to System Admin > Data Sources > Manage Bulk Searches. Select the DSpace RT2 data source and the users or groups of users for whom you wish to enable DSpace data searches. Choose to "Enable search for the selected users" and click update.
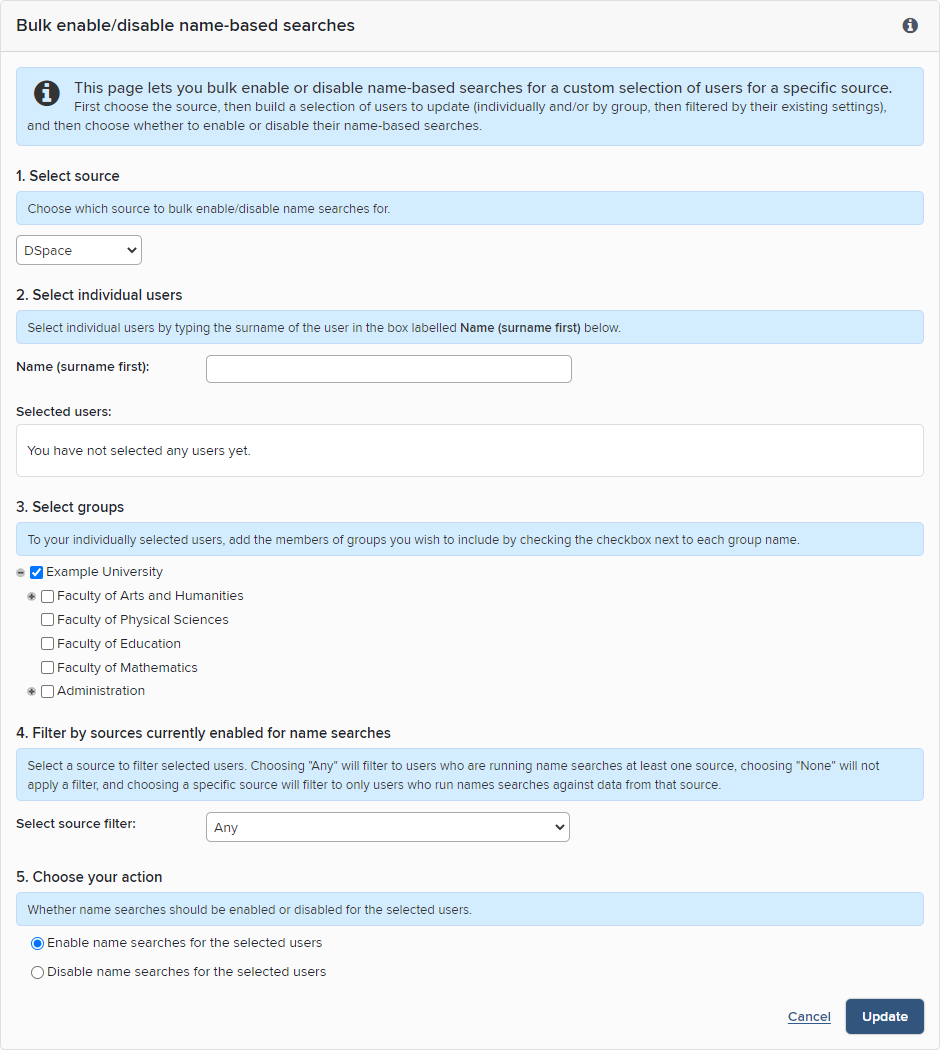
Review the search settings of at least one relevant user, to confirm that their search settings now indicate that DSpace data should be searched for the user:
Please note that currently, unlike for other data sources, only system administrators are able to alter the state of the checkbox shown above
Step 5: Configure deposit settings
N.B. Deposit to DSpace 7 is not available in Elements not Elements 6.8. If integrating with DSpace 7, upgrade to Elements 6.9 or above to use deposit functionality.
Important! Before you enable Deposit for the first time, ensure that a full harvest is complete. This will ensure that users cannot deposit duplicates of publications that are already in the repository.
On the DSpace RT2 data source management page, you can monitor the current activity of the DSpace synchroniser by expanding the Activity Log. You can also download recent logs from below the main panel.
These settings control how items are deposited from Elements to your DSpace instance. Deposit requires you to have licenced the Repository Tools module, which you can confirm via System Admin > Setup > Licence.
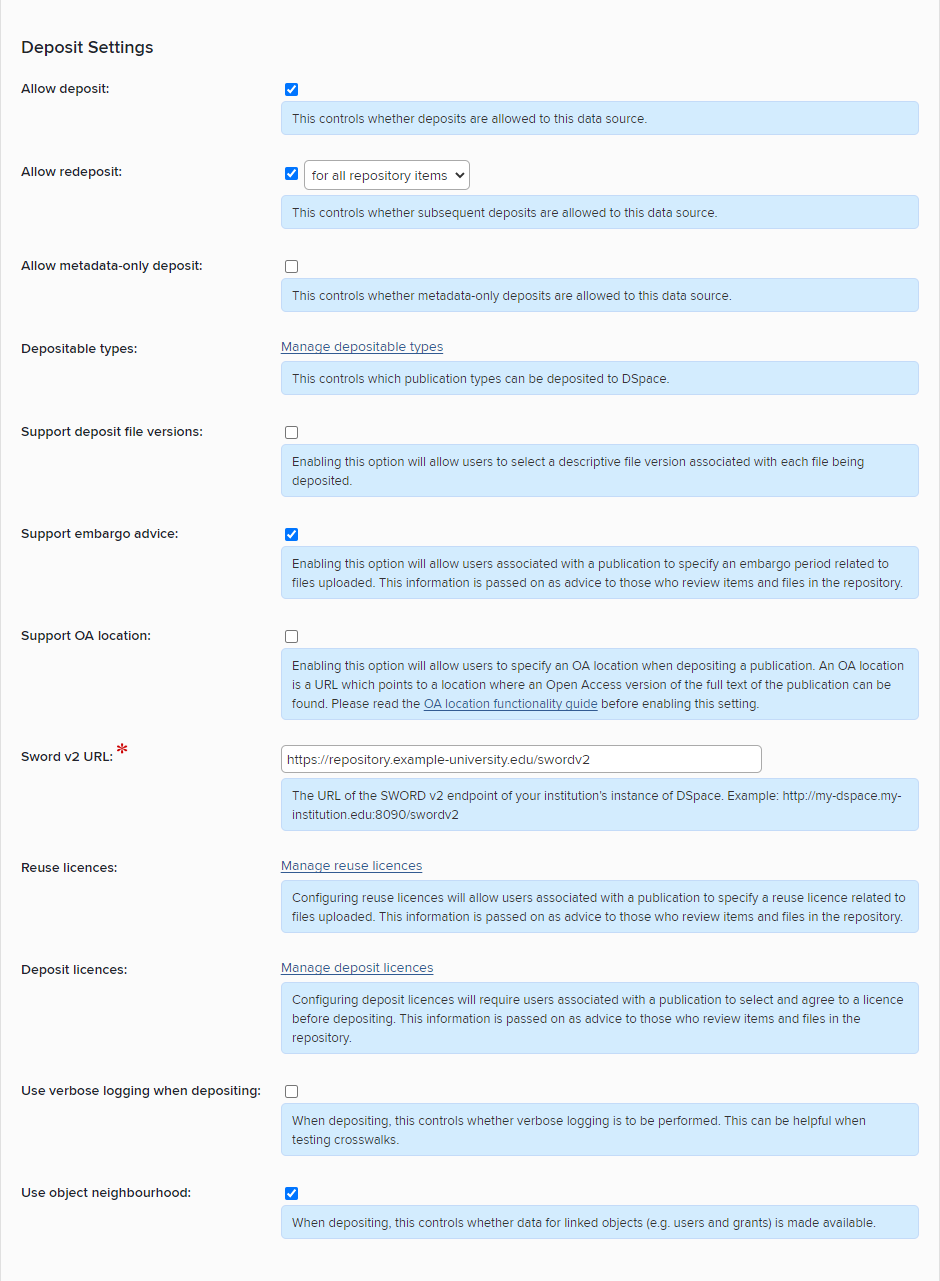
Allow deposit: Select whether to enable deposit to your DSpace system.
Allow redeposit: If checked, users will have the option to add additional files to a repository item after the initial deposit is completed. Via the dropdown, you can choose whether redeposit is allowed:
for all repository items: users will be allowed to add additional files even if the item is already in the repository's live archive.
for non-public items: users will not be allowed to add additional files to items in the repository's live archive. Redeposit to all other items is allowed.
When redeposit is allowed for an item, the 'View Deposit' button will take users to the 'Redeposit' page where additional files can be uploaded and added to the repository item.
Allow metadata-only deposit: Enable this if you wish to allow users to deposit without a file.
Depositable types: Allows you to to configure which publication types are permitted to be deposited to your repository. Users will only see deposit buttons for items permitted to be deposited.
Support deposit file versions: Whether depositors should be allowed to specify which version of a manuscript they are depositing (i.e. "Published version", "Accepted version", etc.)
Support embargo advice: This allows institution to choose to allow users to suggest an embargo period when making a deposit. The embargo period ID and name should be crosswalked to the repository to be reviewed and enacted by administrators.
Support OA Location: Allow users to deposit with a link to a location where an OA version can be found. This can be as well as or in place of a file.
Supplementary Sword v2 URL: The URL of the DSpace Sword v2 endpoint.
Note: This is needed for deposit functionality for DSpace 5.x & 6.x. If you use DSpace 7.x, this endpoint is not necessary.
Reuse licences: Allows you to select which reuse licences a user can select when depositing a publication. If one or more boxes on the Manage Reuse Licences page are checked, the reuse licence functionality will appear on the deposit page. The reuse license ID and/or name and/or URI should be crosswalked to the repository to be reviewed and enacted by administrators.
Deposit licences: This allows institutions to require users to agree to a deposit licence when depositing a publication. Institutions are asked to define a unique ID for the licence, a name of the licence and to upload the licence file. Once enabled, the license will appear on the deposit page. The license ID and name should be crosswalked to the repository to record which license was agreed to at the point of deposit.
Use verbose logging when depositing: Whether Elements should save a copy of data that is deposited before and after the crosswalk mapping has been performed. This can be helpful when testing crosswalks but should generally be switched off in the production system.
Use object neighbourhood: This allows institutions to choose to crosswalk metadata about linked users, grants, or other publications that related to the publication being deposited.
Grant Repository Tools module access
You will also need to ensure that users are given access to the repository tools module in order for them to see the deposit button. To do this, go to System Admin > Group Management > Module Access, check the Repository Tools box and select the users or groups of users you wish to grant access to.
N.B. in older versions of Elements, the Module Access page is in the menu under User Management, not Group Management.
Step 6: Settings for Automated Metadata Updates
N.B. Automated metadata updates to DSpace 7 are not available in Elements not Elements 6.8. If integrating with DSpace 7, upgrade to Elements 6.9 or above to use the automated metadata updates functionality.
"Automated metadata updates" is a feature by which Elements can update repository items with the latest Elements metadata.
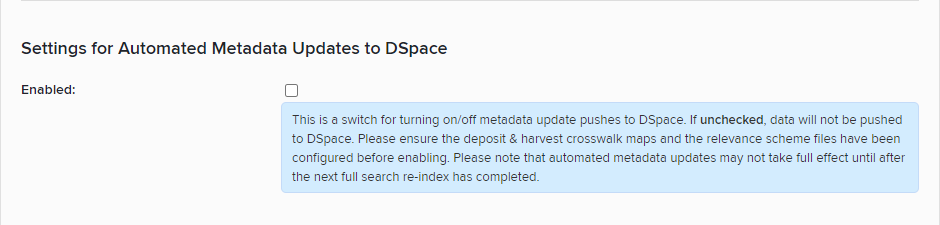
Enabled: controls whether or not the system will assess changes in Elements metadata for push to the repository.
Important! Automated metadata updates require detailed configuration via the relevance scheme and field authority list(s) before use. If you have not configured these, keep automated metadata updates disabled.
For details about this configuration, see:
Further reading
For help with updating and testing DSpace crosswalks - see Repository Tools 2: Updating and Testing Crosswalks.