
Initial Configuration of Elements
This article is for an institution that has recently installed Elements. It has been written to guide the system administrator tasked with taking a 'plain' system and making it ready for Roll-out to a large group of users.
Introduction
The steps in this guide should be worked through in order. They will take you from a new system to one that is completely tailored to the individual needs of your institution.
Step 4: Setting up Primary Groups and other user groups
Step 5: Assign User Group roles
Step 6: Allow module access and assign module roles
Step 8: Testing the Elements Synchroniser
Step 9: Send and check test emails
Being able to perform the initial configuration of Elements assumes the following:
You have access to a working instance of Elements.
You have login details for a system administrator user.
You have been granted a trial licence and are able to navigate the web application.
A method or tool has been developed to import user information from your institution’s HR feed.
You have carefully read and understood the information contained in HR Data Import and Elements User Groups.
If you are uncertain about any of the above, please let your Symplectic Implementation Manager know.
Step 1: Initial Configuration
1.1 Licence
To enable all the functionality of Elements that you have purchased, you will first need to apply your licence. Go to System Admin > Setup > Licence and follow the instructions at Manage your Symplectic Elements licence.
1.2 Global Settings
Various global system settings now need to be made. Go to System Admin > System Settings > Global Settings (in 5.x: System Admin > Setup > Global Settings) and follow the instructions at Manage Global Settings.
1.3 Authenticating Authorities
Now set up the authority or authorities that will authorise users to access Elements. Go to System Admin > Setup > Authenticating Authorities and follow the instructions at Manage Authentication of Users.
1.4 Email Configuration
Elements interacts with your institution’s email system in order to send reminder emails and other alerts. Go to System Admin > Notifications & Actions > Email Configuration (in 5.x: System Admin > Setup > Email Configuration) and set up Elements access your institution’s SMTP server.
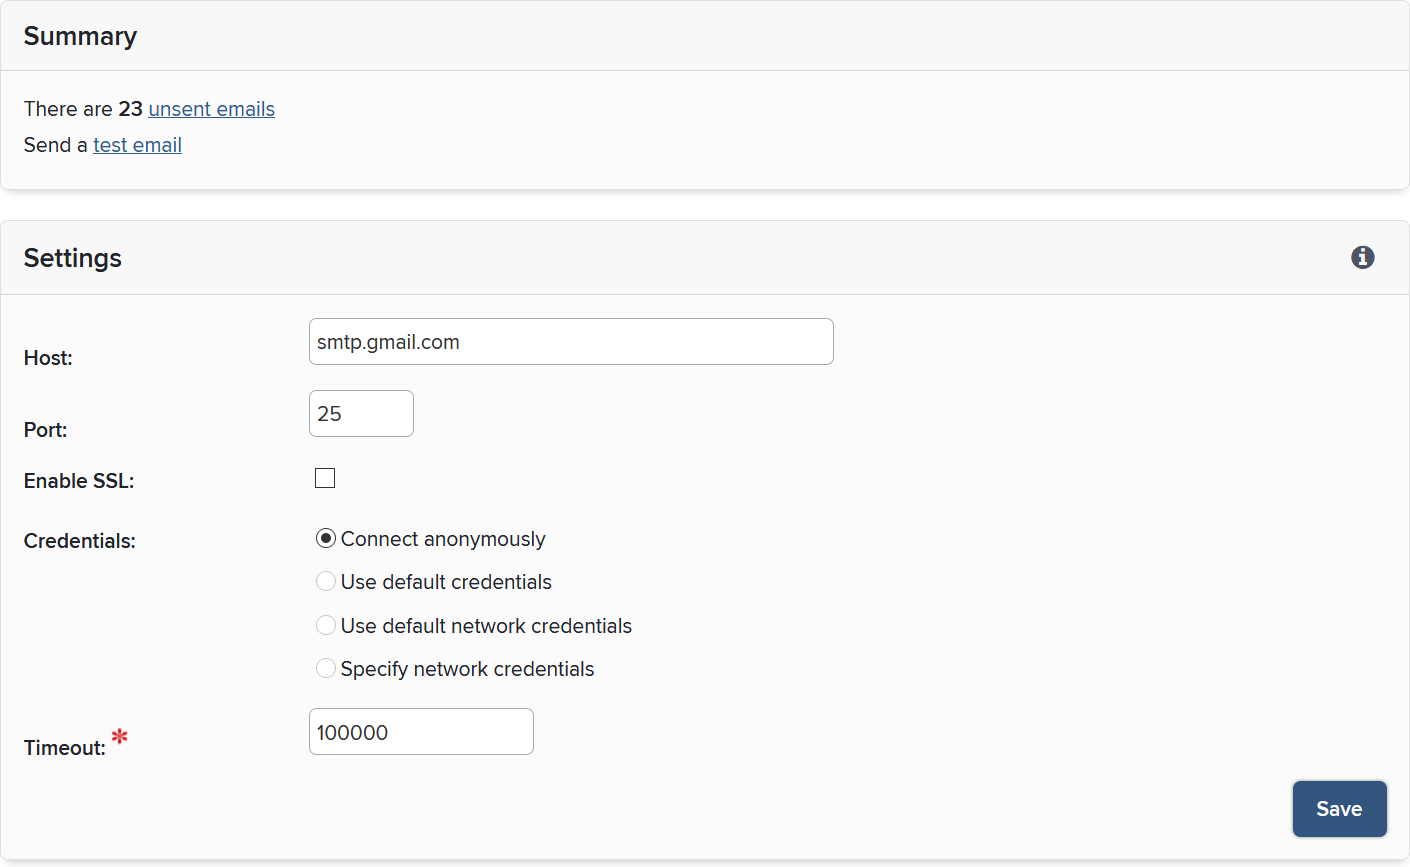
You will need to provide the hostname or IP address of your institution’s SMTP server, along with other connection details (e.g. port, authentication credentials). This section should be completed either by an administrator of your internal email system or with information provided by them.
Once completed, please use System Admin > Notifications & Actions > Send a Test Email (in 5.x: System Admin > Setup > Email Configuration > Send test email) to ensure your email settings have been correctly configured.
Tip: Depending on your SMTP server’s configuration, you may need to ensure that a valid 'from address' in your domain is used in the test email.
Step 2: Importing your Users
In this section we will discuss how to configure Elements to:
enable user data to be supplied to the system.
process the user feed so that users populate the Elements system.
Either your institution or Symplectic should have developed a tool to feed Elements with users from your HR system. If you are confident that an importer tool has already been connected, executed and a user feed from the import table into Elements has been processed, you can skip this step and proceed to step 3.
2.1 Configuring API endpoints
Whatever method has been developed to feed users into Elements will almost certainly have made use of the Elements API, the interface by which Elements interacts with other external systems.
In order to ensure that the tool or 'importer' can successfully communicate with the API, the relevant endpoints must be correctly configured and enabled. To do this go to System Admin > Setup > API Endpoints (in 5.x: System Admin > Manage API > API Endpoints).
By default, only secure endpoints are enabled at the point of installation. These provide the most flexible and secure way to access the API. However, different endpoints can be configured if desired.
Tip: You may need to configure the Elements server’s operating system to grant permissions for the URLs of any enabled endpoints (and if the chosen endpoint is secure, bind a valid SSL certificate). A full description is provided in API Administrator Guide.
2.2 Registering external IP addresses/ranges & user accounts
Once a suitable endpoint has been chosen and enabled, you will need to specify which external systems are permitted to access the Elements API.
Normally, the 'importer' will exist on the same server as the Elements web application. In this case, you will not need to open access as Elements defaults to allow the local host machine to use the API.
However, if the HR importer is run from a separate machine you will need to register that machine’s IP address. To do this go to System Admin > Setup > API Configuration (in 5.x: System Admin > Manage API > API Configuration) and enter the relevant information.
Additionally, if you have chosen to run the importer against a secure Elements API endpoint, you will need to create an Elements API account for the HR importer. You can do this at System Admin > Setup > API Accounts (in 5.x: System Admin > Manage API > API Accounts).
2.3 Starting the API
Once you are satisfied with the configuration of your system’s API access details, activate the API. To do this, go to System Admin > Operations > Scheduled Jobs. In the 'Background services' box, select the 'API' service to go to the API page. Check the ‘Active’ box and hit ‘Save’. You will return to the Scheduled Jobs page, where you can start the API immediately by clicking its ‘Run’ button.
Tip: In the API page, you can set 'Frequency of restart attempts'. Even though the API background service is running constantly, we recommend setting this to 'Recurs every 1 hours'. This will ensure that the API is restarted automatically should it be forced to shut down for any reason (e.g. a server reboot).
2.4 Importing users into Elements
Importing users into Elements is a two-step process:
Load the HR Feed via the Elements API into an intermediate user import table.
Process the user import table to update Elements with the new user data.
2.4.1 Load the HR Feed
Configure your importer with the appropriate API access details, that is the API endpoint and, for secure endpoints, the API account credentials you configured in step 2.2. If you are using the Standard HR Importer, or other importer developed by Symplectic, you can do this in the ‘.config’ file accompanying the executable.
Now run the importer, which will populate the Elements user import table.
2.4.2 Process the HR Feed
The set of users in the import table now need to be processed by Elements. First, Elements will filter the import table, removing any user entries with invalid data. For example, a user missing an email address will not be imported. The remaining users will then be imported into the system.
There are two settings associated with this process, which you can set in the 'User feed' section of the System Admin > User Management > Manage Users and Feeds (in 5.x: System Admin > Users > Users > Manage users and user feed) page:
Global user feed cutoff: the maximum number of users that can be added or removed from the Elements user list during any single user feed process. This cutoff is imposed to ensure that large-scale changes, usually due to incorrect source data, do not negatively impact the running of Elements. If this is your first import, it is likely that the user feed will exceed the default Global user feed cutoff value of 200, which will cause the import to fail. To avoid this, increase the cutoff value before the process import job is run. We strongly recommend that after the first import has completed you set this value to a lower number that reflects your expected number of changes per HR Feed.
When not specified in the HR feed, mark user profiles as public: (Elements version 5.10.1 and above) The default value for 'is-public', should the HR Feed not provide one. 'is-public' indicates whether the user's profile is permitted to be shown in public contexts. See Introduction to Data Privacy and Personal Data in Elements (v5.12 onward) for more information on this topic.
To run the process, go to System Admin > Operations > Scheduled Jobs and run 'Database: Process HR feed'. Further information on how to review the user feed processing import logs is provided in the next step.
2.5 Configuring the import process to run on a regular basis
Once you are satisfied that the import process has been correctly setup, you will normally wish to configure it to run on a regular basis (e.g. overnight) to ensure that Elements is populated with the most recent up-to-date HR data.
If developed by Symplectic, the external importer will normally be configured within Windows to run as a Scheduled Task.
To schedule the 'Database: Process HR feed' task, go to System Admin > Operations > Scheduled Jobs and configure the job appropriately. Please note that you will wish this job to run shortly after the external importer has executed (~30 minutes to an hour after).
Step 3: Inspecting your Users
Your Elements instance should now be populated with users from an import feed. To ensure that the user feed has imported correctly go to System Admin > User Management > Manage Users and Feeds (in 5.x: System Admin > Users > Users > Manage users and user feed).
If you require further information on specific HR data requirements for Elements, please refer to HR Data Import for full details.
3.1 User feed
In the 'User feed' section of this page, a table summarises the results of the last 10 times the user feed was processed. It shows the number of rows that have been processed and filtered by the user feed, any errors that might have occurred and the number of active users present in the system after filtering against what was present previously.
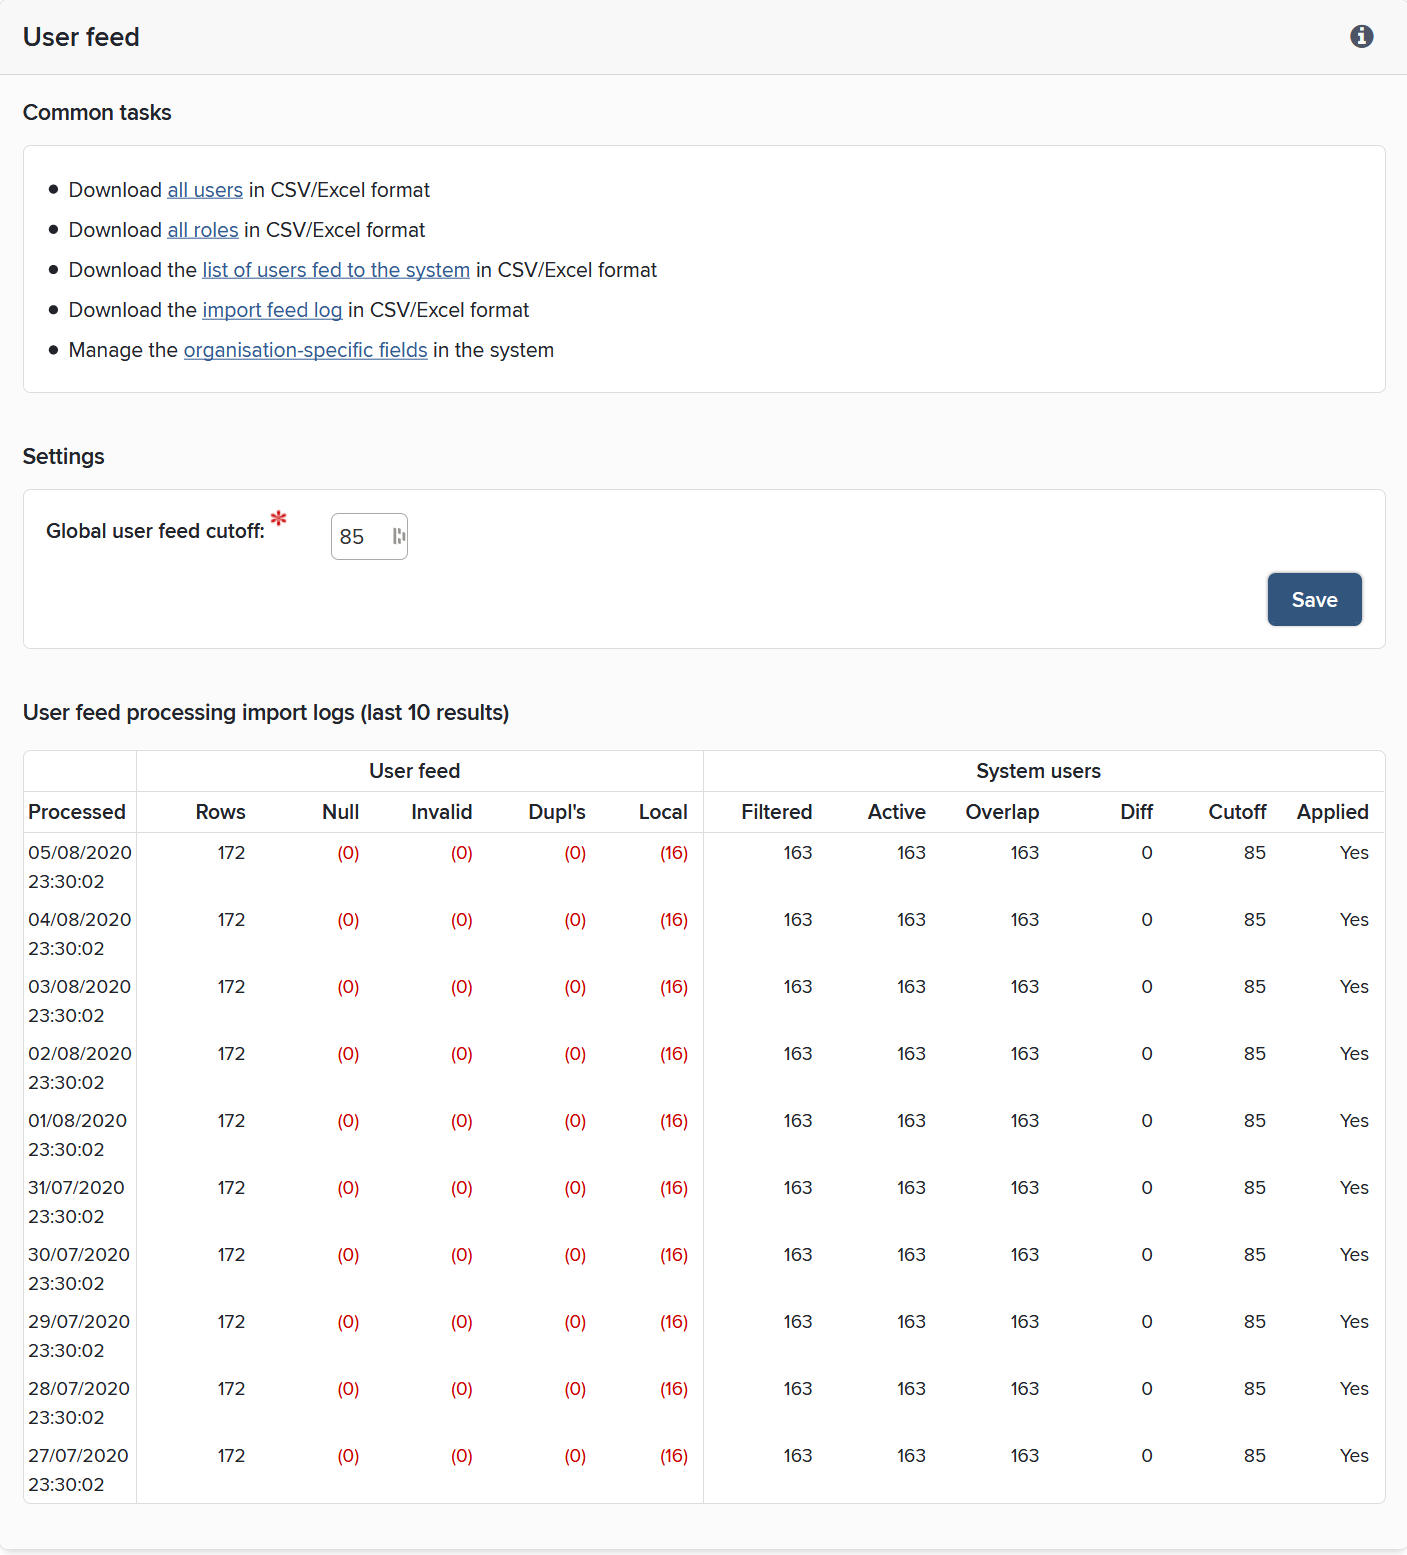
Any rows that have been filtered out by the feed processing can be inspected by downloading the list of users fed to the system. The final column of this .csv file identifies the import issue attributed to that particular row which prevented it from being processed (e.g. missing propriety ID or locally covered authentication credentials).
3.2 Manage organisation-specific fields
Your organisation can supply up to 50 pieces of information about users in a set of generic, organisation-specific fields. You can set up more user-friendly names for these fields via the organisation-specific fields link.
Simply enter the names you wish to use for each generic field, and the system will automatically use these wherever the generic fields are displayed, including in the downloaded reports.
Important! The organisation-specific fields numbered 11 and above are treated as sensitive HR data fields. Data placed in these fields is subject to tighter security both in Elements and when accessed through a secure API endpoint.
3.3 Managing Users
Most user processes, such as the creation of new users and the deactivation of users who leave your institution, will be carried out automatically using the data in the user feed supplied by your institution’s HR system. However, a small number of users may not appear in the user feed and will need to have their details managed manually by System Administrators. Please see Managing Users for full details.
Tip: When a user is set to be managed by the automated feed, that user’s information will be superseded by what is present in the feed. For example, a user that is created locally in Elements and is then switched to be managed by the Automated feed will either: (a) have all its fields updated if a matching unique user identifier can be found in the incoming feed, or (b) set to inactive if it cannot.
3.4 Assign system administrator rights
Once you are satisfied with your Elements users, you may wish to assign system administrator privileges to other individuals in your institution. This can be done in System Admin > User Management > Manage System Roles (in 5.x: System Admin > Users > Manage System Roles).
Ensure that these rights are distributed sparingly as system administrators have complete control over the entire system and can access all information.
Step 4: Setting up Primary Groups and other user groups
Having imported your users, you can begin to construct your Elements group structure by creating Primary Groups and other user groups. At this point, it is strongly recommended that you have carefully read the User groups: role and importance section in the page Elements User Groups.
4.1 Consider your Elements group structure
Elements offers great flexibility in setting up groups and sub-groups of users. These can be used for many purposes, such as reporting, grouping users for linking to other systems, or listing on websites via the API and many more.
Before creating groups, you may wish to spend some time considering the shape your group structure might take, and how to make use of the various user groups and their respective properties to not only reflect your institution's actual organisational structure but further, address some of your institution's requirements for Elements.
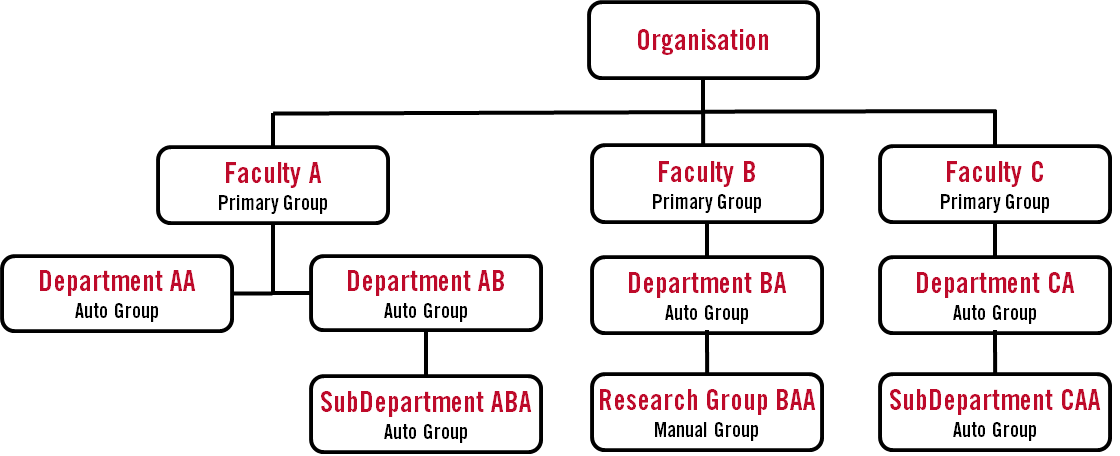
In preparing your HR feed, you will have had to make decisions concerning primary groups. In most cases, they will correspond to the main faculties or departments within your institution.
Further, you may have also considered what Auto Groups and Manual Groups you might wish to create, perhaps to represent any lower level tiers of your institution’s structure not captured by the Primary Groups. In such a scenario, a group structure of the following type may be considered:
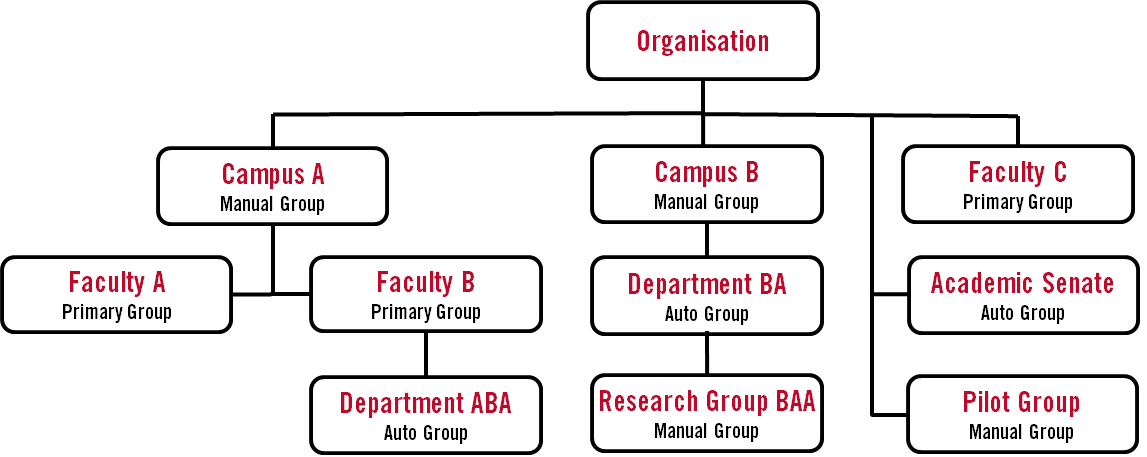
However, it is important to note that more complicated structures are possible and should be considered dependent on your needs. One possible example is given below:
4.1 Creating groups
The only group that is included in a new installation of Elements is the top-level group that can be seen by navigating to System Admin > User Management > User Groups (in 5.x: System Admin > Users > User Groups).
New groups must be created below the top-level group as sub-groups or siblings of sub-groups. As such, to create a new group you have to select either 'parent' group or another 'sibling' group first, and then select the appropriate link at the top of that group's page.
The first choice to make when you create a new group is what membership model the group you want to create should have. There are three group membership models:
Primary Group: automatically populated from HR data; customisable for unique user experience; each user belongs to only one Primary Group [this is not technically correct - users can be manually added to a second PG for reporting purposes, though their settings will still be taken from the PG allocated to them in the HR feed. BH].
Auto Group: automatically populated by an expression querying the HR data.
Manual Group: manually populated by System Administrators.
For full detail on how to create and manage user groups see Managing User Groups.
4.2 Check group membership
After the creation of a group, the system will take you to a summary screen where further edits are possible. Next to the heading 'Group Members', this screen shows how many members belong to the group. You can click on this number to see a full listing of the members. Inspect this listing to check that the appropriate people are being assigned to the group.
Alternatively, at the top of the screen you can download a list of all users the group in .csv format.
4.3 Create further groups
When setting up a series of new groups that will sit at the same level within the organisation 'tree', you can make use of the option to 'Create a sibling of this group'. Clicking on this link on the summary page of your first group will create a new group alongside it under the top-level group. This function saves having to click back to the top-level or parent groups repeatedly when setting up a set of groups.
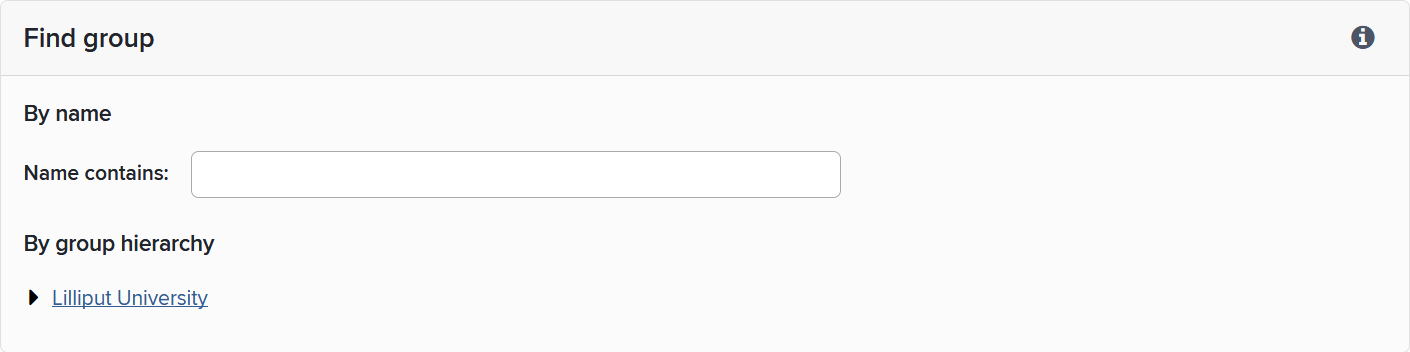
4.4 Search groups
When your Elements system has been set up with a user group structure, the ability to search groups is useful.
To search for an existing group, go to System Admin > User Management > User Groups (in 5.x: System Admin > Users > User Groups). Type your search query into the name field and groups from anywhere in the Organisation’s structure that match the terms will appear in a list. You can click on the name of the group you are interested in to inspect it and make any necessary changes to the settings and membership details.
Step 5: Assign User Group roles
To assign roles for your user groups go to System Admin > User Management > User Groups (in 5.x: System Admin > Users > User Groups), click on a specific group in the hierarchy and select 'Manage the roles associated with this group' in the Tasks section.
There are four different roles that can be assigned to staff at a group level. These can be assigned to users (individually or by group) who require these roles:
Administrator [Group]
Research Manager
Statistician
Group Impact Officer
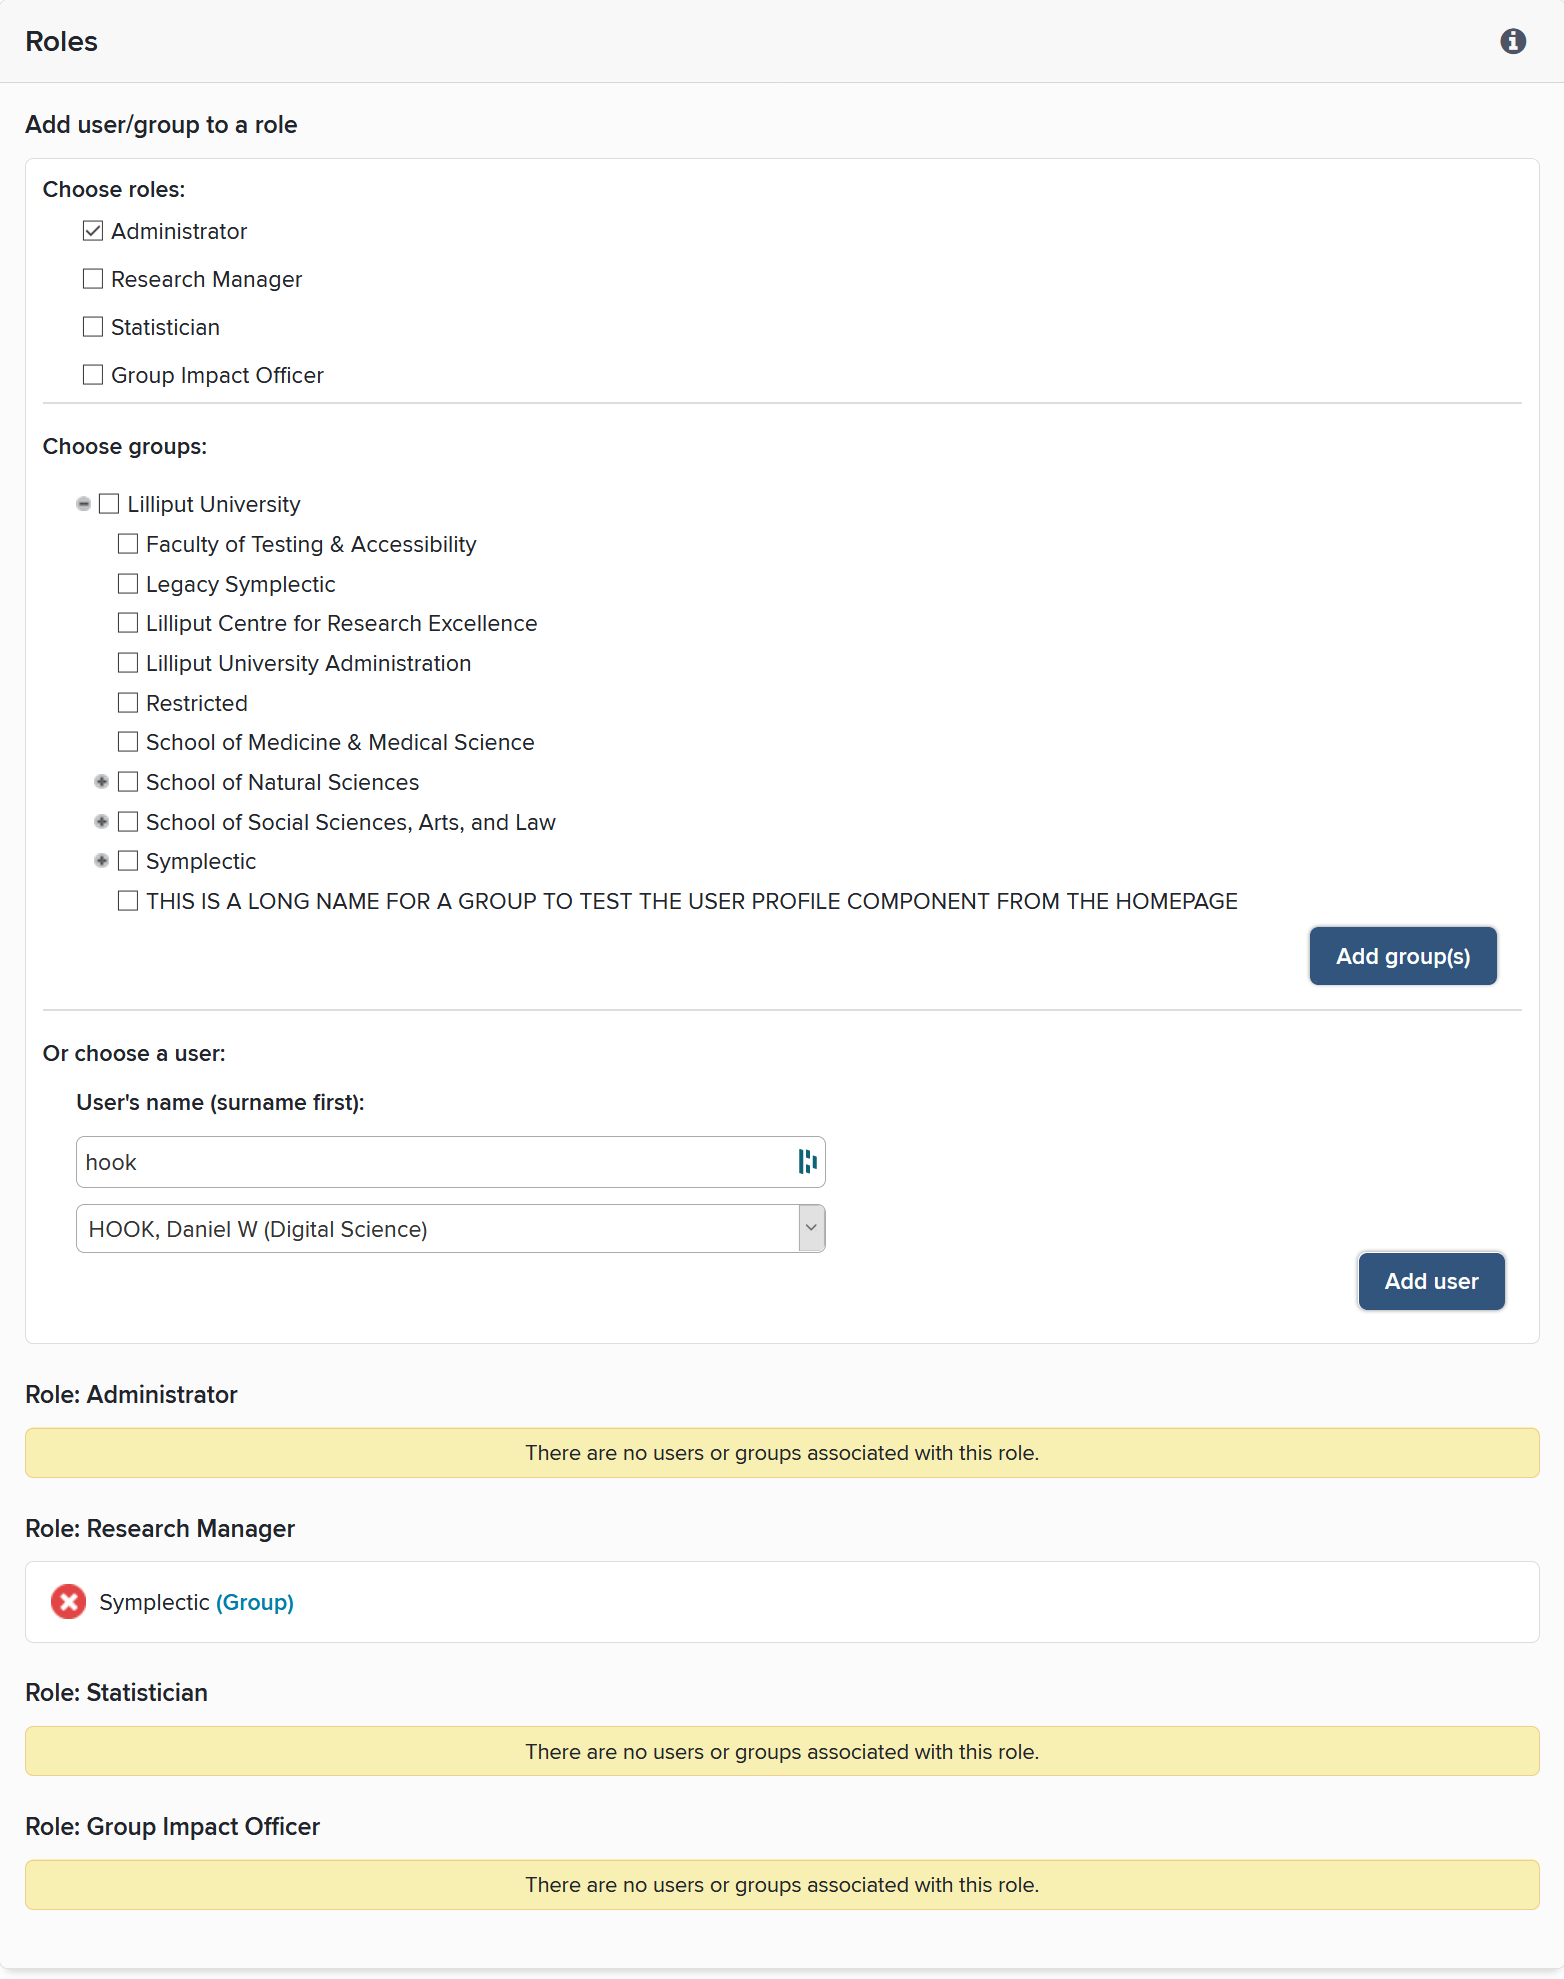
Before proceeding, it is essential that you have understood what function each of these roles play in the operation of Elements. For a description of the roles and the rights that come with them please see the Group Roles section in Roles in Elements.
It is likely that some people will take on several or all of the roles above for their group (e.g. Faculty).
Users need not be members of the group to which they are being assigned rights to.
Note: Rights cascade through the group hierarchy. For example, Administrators for the group will automatically gain rights to edit all the sub-groups. Further, System Administrators automatically become Group Administrators, Research Managers and Statistician for the whole organisation.
Step 6: Allow module access
Now you have configured your user groups, you can set up your licensed modules for specific user groups. Each module deals with a specific category of objects within Elements (e.g. Publications, Grants, Professional Activities, etc.) or a particular aspect of Elements' functionality (e.g. access to the Repository Tools module allows users to deposit publications to a connected repository).
6.1 Allow access to modules
To activate a module for a specific group or user go to System Admin > User Management > Module Access (in 5.x: System Admin > Users > Module Access).
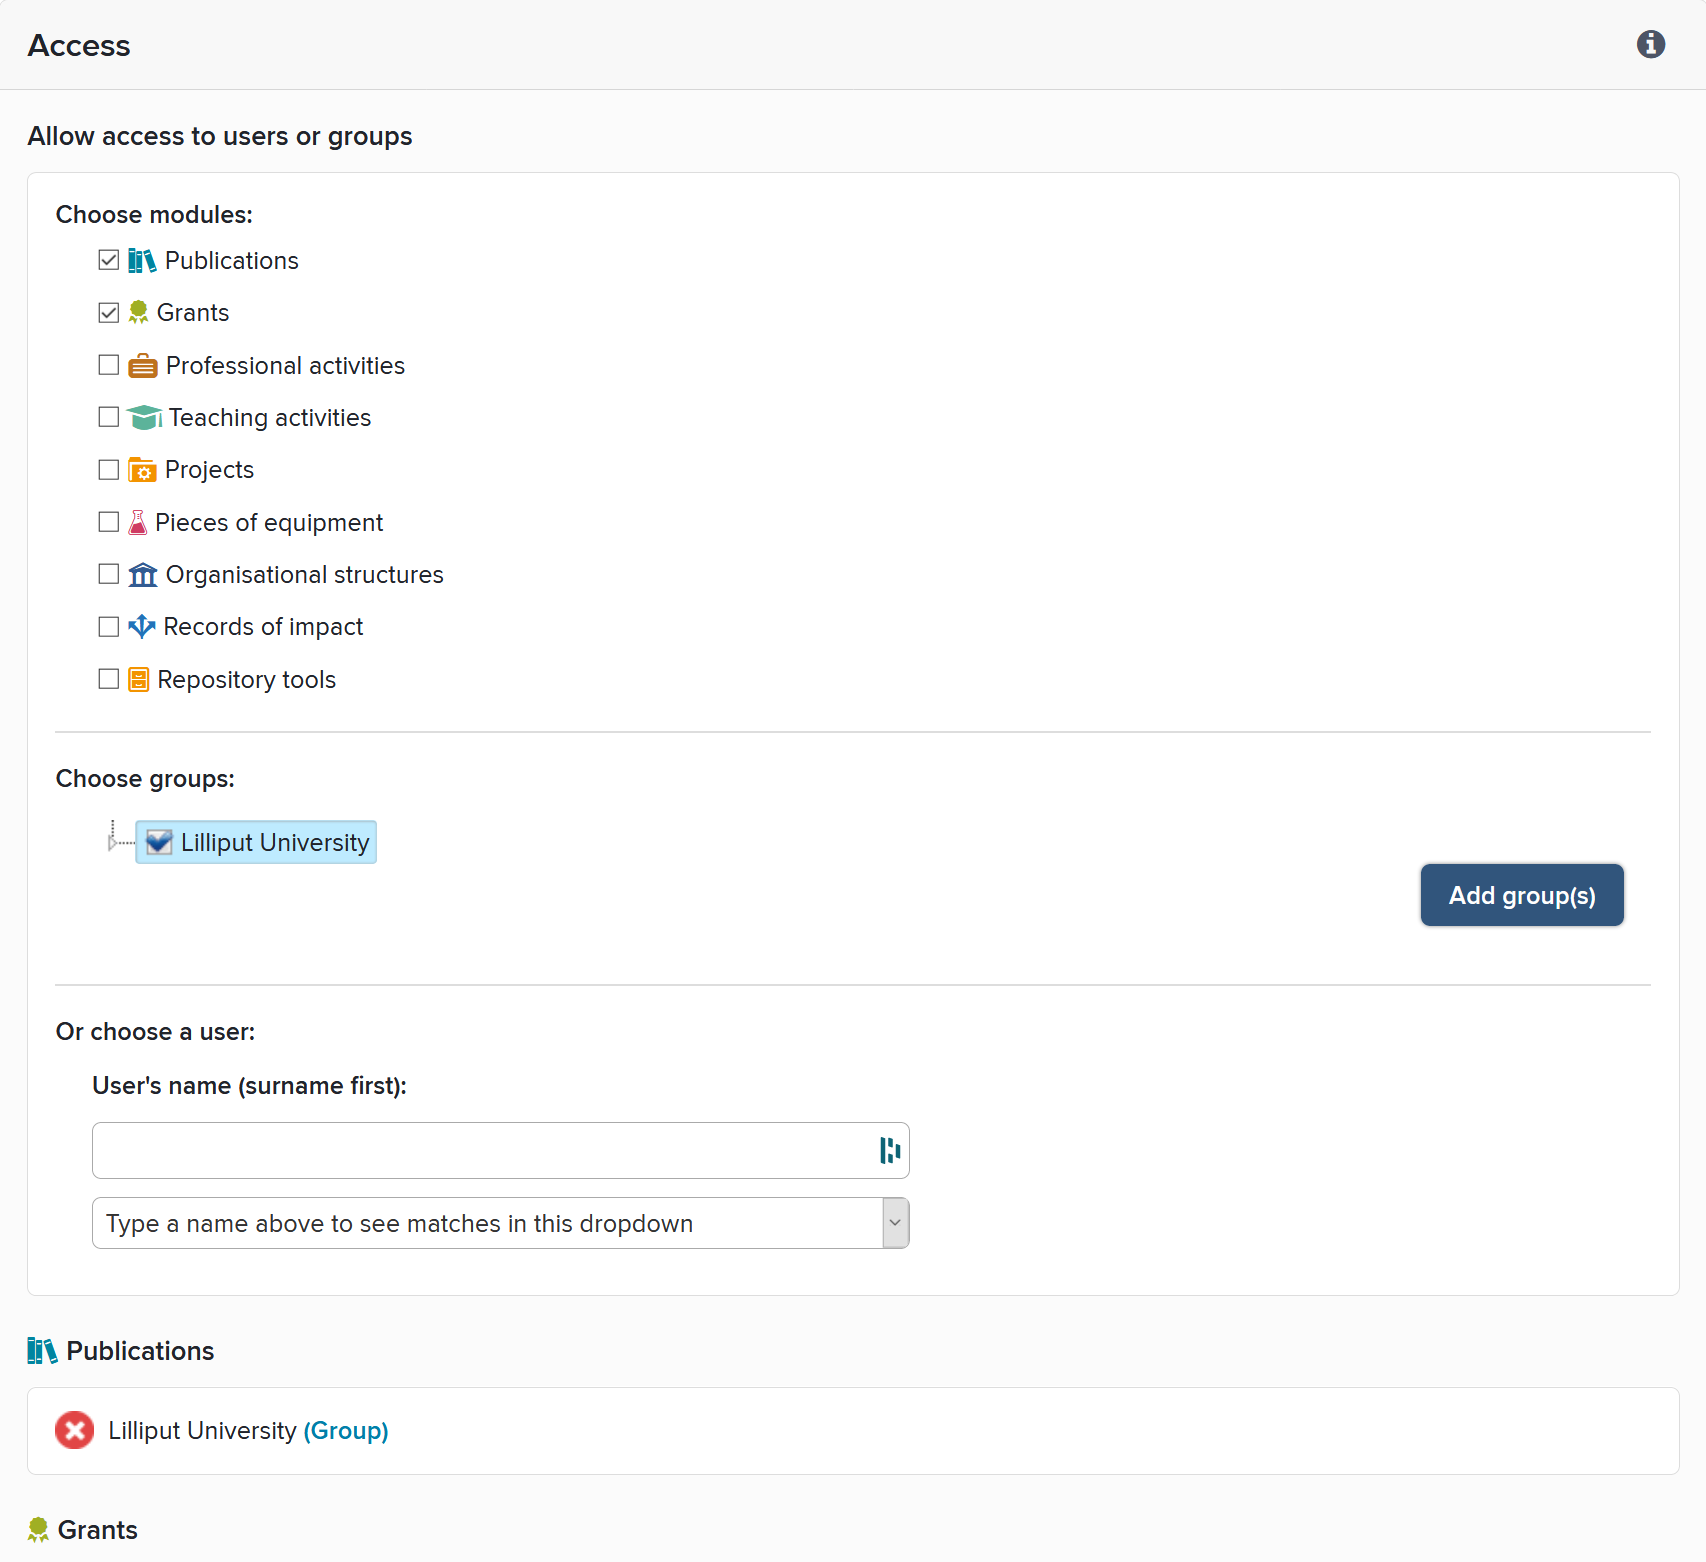
Under 'Choose module', select all the modules to which you wish to apply changes.
In the 'Group' box that opens, expand the organisational structure and select the user groups which will be given access to the selected modules. Click 'Add group(s)' to apply the changes.
Note: the ability to activate certain modules for particular user groups or individuals is particularly useful if you wish to phase the release of your Elements system. For example, if the decision is that only the Faculty of Social Sciences should have their publications searched for the present time, this can be done by allowing access to the Publications module for only the 'Faculty of Social Sciences' user group.
You can also allow module access to an individual user:
Type the user's surname in the box below 'User's name (surname first)'. The drop down list below will populate with matching users.
If you need to further refine the matches, add a first name and initial preceded by a comma (e.g. "Smith, John A").
Select the correct user from the drop down list.
Click 'Add user' to apply the changes.
6.2 Assign module roles
The only module role available is 'Category Admin' (for a module that deals with a certain category of objects). Some Administrators will need to be able to access certain modules and make system-wide changes to them. The table below summarises the rights available in each module for ordinary users and Category Admins.
Category | Can create relationships to objects | Can create objects | Can edit data structure | Can assign Category Admin role to another user |
|---|---|---|---|---|
Publications | All users | All users | Category Admins | Category Admins |
Grants | All users | All users | Category Admins | Category Admins |
Professional Activities | All users | All users | Category Admins | Category Admins |
Teaching Activities | All users | All users | Category Admins | Category Admins |
Records of Impact | All users | All users | N/A | Category Admins |
Equipment | All users | Category Admins | Category Admins | Category Admins |
Projects | All users | Category Admins | Category Admins | Category Admins |
Organisational Structures | All users | Category Admins | N/A | Category Admins |
Journals | N/A | Category Admins | N/A | Category Admins |
Deposit Advice | N/A | Category Admins | N/A | Category Admins |
For example, only an Equipment Category Admin has the right to add a new piece of Equipment to Elements. Once it is added, however, all users can create relationships with it. This contrasts with the Publications Category, where all users have the right to create a new publication.
To assign Category Admin rights, navigate to Category Admin > Category > Manage Roles (in 5.x: Module Admin > Module > Roles), where Category (in 5.x: Module) is the relevant module (e.g. Publications, Grants, Professional Activities).
Tip: System Administrators automatically become a Module Administrator for all modules.
6.3 Download a report showing users with roles
Once roles have been set up for your users with special rights, you can download a report showing all users with roles (including group administrator roles), along with the groups and modules for which they hold these privileges. A link to download 'all users with roles' can be found under System Admin > User Management > Manage Users and Feeds (in 5.x: System Admin > Users > Users > Manage users and user feed).
Step 7: Module Configuration
Now that user groups have been configured and appropriate permission roles assigned, you may wish to customise the various settings of the modules you have purchased. In this step, we will discuss how to configure the various features of Elements on both a system wide and Primary Group level.
In the following, only settings that are most relevant to the initial configuration of Elements will be covered in any great detail. More extensive information is available in the Elements Module Administration section.
7.1 System Wide vs. Primary Group Level Changes
Settings for the various modules can be configured under the Category Admin (in 5.x: Module Admin) menu.
Some settings can also be configured for each Primary Group individually. This is to allow for Elements to be configured differently for different types of users. For these settings, an 'Override' option is provided.
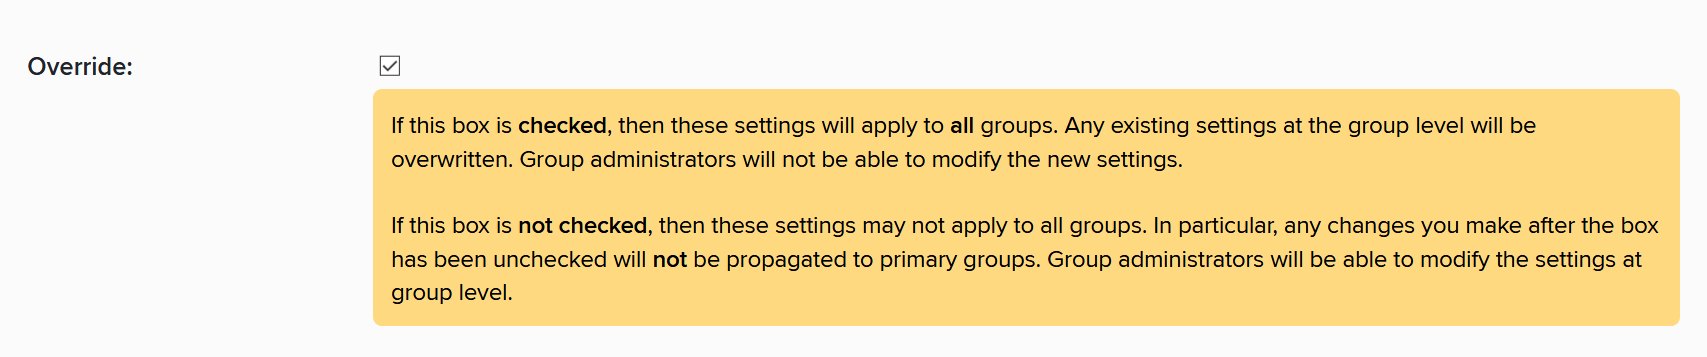
Check the 'Override' box if you wish to enforce a single setting across the whole system, overwriting any settings made at the Primary Group level. Checking this box will apply the module setting on a system wide level, enforcing them to all Primary Groups and disabling editing of the module setting at a Primary Group level.
Important! If the 'Override' box is unchecked, module setting changes will only be applied to users that have a Primary Group descriptor that is either empty or not yet configured. If you wish to apply these settings on a system wide level, the 'Override' box must be ticked
In order to make modifications for a given Primary Group, navigate to System Admin > User Management > User Groups (in 5.x: System Admin > Users > User Groups) and select the Primary Group in question. In the group’s edit page, there will be a section entitled 'Module Settings' where you will able to expand and edit the various module settings that can be customised.

It is strongly recommended that you begin your Elements module configuration by considering and making modifications to your system wide settings, before delving into the specific configuration of those same settings on a Primary Group level.
Important! In order to enable customisation on a Primary Group level, you must ensure that (a) the Primary Group has access to the module and (b) the 'Override' box for the setting in question is unchecked.
7.2 Standard package modules
7.2.1 Publications module
The 'Publications' module is undoubtedly the most important module of Elements as it governs how the system searches, stores and presents publications metadata. For this reason, it is most likely that of all the modules in Elements, you will wish to spend the most time reviewing and modifying its settings at both an organisational and Primary Group level. This module can be configured by going to Category Admin > Publications (in 5.x: Module Admin > Publications) and using Publications Module - Roles, Home Page, Citations, Journal Statistics as reference.
Roles
This is described above in section '6.2 Assign Module Roles'.
Underlying Fields
As their name suggests, 'underlying fields' for publication types define the various data fields that might compose a publication type, e.g. publication title, publication date. A large number of underlying fields come pre-defined along with the default publication types.
On this page, a grid can be downloaded which displays all underlying fields, their respective data formats and display names against the publication types of the system. Review the default set, and determine if they meet your institution’s requirements. If you wish to create new underlying fields please refer to Manage Types and Underlying Fields for full details.
Important! If you are planning to import legacy publications data, please ensure that the import is complete before making further modifications in this section.
Publication Types
There are twenty-two default types of publications initially provided in the system:
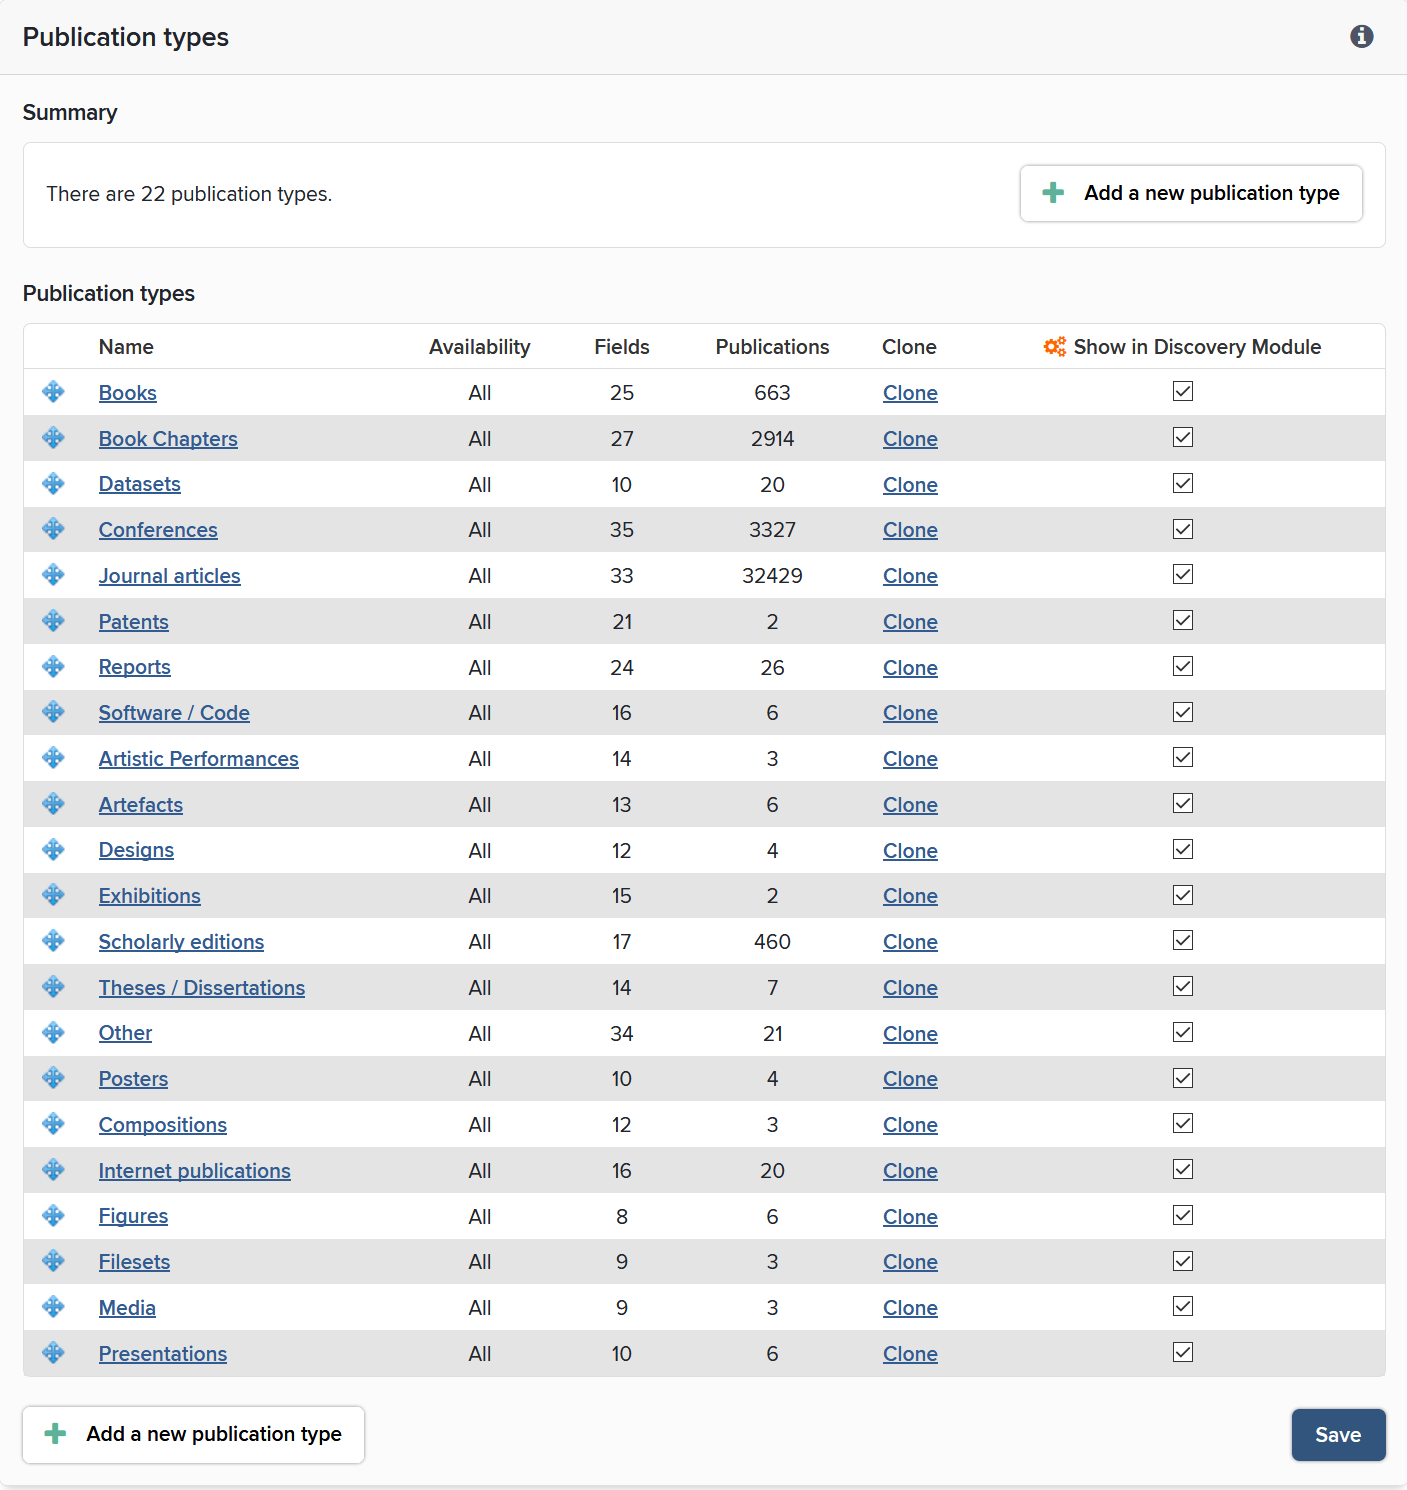
Review the default set, and determine if they meet your institution’s requirements. If you wish to add new or existing fields to these publication types, or add new custom publication types, please refer to Manage Types and Underlying Fields for full details.
Tip: If you are planning to import legacy publications data, please ensure that the import is complete before making further modifications in this section.
Tip: Any new types you create, including cloned types, will not be automatically filled with data from the online sources. The system is only ever able to assign records automatically to types within the default set of publications.
Tip: you are unable to neither delete default publication types nor remove default underlying fields from the default set. You can, however, change their display name and re-order them if required.
Display of Types on the Home Page
There are twenty-two different publication types available by default, and not all of these will be commonly used by your academics. This is where you can to restrict the types of publication shown on the users' summary screen.
Display of Citation Information
Administrators can control whether information on citations appears within publication records when users are browsing the system. Choose whether or not to make this information visible by adjusting this setting.
Display of Journal Statistics
Journal statistics (e.g. SJR rank or Impact Factors, if available) can be set to appear within the details of each publication. Choose whether or not to make this information visible by adjusting this setting.
Emails
The 'notification' email is sent to users by the system when the automated search finds new publications they need to check and approve, and also when a co-author associates them with a publication they have not yet seen and approved.
A reminder email can be sent by a Group Administrator or a Research Manager to remind a user to check their publications.
7.2.2 Annual Collection module
The Annual Collection module is used by Australian institutions. To setup the module use the Annual Collection Administrator Guide as reference.
7.3 Modules
Your licence will allow you access to the following modules:
Grants
Professional Activities
Teaching Activities
Records of Impact
Projects
Equipment
Organisational Structure
Depending on your subscription you may also have access to the following modules
Assessment
OA Monitor
Repository Tools
Analytics
The modules in Elements provide the ability to either create, define and link a variety of data object types to each other, or reuse data in other modules. For example, in the 'Grants' module, a grant type, as well as the underlying fields that define it, can be built and configured, enabling your institution to store a variety of grants data. Publication records can then be linked to a specific grants record with a particular the relationship type e.g. the publication is funded by the grant in question.
Please find articles on the different modules in the Elements Module Administration section.
Tip: As for publications data, Symplectic may be able to provide services to aid you in importing any legacy data you may wish to include in other modules. If you are considering this, please ensure that the import is complete and the associated data structure finalised before making further modifications to the relevant module and object type.
Step 8: Testing the Elements Synchroniser
Now that the system has been set up with the correct user group structure, relevant permission roles assigned and subscribed modules configured, we are ready to test the online search functionality.
In Testing the Elements Synchroniser, we propose a possible workflow to test your instance of Elements' synchroniser and preparing it for use in a live environment. In particular, this involves:
Testing you are returning expected results from the data sources you have access to; and
Modifying search settings to ensure you are receiving an acceptable amount of publications for your academics
Step 9: Send and check test emails
Before launch, it is also a good idea to send and check a final test copy of each of the emails the system is programmed to send automatically to users. It is important to note that the synchroniser does not email the users - this is done via a separate process ('Emailer: Notification' on the System Admin > Operations > Scheduled Jobs page).
When the 'synchroniser' and 'emailer' are both activated, one of the first things the system will do is send a notification email to all users with pending publications, so double-checking this email is particularly important.
The contents of these emails may be set globally from within the module settings of the 'Publications' module, or tailored for each Primary Group. To adjust and test tailored emails for a group, access the module settings from within System Admin > User Management > User Groups (in 5.x: System Admin > Users > User Groups).
To send a test email to the email address attached to your login, simply click on the link at the bottom of the settings screen for each email.
The Emailer process will not send notification emails to users if they fulfil either of the following conditions:
They have already been notified of all their pending publications by before.
They are currently in the Synchroniser queue